

OrcaSlicer is a free, open-source slicer that doesn’t belong to any manufacturer. It isn’t published by a printer brand to sell its own machines: it’s developed by an open team with contributions from hundreds of users, and it ships with ready-made profiles for printers from more than 60 manufacturers, from Bambu Lab, Prusa or Creality to Voron, Elegoo, Anycubic or QIDI. If your machine isn’t listed, you can set it up manually, just like in any other slicer.
Got questions about OrcaSlicer or Bambu Studio? Join our community: Instagram, YouTube, TikTok. And on Telegram: the general group 3Dwork, and the dedicated group Bambu Studio and OrcaSlicer, all of them in Spanish.
That independence is what has made it the most versatile slicer, with the biggest community behind it. At 3Dwork we’ve been using it since its earliest versions, and this guide covers what you need to know to get the most out of it. The first part is for beginners: what a slicer is, how to install OrcaSlicer and how to go from an STL to a file ready to print. The second part is for users with some mileage: calibrations, everyday features and advanced tools. We use the English menu and button names as they appear in the interface and, where relevant, mention how the Spanish translation renders them.
What a slicer is and what it’s for
A 3D printer doesn’t understand 3D models. What it runs is a list of very simple commands: move to this point, at this speed, extruding this much plastic, at this temperature. That list is called G-code (G-code) and it’s generated by a program called a slicer, also known as slicing software, or simply slicer.
The slicer does three things:
- It cuts the model into layers horizontal slices, of whatever thickness you choose (the layer height).
- It calculates the toolpaths for each layer: the outer walls (perimeters), the inner infill, the solid top and bottom layers and, where needed, supports for areas that would otherwise hang in mid-air.
- It translates everything into G-code using the settings for your printer and your filament: temperatures, speeds, fan, retractions.
That’s why the same STL can come out very well or very badly depending on how you slice it. Mastering the slicer is half the result.
Contents
Where OrcaSlicer comes from
Free slicers form a chain of projects that build on one another. Slic3r, by Alessandro Ranellucci and the RepRap community, laid the foundation; PrusaSlicer branched off from Slic3r; Bambu Studio branched off from PrusaSlicer. OrcaSlicer was born from Bambu Studio and PrusaSlicer, borrowed ideas from SuperSlicer and Cura, and has since grown on its own: built-in calibrations, fine control over perimeters and seams, tree supports and hundreds of other features, several of which other slicers have ended up copying.
It’s free software under the AGPLv3 licence, its code is on GitHub and it doesn’t require you to create any account. It’s maintained by a team led by SoftFever with open contributions, and funded through donations and sponsorships: according to its official README, QIDI and BIGTREETECH are among its sponsors. Even so, no manufacturer controls the project. It’s an FDM-only slicer: it doesn’t prepare resin prints.
An open project that manufacturers also take part in
Its AGPLv3 licence allows anyone, manufacturers included, to take OrcaSlicer’s code and adapt it to their machines, with one condition: they must publish the code of their version under the same licence. That openness, together with a very active community, explains a good part of its current weight.
Some manufacturers also collaborate directly on the project. The repository history contains contributions from official accounts or corporate email addresses at Elegoo, Flashforge, Flying Bear, InfiMech, Volumic, Longer, Cubicon, Co Print, Eryone and Peopoly, among others. Most add and maintain the profiles for their printers, but not only that: Elegoo, for example, has contributed the rib-type wall for the prime tower, file upload to its Centauri Carbon 2 and the multi-head configuration for its GIGA.
The community, for its part, doesn’t just develop new features: it also brings the best ideas from other free slicers into OrcaSlicer, and the release notes usually say where each one comes from. Some examples:
- From Bambu Studio, which it was forked from: the STEP file import dialog, mesh boolean operations and mesh subdivision. The option to fill the bed with copies arrived from Bambu Studio and PrusaSlicer at the same time.
- From PrusaSlicer: the embossed text and SVG tool, fuzzy skin painting, extra perimeters on overhangs, the revamped G-code preview and combined brim types “Prusa style”.
- From Cura: the Arachne perimeter generator and lightning infill use code from CuraEngine, the engine behind UltiMaker Cura (Arachne was later updated from PrusaSlicer); beam interlocking for multi-material parts is an adaptation of Cura’s feature, and organic tree supports are based on Thomas Rahm’s work on CuraEngine’s tree supports.
- From SuperSlicer: mouse ears, converting holes to polyholes, filament shrinkage compensation, and the flow and retraction tests, which the wiki acknowledges as inspired by SuperSlicer. The line and tower methods of the pressure advance test, in turn, are inspired by the tools in Marlin and Klipper.
What is unique to OrcaSlicer is how it integrates everything and what it has built on top: the full calibration menu, Expert mode, Z contouring and Orca Cloud are the project’s own developments.
Where to download OrcaSlicer: versions and operating systems
First of all, an important warning: there are websites that pose as the official one to slip in dubious downloads. The project itself warns about this in its repository. The only official sources are the website orcaslicer.com and the releases page of the GitHub repository. If a search engine takes you to another domain with a similar name, don’t download anything from there.
- Windows: .exe installer for x64 and ARM64 processors (pick the one that matches your computer), or a portable .zip version if you’d rather not install anything. It’s also on the Microsoft Store and can be installed with winget. The Windows binaries are digitally signed.
- macOS: a universal .dmg image that works on both Apple Silicon and Intel Macs. You install it by dragging the app to Applications. It can also be installed with Homebrew.
- Linux: the recommended channel is Flathub, either from your distribution’s software centre or from the terminal. There’s also an AppImage for x86_64 and ARM64 (aarch64).
There are two channels. The stable version (currently OrcaSlicer 2.x) is the one you should use for printing. The nightly builds (nightly builds) include the latest additions to the code, but they haven’t been thoroughly tested: they’re for trying out new features and giving feedback, not for everyday use. From time to time, alphas and betas are also released ahead of each stable version.
Getting started with OrcaSlicer
The setup wizard
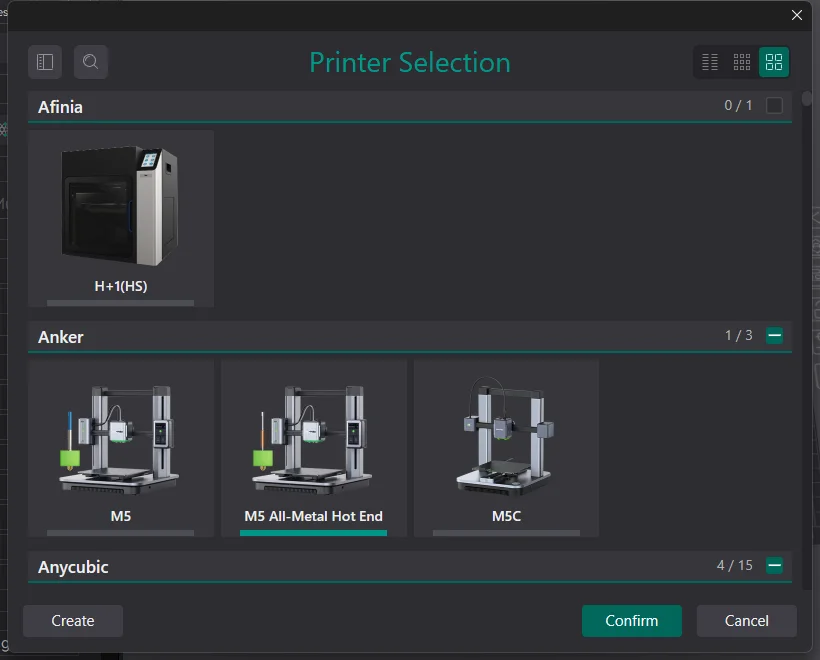
The first time you open OrcaSlicer, the Setup Wizard (Setup Wizard). To come back to it later, for example to add another printer, go to Help > Setup Wizard. The important thing is to choose your printers and filaments properly:
- Printers. They appear grouped by manufacturer, with a sidebar to jump from one brand to another and a search box (just start typing). You can view them as cards with a photo, in compact view or as a list. Each card shows the nozzle in the profile. Tick yours and, if you use several nozzles, each variant.
- If your printer isn’t listed, the Create button lets you define a new printer. The sensible approach is to start from the profile of a similar model and adjust the bed size, the maximum height and the firmware type.
- Filaments. You choose the material profiles you want to have at hand. Besides the generic ones and those from each printer manufacturer, OrcaSlicer includes its own filament library with profiles from several material brands.
Everything you choose here can be changed later, so you don’t need to get it right the first time.
The interface, piece by piece
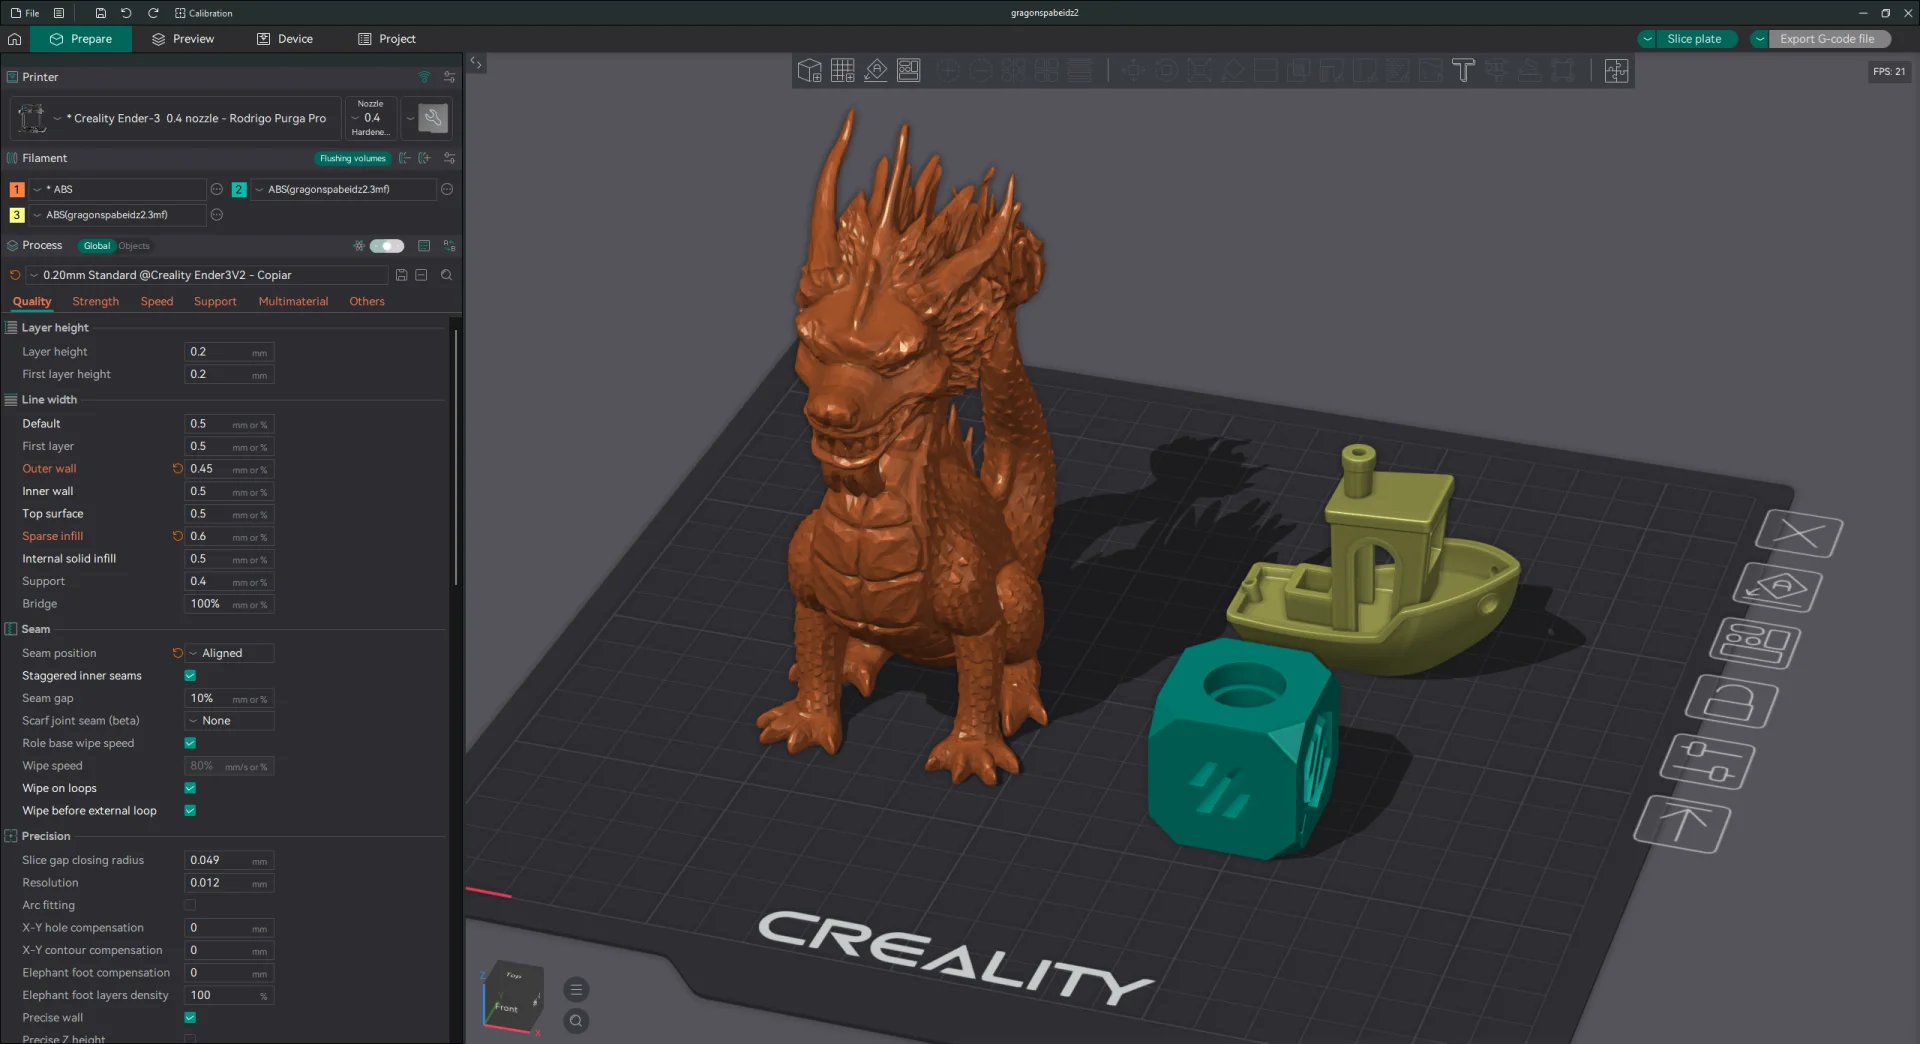
If you’re coming from Bambu Studio, you’ll recognise it instantly; if you’re coming from PrusaSlicer, you’ll see everything is in the same place but organised differently. The screenshot shows all the parts. Along the top are the main tabs:
- Prepare (Prepare): where you place and configure your parts. This is where you’ll spend almost all your time.
- Preview (Preview): the slicing result, layer by layer.
- Device (Device): the connection to the printer. If it’s on your network, its control interface appears here.
- Project (Project): the 3MF project information.
In the Prepare tab, the 3D view takes up most of the screen and this is what surrounds it:
- Left side panel: the three profile blocks, from top to bottom. Printer (with the nozzle and bed type), Filament (one for each loaded filament) and Process, with the print settings spread across the Quality, Strength, Speed, Support, Multimaterial and Others tabs. The Global / Objects switch in the Process block indicates whether you’re changing the settings for the whole project or only those of a single part.
- Top toolbar: add parts, add plate, orient, arrange, move, rotate, scale, cut, the painting tools, text, measure and more.
- Top right: the Slice plate button and, next to it, the one to export or send the result.
- Menu bar: File, Edit, View, Help and a menu of its own, Calibration, which we cover below.
A note on the Spanish translation: it’s quite complete, but it has a few oddities. The brim appears as borde de adherencia, the raft as balsa, the Strength tab as Fuerza and the scarf seam type as unión de bufanda. The bed is always called “cama”, which is welcome.
Importing the model
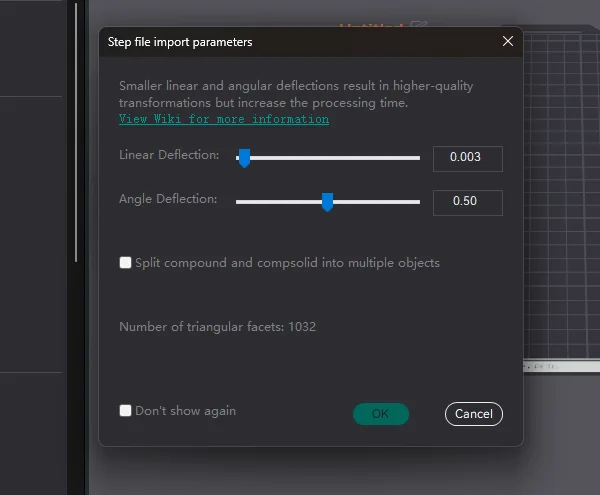
Drag the file into the window, use the add button on the top toolbar or go to File > Import. OrcaSlicer supports 3MF, STL, STEP, SVG, OBJ and AMF, and can also import a .zip file containing several models. If you open a 3MF made with OrcaSlicer or another compatible slicer, its settings are loaded too. When importing a STEP file, OrcaSlicer asks how precisely to convert it to a mesh: higher precision gives smoother curves, but takes longer to process.
Move, scale, rotate and lay flat
With a part selected, the tools on the top toolbar let you Move, Rotate and Scale, by dragging in the 3D view or typing exact values. For a part that was imported lying on its side or upside down, the most useful tool is Select face as base (in English, Lay on face)): you click a face and that face is placed flat on the bed. A good orientation reduces supports, improves the finish and makes the part stronger in the direction that matters. If you’re not sure, auto-orient works it out for you; we cover it in the everyday features.
Slicing and checking the preview
- Check the three profiles in the left-hand panel: printer, filament and process. If you picked them in the setup wizard they will already be right; we explain them in depth in the next section.
- Check the bed type next to the printer, if your profile uses it: each filament’s bed temperature depends on that surface.
- Decide whether you need supports. In the process’s Support tab, turn on Enable support if the part has areas that would be left hanging in mid-air.
- Click Slice plate. OrcaSlicer generates the G-code and switches to the preview on its own.
- Review it layer by layer with the vertical slider. Check that the shape matches the model and look for areas that start printing in mid-air. The legend shows the estimated time and the filament used, and a drop-down changes what is colour-coded: line type (perimeter, infill, support…), speed, layer height, fan, temperature, filament or volumetric flow rate. It is the best way to understand what the slicer is doing.
Export or send the G-code
After slicing, the button on the right lets you Export G-code to save it to an SD card or a USB drive. The drop-down next to the button offers more options depending on the printer, such as exporting the sliced plate as a 3MF file (with the G-code inside) or, if your printer is on the network, sending it directly. We cover this in the everyday features section.
OrcaSlicer profiles: printer, filament and process
Everything OrcaSlicer needs to know in order to slice is split across three profiles, which are always active in the left-hand panel: printer, filament and process (what PrusaSlicer calls the print profile). Separating them has a huge advantage: if you switch material you only change the filament profile, and if you want better quality on one particular part you only touch the process profile, without redoing everything else.
Process settings are edited directly in the side panel. Printer and filament settings open with the edit icon next to each selector, in a window with its pages on the left. If this is your first printer, the logical order is: printer (once), filament (one per material) and process (the one you choose for each job).
Process profile: how the part is printed
It defines the printing strategy and is split into six tabs: Quality, Strength, Speed, Support, Multimaterial and Others. This is the profile you will change the most: it is normal to have several (a fast one, a detailed one, a strong one) and pick according to the part. These are the settings worth mastering first.
Layer height (Quality)
- What it controls: the thickness of each layer, and separately that of the first layer. It has the biggest influence on print time and vertical resolution: taller layers print much faster, but they are more visible.
- When to change it: depending on the part. The system profiles already include several heights for each printer (the height appears in the process profile name, for example 0.20mm Standard), so it is usually better to choose a different profile than to change the number by hand.
- A caveat: layer height only changes the vertical resolution. To gain detail in the XY plane you need a finer nozzle.
Line width (Quality)
- What it controls: the width of the lines that get deposited, with a default value and separate values for the first layer, outer and inner walls, top surface, infill and supports. It can be set in millimetres or as a percentage of the nozzle diameter.
- When to change it: mainly when you change nozzle. If you use the system profiles for each nozzle variant, they already come tuned.
Walls and top and bottom layers (Strength)
- What it controls: the Wall loops are the number of lines that make up the part’s wall; the solid top and bottom layers close it off at the top and bottom.
- When to change it: when you need strength. Adding walls usually gives you more than adding infill, and it is the first thing to try for a stronger part. If you see gaps in the top surface, try adding another top layer or two.
Infill: density and pattern (Strength)
- What it controls: how much of the interior is filled and with what pattern. It is also called low-density infill (sparse infill). Infill holds up the top layers and affects print time, filament use and stiffness.
- Pattern: OrcaSlicer has one of the widest catalogues: rectilinear, grid, triangles, cubic, adaptive cubic, lightning (lightning), 2D and 3D honeycomb, gyroid, TPMS and quite a few more. Gyroid is a well-balanced choice for almost everything; lightning only puts infill where it is needed to support the top, which is handy for decorative figures; adaptive cubic puts more infill near the walls and less in the centre.
- To choose one: the official wiki has a pattern reference table with their advantages and typical uses.
Supports (Support)
- What it controls: whether structures are generated under areas that would otherwise be left hanging in mid-air, and what they look like.
- Type: Normal or Tree, each in an automatic version (OrcaSlicer decides where they are needed) or a manual one (only where you paint them or force them).
- Style: normal supports can be grid or snug (fitted to the part); tree supports can be slim, strong, hybrid or organic. Organic ones grow like branches and touch the part only where needed, which usually saves material and leaves fewer marks.
- When to change them: before enabling them, try reorienting or splitting the model to reduce overhangs. If supports appear where you don’t want them, adjust the threshold angle or paint blockers (we cover this in the advanced features).
Skirt and brim (Others)
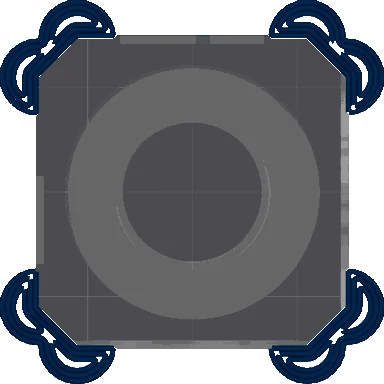
- Skirt: one or more outlines printed around the parts before they start. They help stabilise the flow and let you check the first layer before the parts begin. It can be shared across the whole plate or one per object.
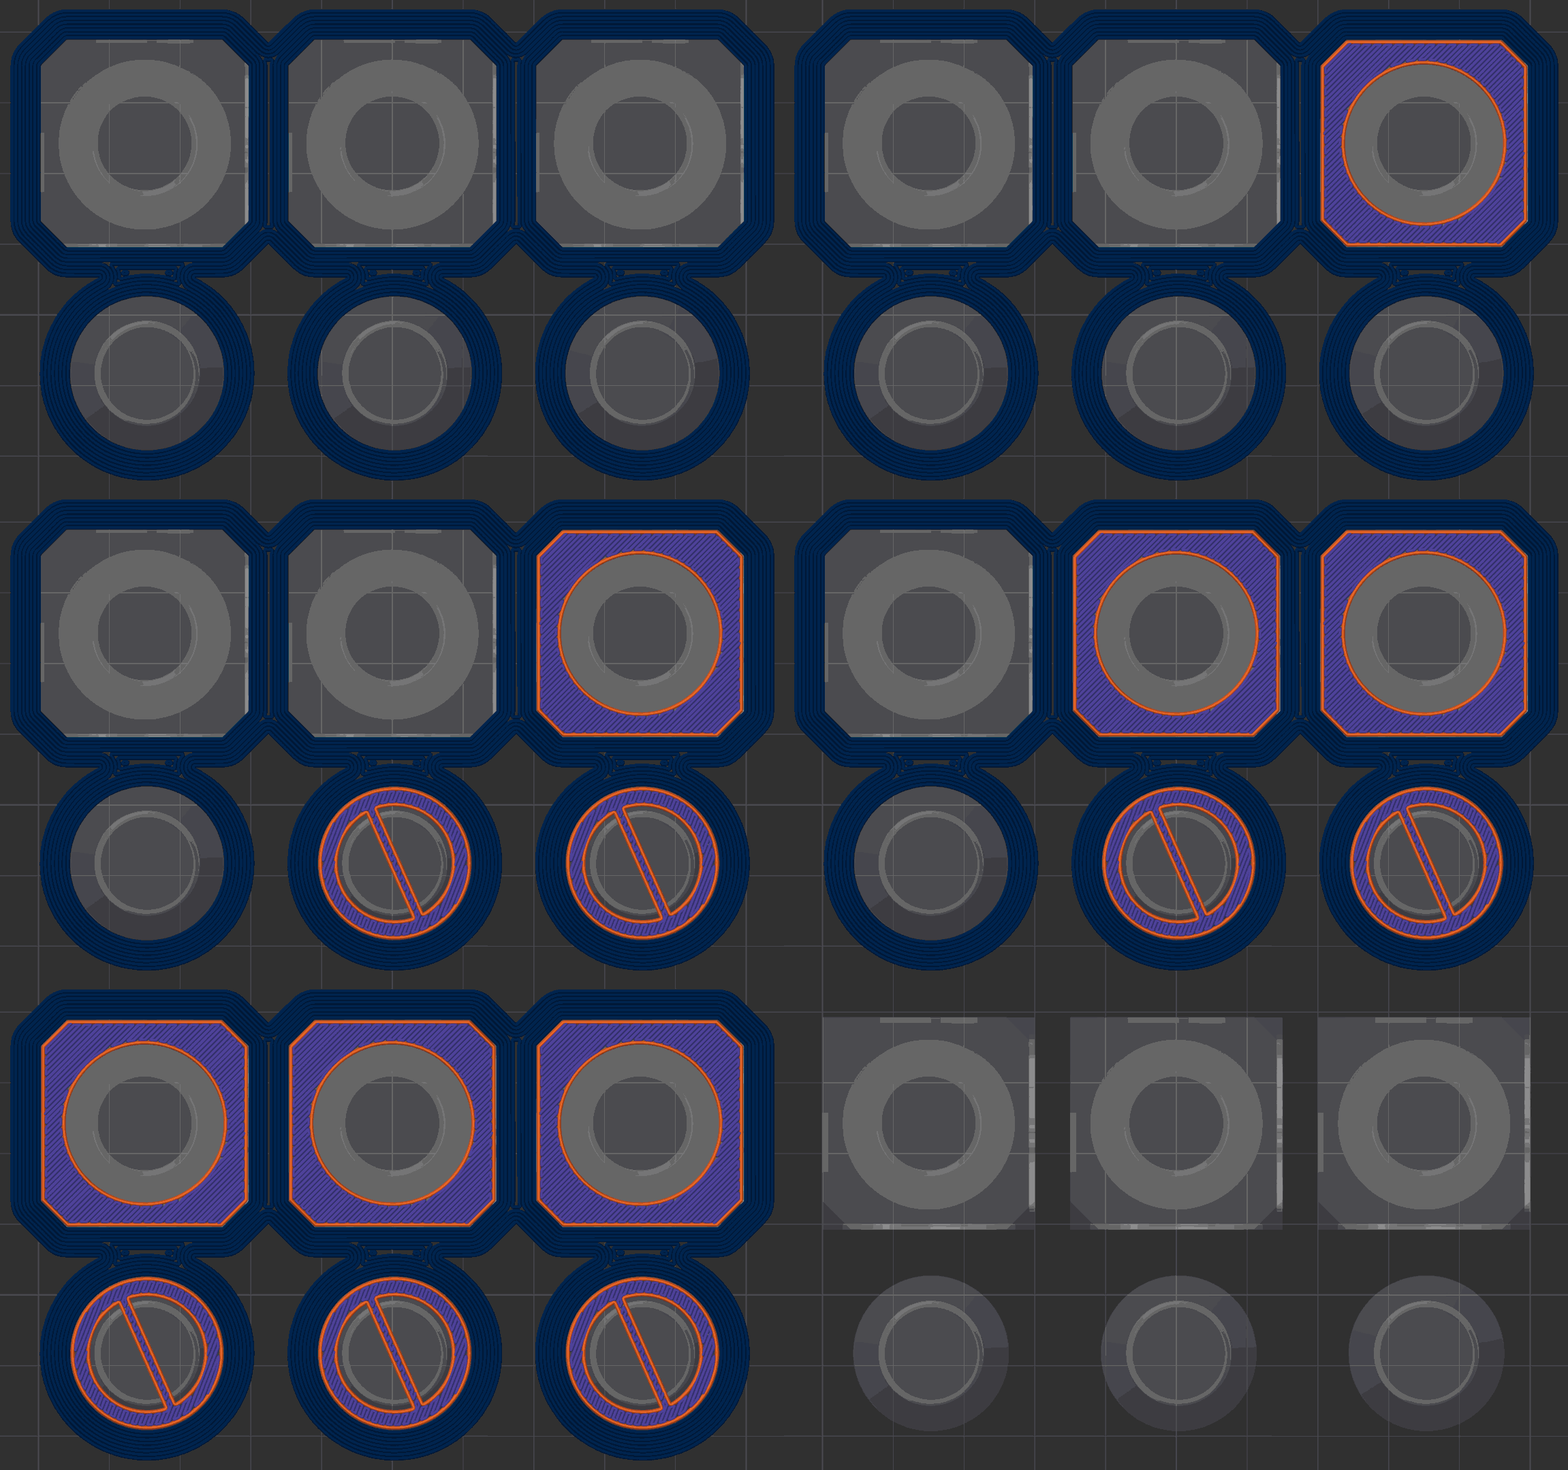
- Brim: extra loops attached to the first layer that increase the gripping surface, useful for tall parts with a small base or for materials that tend to lift. OrcaSlicer offers automatic brim, outer, inner or both, hand-painted, and mouse ears, discs placed only at the corners that hold the part without having to clean up the whole outline afterwards. Since the 2.4 series, brims that touch can be merged and printed together as one continuous outline, which is useful with lots of small parts.
Speed (Speed)
- What it controls: the speed of each line type (first layer, walls, infill, top surface, bridges, travel moves), as well as accelerations and jerk, and slower speeds on overhangs depending on how far they stick out.
- A key concept: no matter how much you raise the speeds, the real limit is set by the filament profile’s max volumetric speed , that is, how much plastic per second your hotend can melt with that material. OrcaSlicer slows down automatically so as not to exceed it, which is why it is worth calibrating (we cover this below).
Printer profile: the machine
It describes your printer and is set up once. Its main pages are Basic information, Machine G-code, Multimaterial, Extruder and Motion ability. If your model appears in the wizard, start from that profile and check the following; if you create one from scratch, copy as much as you can from a reliable profile for your printer.
Printable area and firmware (Basic information)
- What to check: the Printable area (bed shape and size), the maximum print height and the G-code flavour, which must match your firmware: Klipper, Marlin 2, Marlin (legacy), RepRapFirmware or Repetier.
- Adaptive bed mesh: the same section is where you configure the adaptive mesh, which probes only the area of the bed where the parts go instead of the whole surface. It needs your start G-code to call it; the official wiki explains how.
Bed type
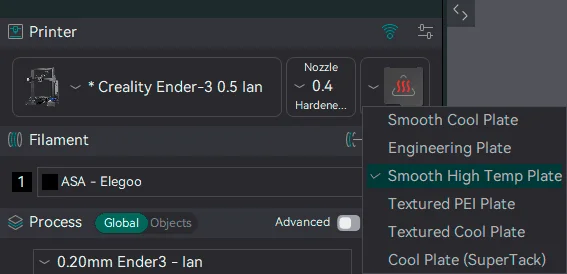
An idea OrcaSlicer inherited from Bambu Studio: many profiles let you indicate which surface you have fitted (smooth, textured, PEI, engineering…). Each filament profile stores a bed temperature for each type, and when you change the surface the matching one is applied without touching anything else.
Nozzle, retraction and Z-hop (Extruder)
- Nozzle diameter: the exact diameter of the one you have fitted. For each printer there are usually system profiles per diameter, which you enable from the wizard.
- Retraction: how much and how fast the filament is pulled back during travel moves to avoid stringing. Bowden extruders need considerably more than direct-drive ones. It is tuned with the retraction test and can be overridden for a specific material from the filament profile.
- Z hop height (Z-hop): how far the nozzle lifts when travelling, so it doesn’t scrape the part.
Start and end G-code (Machine G-code)
- What it controls: the commands that run before starting (heating, homing the axes, levelling, purging) and at the end (turning off the heaters, parking the toolhead). There are more fields for specific moments, such as layer change or filament change.
- What to check: that it matches your printer and your firmware. If your model has a profile, use it as it is; if not, copy the manufacturer’s. A mistake here can drive the nozzle into the bed, so only change what you understand.
Speed and acceleration limits (Motion ability)
- What it controls: the maximum speeds, accelerations and jerk of each axis. OrcaSlicer uses them to estimate print time and, depending on the firmware, can write them into the G-code.
- Input shaping from the slicer: in Expert mode, this page lets you set the frequency and damping of input shaping for Klipper, RepRapFirmware and Marlin 2. It is useful on Marlin printers that don’t expose that setting in their menu.
Filament profile: the material
It defines how each material behaves. Ideally you have one per material and, if you fine-tune, one per brand or colour, because behaviour changes from one spool to another. Always start from a system profile of the same type (PLA, PETG…) and adjust it with the calibrations in the next section. These are the key settings:
- Temperatures: nozzle, bed (one per bed type, as we have seen) and, on enclosed printers that support it, chamber. Each has one value for the first layer and another for the rest. The orderly way to choose the nozzle temperature is a temperature tower.
- Flow ratio: adjusts how much plastic comes out. Don’t tweak it by eye: it is calibrated with the flow test.
- Pressure advance: compensates for the pressure lag in the nozzle when accelerating and braking. OrcaSlicer stores it in the filament profile, because each material needs its own value, and sends it to the printer (Klipper, Marlin with Linear Advance enabled and other compatible firmwares).
- Max volumetric speed: the maximum flow of molten plastic that material can handle in your hotend. Enter a calibrated value, not the one on the box.
- Cooling: the part cooling fan, with minimum and maximum values depending on how long each layer takes, the fan on bridges and overhangs, and the initial layers with no fan.
- Shrinkage: lets you compensate in XY and in Z for how much the material shrinks as it cools, for parts that have to fit together.
- Overriding printer settings: the Setting Overrides page lets the filament change the printer profile’s retraction or Z-hop. It is what you need with flexible materials, without having to create another printer.
System profiles and your own profiles
The profiles that ship with OrcaSlicer, the system ones, are never overwritten. When you change a setting, it is marked as modified and the profile name shows an asterisk; with the save icon you turn it into your own profile with whatever name you like. If you switch profile with unsaved changes, OrcaSlicer asks whether you want to carry them over to the new one or discard them. There is also a tool to compare profiles and see what differs between two.
Your profiles are stored in the configuration folder, which you open from Help > Show Configuration Folder, and they survive updates and uninstalls (on macOS, the uninstaller may offer to delete it: be careful with that). To move them to another computer you have two options: File > Import / Export configurations, or sign in to Orca Cloud, the project’s own free service that syncs your printer, filament and process profiles between computers. Orca Cloud is optional: OrcaSlicer works exactly the same without an account.
Filament and process profiles have a Dependencies page that shows which printers they are compatible with. OrcaSlicer uses it to show you only what fits the selected printer; if you can’t find a profile, it most likely isn’t marked as compatible.
Basic and advanced settings: the view modes
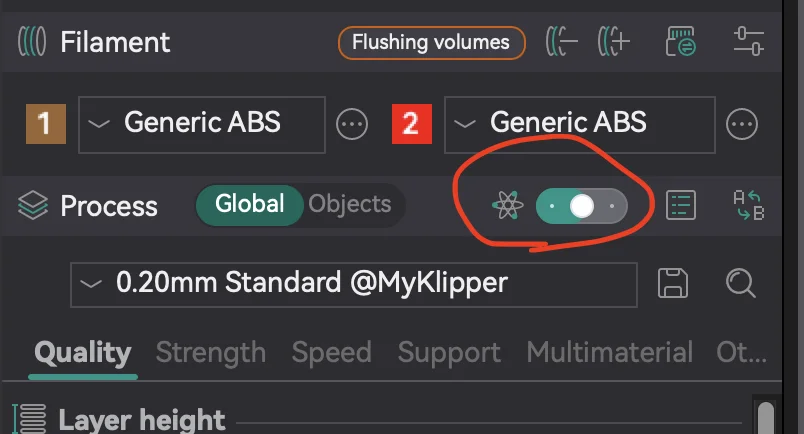
Each profile has hundreds of parameters, and OrcaSlicer doesn’t show them all at once. What you see depends on the mode, which you change with the three-position switch in the Process block:
- Simple: only the essential settings for slicing. Ideal for getting started.
- Advanced: adds the usual fine-tuning options.
- Expert: shows experimental and advanced options that require a good understanding of the printing process, such as Z contouring or input shaping from the slicer.
There is a fourth level, developer mode, which shows absolutely everything and is enabled in Preferences; you don’t need it to print. Our advice: start in Simple with a system profile and move up a level when you need a specific setting. If you don’t know what a parameter does, hover the cursor over it: the explanation is usually clear, and the official wiki has a page for almost every setting.
Tests and calibrations
This is where OrcaSlicer earned its reputation. The system profiles are a good starting point, but they don’t know your filament: the ideal flow, pressure advance or temperature changes with each material, each colour and sometimes each spool. Calibrating means printing a test part designed for one specific parameter, looking at the result and taking the best value back to the profile. OrcaSlicer generates those parts for you, with the parameter already varying in each block.
Here we explain how it is done in OrcaSlicer. If you want to understand in depth what each test measures and how to interpret it, the 3Dwork Labs FDM calibration guide walks through them from basic to advanced, and the official wiki calibration guide details every procedure inside OrcaSlicer.
Before calibrating: what gets fixed outside OrcaSlicer
No slicer test can fix a badly prepared machine. Before touching the Calibration menu, check three things, in this order:
- Bed levelling. Mechanics first (the paper method works), then the Z-offset and, last of all, OrcaSlicer’s adaptive mesh to absorb small imperfections. The mesh won’t rescue a badly levelled bed.
- Z-offset. This is the distance between the nozzle and the bed on the first layer. It is set in the firmware or physically; the value in OrcaSlicer is left for fine touch-ups, if your printer supports it. If it is too high, the part won’t stick; if it is too low, the nozzle scrapes, you get elephant foot or the extruder clicks.
- Steps per millimetre (Marlin) or rotation distance (Klipper). If the extruder pushes more or less filament than it thinks, the flow test is useless. This is firmware calibration, not OrcaSlicer calibration, and most current printers ship with it set correctly.
The Calibration menu
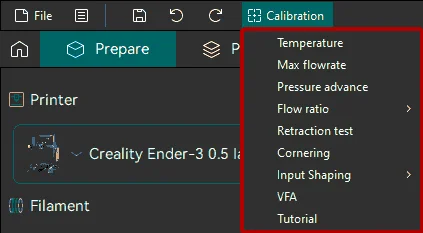
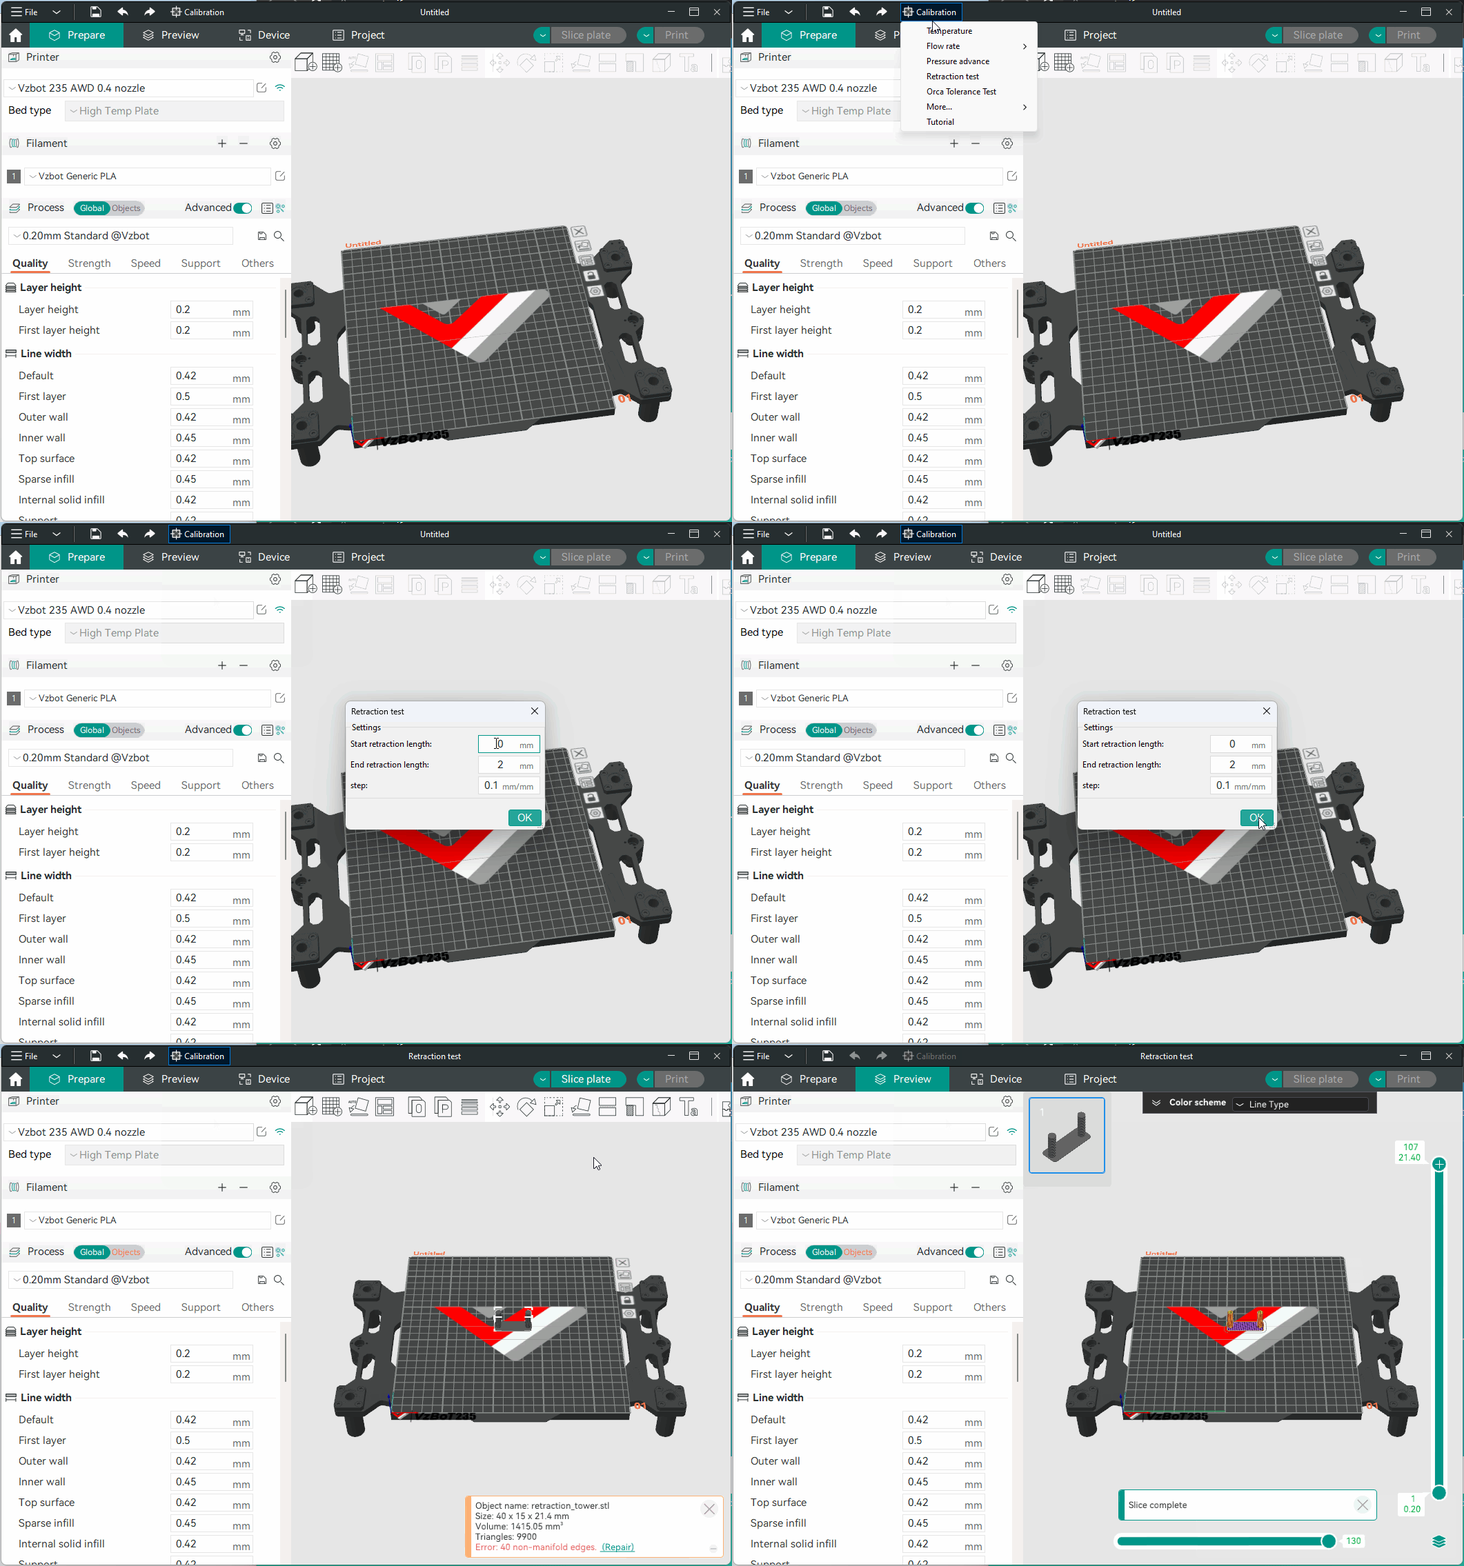
All the calibrations are in the menu Calibration in the top bar. It always works the same way:
- Select your printer and filament you want to calibrate. Several tests start from the current profile values, so this step matters.
- Choose the test from the menu and, if it asks, set its parameters (start value, end value and step).
- OrcaSlicer creates a new project with the test model and the settings already prepared. Slice and print.
- Pick the best block, copy that value into the profile (usually the filament one) and save it under your own name.
- Create a new project to leave calibration mode before printing anything else. It is easy to forget, and the wiki stresses this.
Calibration order
Order matters, because each test builds on the previous ones. Calibrating pressure advance with a badly tuned flow, for example, gives a value that won’t hold up later. For a new filament, this is the sequence we suggest:
| Step | Test | What it calibrates | Depends on | Sign of a good result |
|---|---|---|---|---|
| 1 | Temperature | Filament printing temperature | Extruder calibrated in firmware | Clean bridges, little stringing and good layer adhesion |
| 2 | Flow | Flow ratio in the filament profile | Temperature and a calibrated extruder | Smooth top surface, with no gaps or excess material |
| 3 | Pressure advance | Pressure compensation in the nozzle | Flow | Sharp corners and constant line width when speed changes |
| 4 | Retraction | Retraction length | Pressure advance and flow | No stringing between towers and no clogs |
| 5 | Tolerance | Hole compensation | Reliable extruder and flow | The right hole takes the test peg without forcing and without slack |
| 6 | Max volumetric speed | Maximum flow rate the hotend can melt | Temperature and flow | The wall stays intact up to the measured height |
| 7 | VFA | Speeds that cause fine vertical marks | Flow limits already set | Walls without vertical banding at the chosen speed |
If the result doesn’t settle in any of the first steps, don’t carry on: an earlier prerequisite is wrong (temperature, extruder steps or mechanics). After the table come the advanced calibrations, which are optional. Repeat the process whenever you change filament, even if it’s only the colour, or hardware.
Temperature
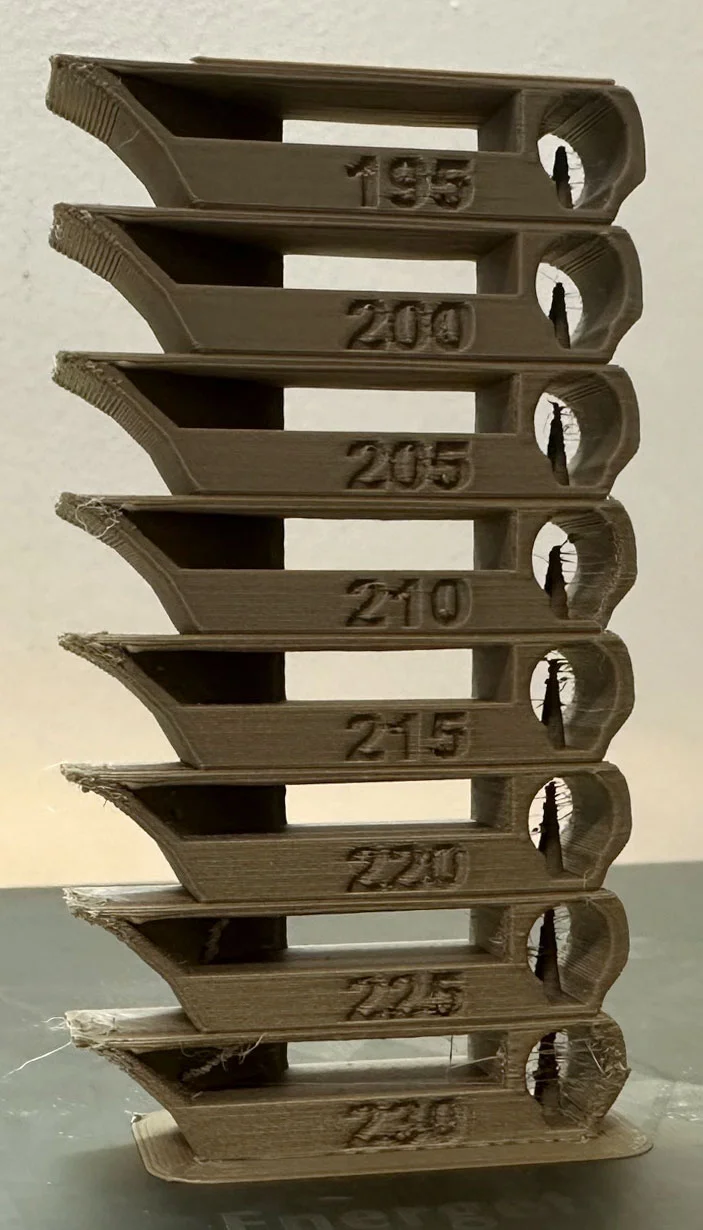
This is the first test, because temperature changes the plastic’s viscosity and everything else depends on it. You choose the range and OrcaSlicer generates a tower with one block per value, each labelled with its temperature.
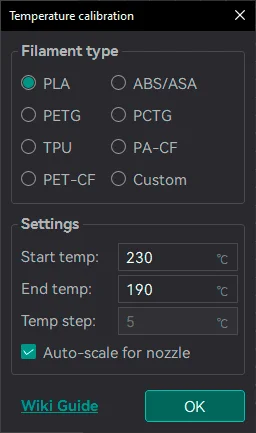
- What to look at: the finish of bridges and overhangs, the sharpness of the numbers, stringing between parts of the tower and layer adhesion.
- How to choose: the temperature that best balances all of the above. Copy it into the filament profile.
Flow
Adjusts the flow ratio in the filament profile. The wiki recommends the YOLOmethod, from the flow submenu: in a single pass it generates eleven blocks, each with a small correction on top of the current flow, and you pick the one with the smoothest top surface and no gaps between lines. There is also a “perfectionist” variant with finer steps and the classic two-pass method (coarse and fine).
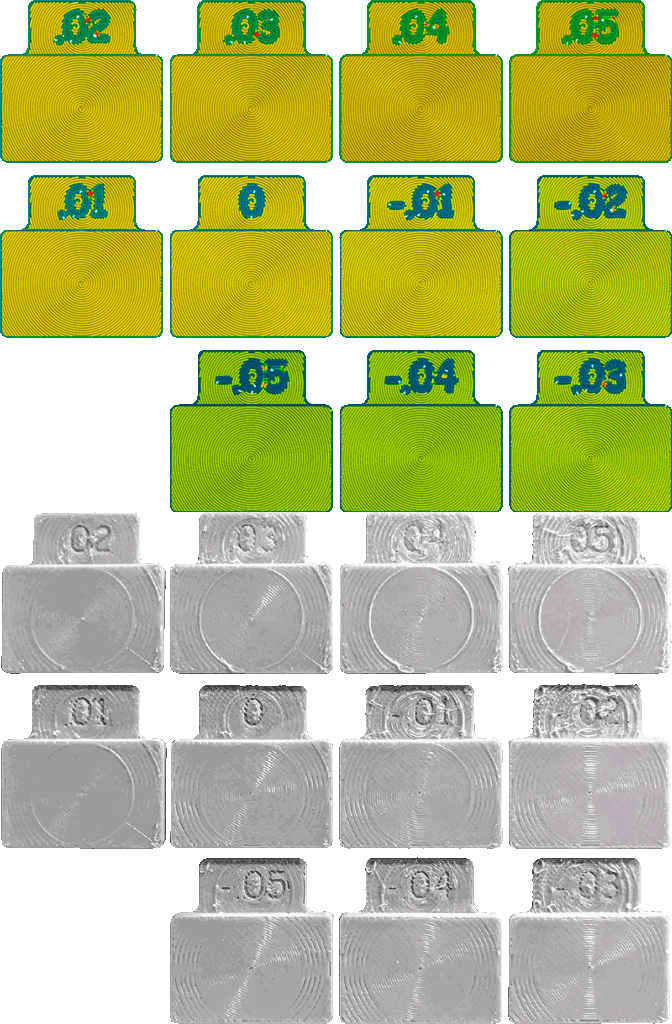
Before repeating a test that comes out odd, work out what the machine is telling you:
- Over-extrusion at the start or material dragging: temperature too high or steps/rotation distance wrong. Check it before repeating.
- Clicking in the extruder: the temperature falls short for that flow rate. Raise the temperature slightly or lower the max volumetric speed and repeat.
- Gaps between lines or excess at the edges: this is exactly what the test is designed to correct; pick the smoothest block.
- Inconsistent results between blocks: the test speed is too high (lower it) or the line width is wrong. With a 0.4 mm nozzle, the process line width shouldn’t exceed about 0.45 mm.
- If you use a Bambu Lab printer: the wiki warns you not to tick the printer’s own flow calibration option when sending these tests.
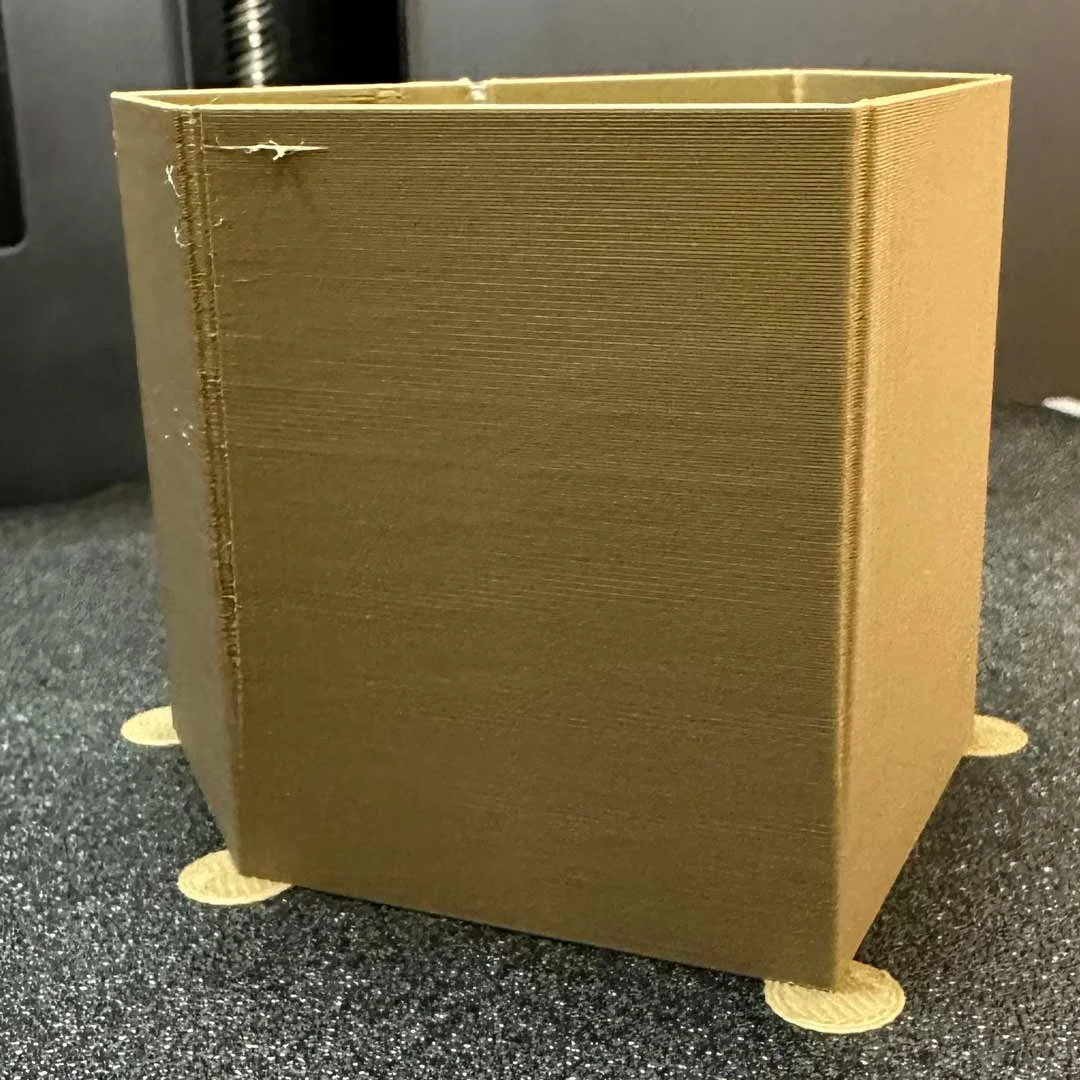
For an objective check, print a single-wall cube (20×20×20 mm, 0 % infill and a single perimeter), measure the wall thickness with calipers and correct as follows: new flow = current flow × (desired thickness / measured thickness). The desired thickness is the nozzle diameter. For example, with a flow of 0.98, a 0.4 mm nozzle and a measured wall of 0.43 mm, the result would be 0.98 × 0.40 / 0.43 ≈ 0.91 (example figures, just to illustrate the formula).
Pressure advance
Pressure advance compensates for the pressure lag in the nozzle: without it, corners bulge and line ends are thin. It comes after flow because, with a badly tuned flow, the compensation comes out wrong. OrcaSlicer offers three methods, each with a version for direct drive and one for Bowden. They are calibrated separately and, as a rule, Bowden needs higher values because the tube adds elasticity to the system.
| Method | Extruder type | Advantage | Drawback | What to look for |
|---|---|---|---|---|
| Tower | Direct drive and Bowden | Less sensitive to the first layer; the most reliable at high speeds (above 120 mm/s) | It’s the slowest | The height where the corners are cleanest |
| Pattern | Direct drive and Bowden | Very visual: each corner has its value labelled | You have to compare corners by eye | The sharpest corner with no bulging |
| Lines | Direct drive and Bowden | Quick to print | Depends heavily on a good first layer | The line that keeps its width when speed changes |
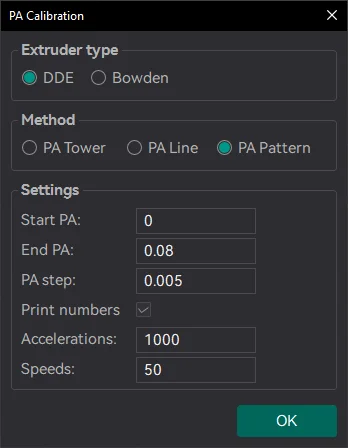
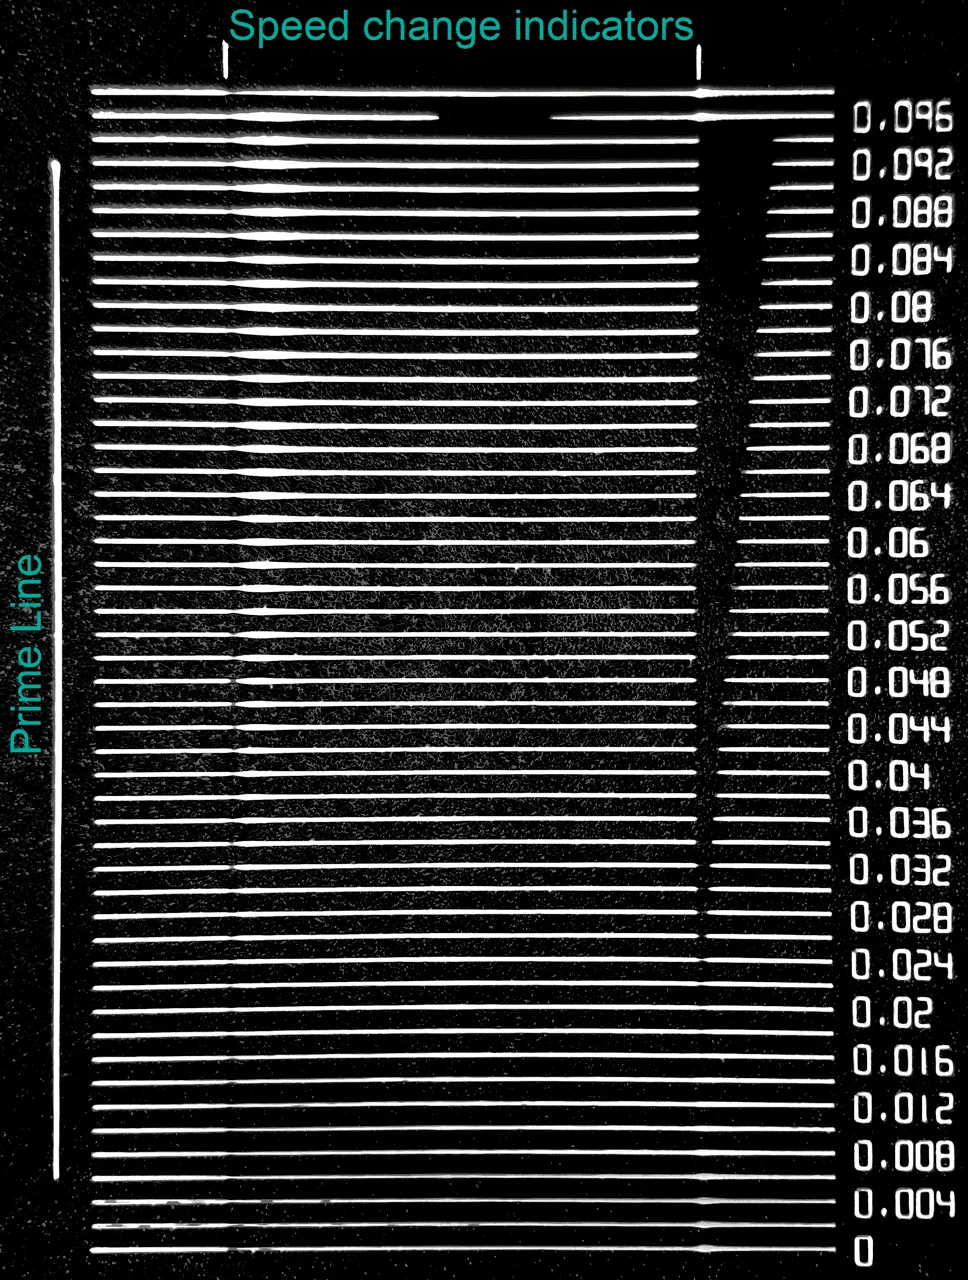
On printers running Marlin, Linear Advance must be enabled in the firmware, and not all of them ship with it enabled. The result is saved in the filament profile, by ticking the pressure advance checkbox.
Retraction
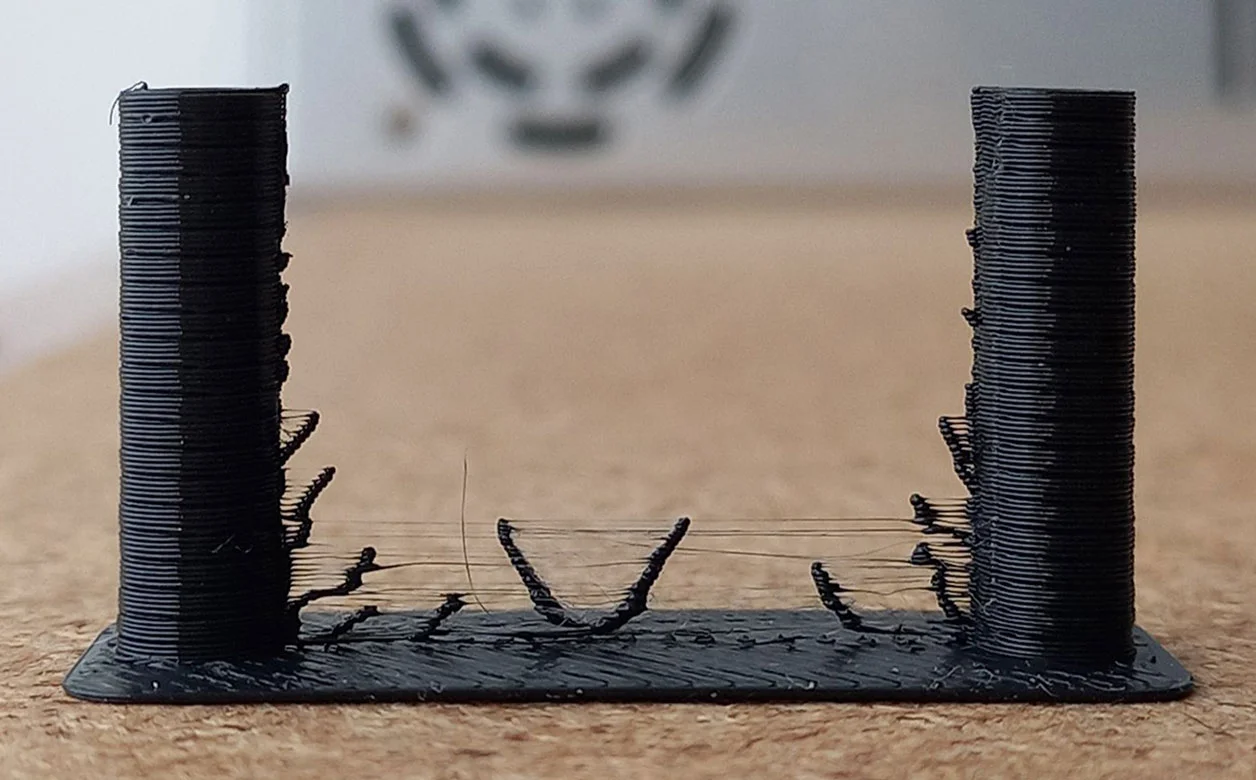
It looks for the minimum retraction length that eliminates stringing without causing clogs. The test prints two towers with travel moves between them and a retraction that increases with height; where the strings disappear, that’s your value. It comes after pressure advance and flow, because both change the pressure in the nozzle. As a starting range, use 0–2 mm for direct drive and 1–6 mm for Bowden. The default values usually work well.
If stringing persists, don’t just raise the retraction. Check in this order: filament moisture, temperature, nozzle installation and hotend cleanliness. Once the length is right, these complementary settings fine-tune the result:
- Wipe while retracting: wipes the nozzle while retracting and reduces stringing.
- Deretraction speed: with a value of 0 it uses the same speed as retraction.
- Travel distance threshold: avoids retracting on short moves, where there’s no risk of stringing.
- Z-hop: lifts the nozzle during travel moves so it doesn’t drag across the part, at the cost of more time and possible stringing when lifting and lowering.
| Symptom | Adjustment |
|---|---|
| Fine strings between parts | Longer retraction, lower temperature or dry filament |
| Strings that persist with high retraction | Check moisture, nozzle and hotend cleanliness; try Wipe while retracting |
| Clogs or clicking after retracting | Shorter retraction length or slower deretraction |
| Pointless retractions on short moves | Raise the travel distance threshold |
| The nozzle scrapes the part when travelling | Enable Z-hop |
Save the value in the printer profile or, if it is material-specific, in the override settings page of the filament profile.
Tolerance
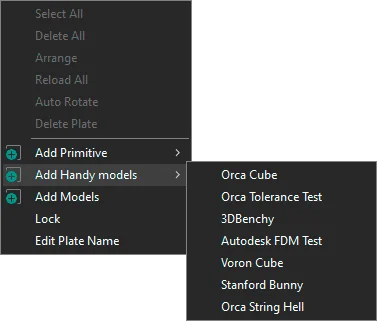
Right-click on the bed and Add Practical Models includes the Orca Tolerance Test: a base with hexagonal holes whose clearance ranges from 0 to 0.4 mm. It is used to tune the X-Y hole compensation. The wiki places it almost at the end, because it depends on an extruder and flow that are already reliable. The procedure:
- Set the X-Y hole and contour compensation to 0 mm for the test and print it.
- Try an M6 Allen key or the printed hex tester in each hole.
- Find the smallest hole where it goes in with little force and no visible slack. That is your real value.
- Work out the correction: if the 0.2 mm hole is tight and only the 0.3 mm one fits, the printer makes holes about 0.1 mm smaller, so the X-Y hole compensation will be +0.1 mm. If the 0.1 mm one already fits and feels loose, it will be −0.1 mm. These are example figures; use your own.
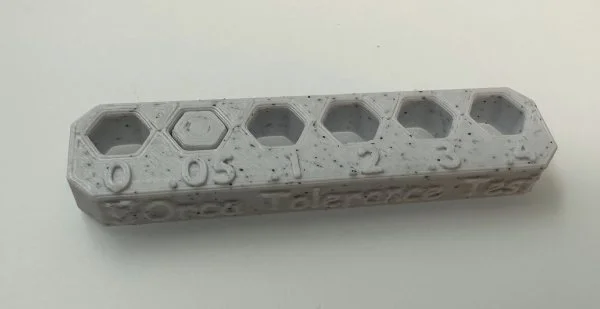
This test tunes the holes; outer contours are not corrected by it.
Max volumetric speed
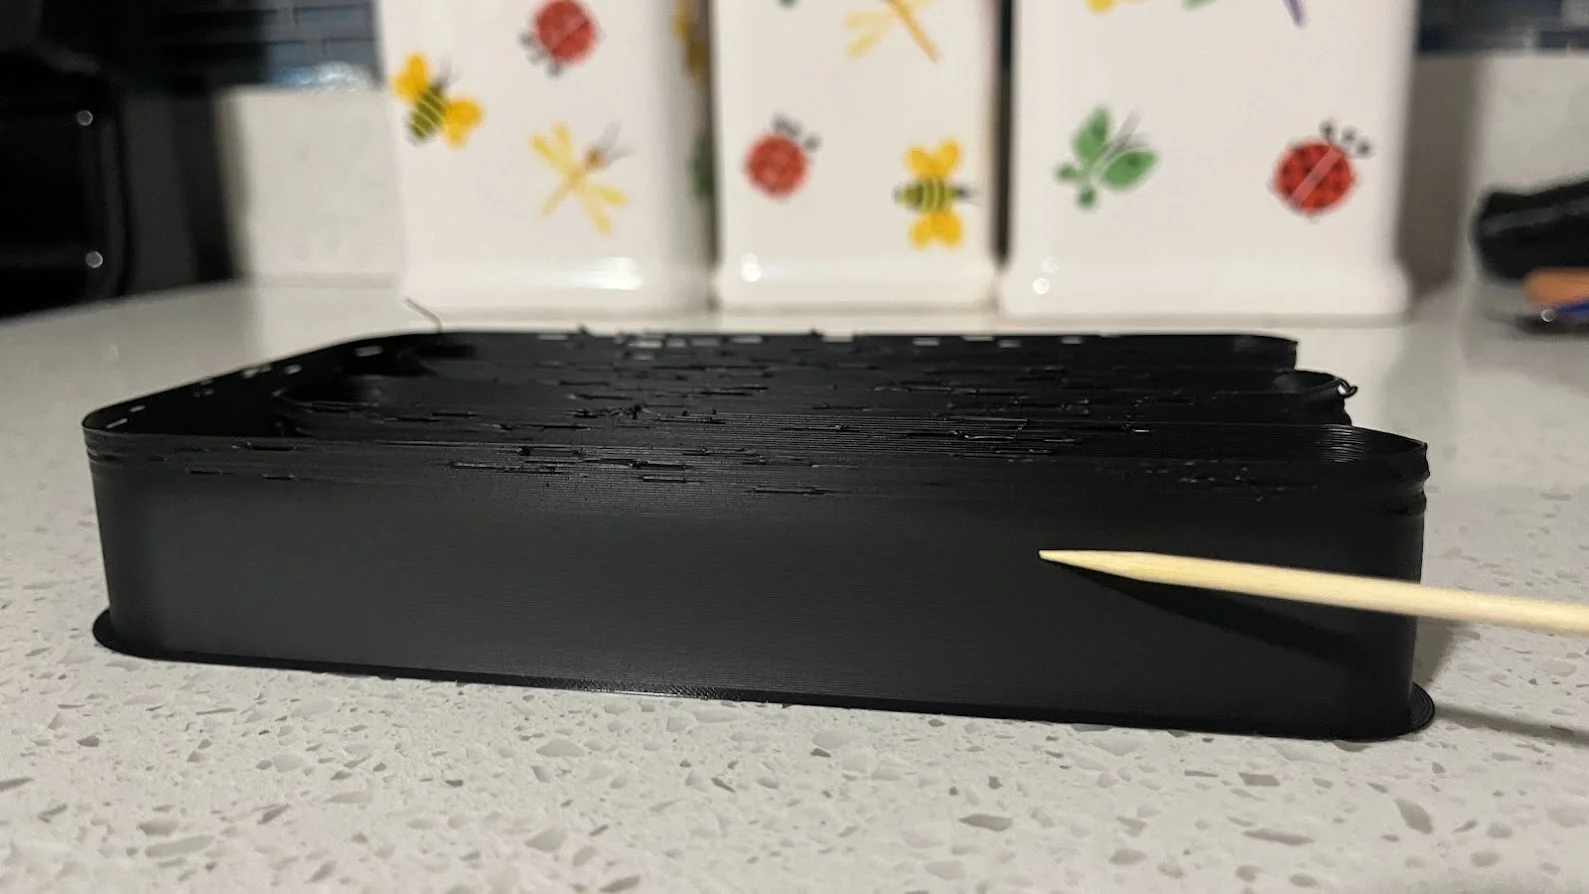
The Max Flowrate Test (Max flowrate) measures the maximum flow rate the hotend can melt without falling into under-extrusion. It prints a part where the flow rate rises with height; when the hotend can’t keep up, the wall starts to fail. Note the flow rate just before that point and use a value 10 to 20 % below it as a safety margin. Don’t blindly trust the filament manufacturer’s figure, which is sometimes optimistic. Do it after temperature and flow, because both affect the limit.
VFA
VFAs (vertical fine artifacts) are fine vertical marks on the walls. They are not a hotend limit, like volumetric speed, but a motion and mechanics problem: resonances at certain speeds. That is why it is calibrated last, with the flow limits already set.
- Parameters: start speed, end speed and step. OrcaSlicer prints a tower with one mark for each speed.
- How to read it: look for the last mark with good quality. With the formula speed = start + (mark − 1) × step, if you start at 120 mm/s with a 20 mm/s step and the last good mark is number 8, your speed is 120 + 7 × 20 = 260 mm/s (illustrative example).
- If there is VFA: go to input shaping first before lowering the speed too much.
Advanced calibrations
These are optional, mainly tune the printer rather than the filament, and only need repeating if you change hardware:
- Cornering (Cornering): calibrates the jerk or the junction deviation so the printer can take corners faster. The wiki itself warns that most printers don’t need it, because their firmware already limits corner speed.
- Input Shaping: frequency and damping tests to reduce ripples (ringing). If your printer has automatic input shaping calibration, use it: it is usually more accurate than the manual test.
- Adaptive pressure advance: adjusts pressure advance according to the flow rate and acceleration at each moment. It needs pressure advance and flow already calibrated, and the wiki says it has mainly been tested with Klipper.
From symptom to calibration
If you already have a defect in front of you and don’t know where to start, this table takes you to the right step:
| Problem | Likely calibration cause | First step |
|---|---|---|
| First layer doesn’t stick | Z-offset, bed levelling, bed temperature | Check Z-offset and levelling |
| Stringing and oozing | Retraction, temperature, flow; wet filament | Dry the filament and repeat the retraction test |
| Bulging or rounded corners | Pressure advance, speed | Repeat the pressure advance test |
| Under-extrusion or gaps | Flow, temperature, max volumetric speed | Flow test and check the flow rate limit |
| Over-extrusion or rough surface | Flow, temperature | Flow test; lower the temperature |
| Inaccurate dimensions | Tolerance, flow | Tolerance test after confirming the flow |
| Fine vertical marks | VFA, input shaping, mechanics | VFA and input shaping test |
| Layer shifts | Belts, motors, acceleration | Check belt tension and motors; lower acceleration |
Everyday features
Compatible with Klipper, Marlin and other firmwares
The G-code flavor setting in the printer profile adapts the file to your firmware: Klipper, Marlin 2, Marlin (legacy), RepRapFirmware and Repetier. It is the first thing to check if you set up a printer by hand. If you use Klipper, the project itself recommends adding to your printer.cfg the sections [exclude_object], so you can cancel a specific part mid-print, and [gcode_arcs], so the printer understands arc moves.
Sending the file over the network or by USB
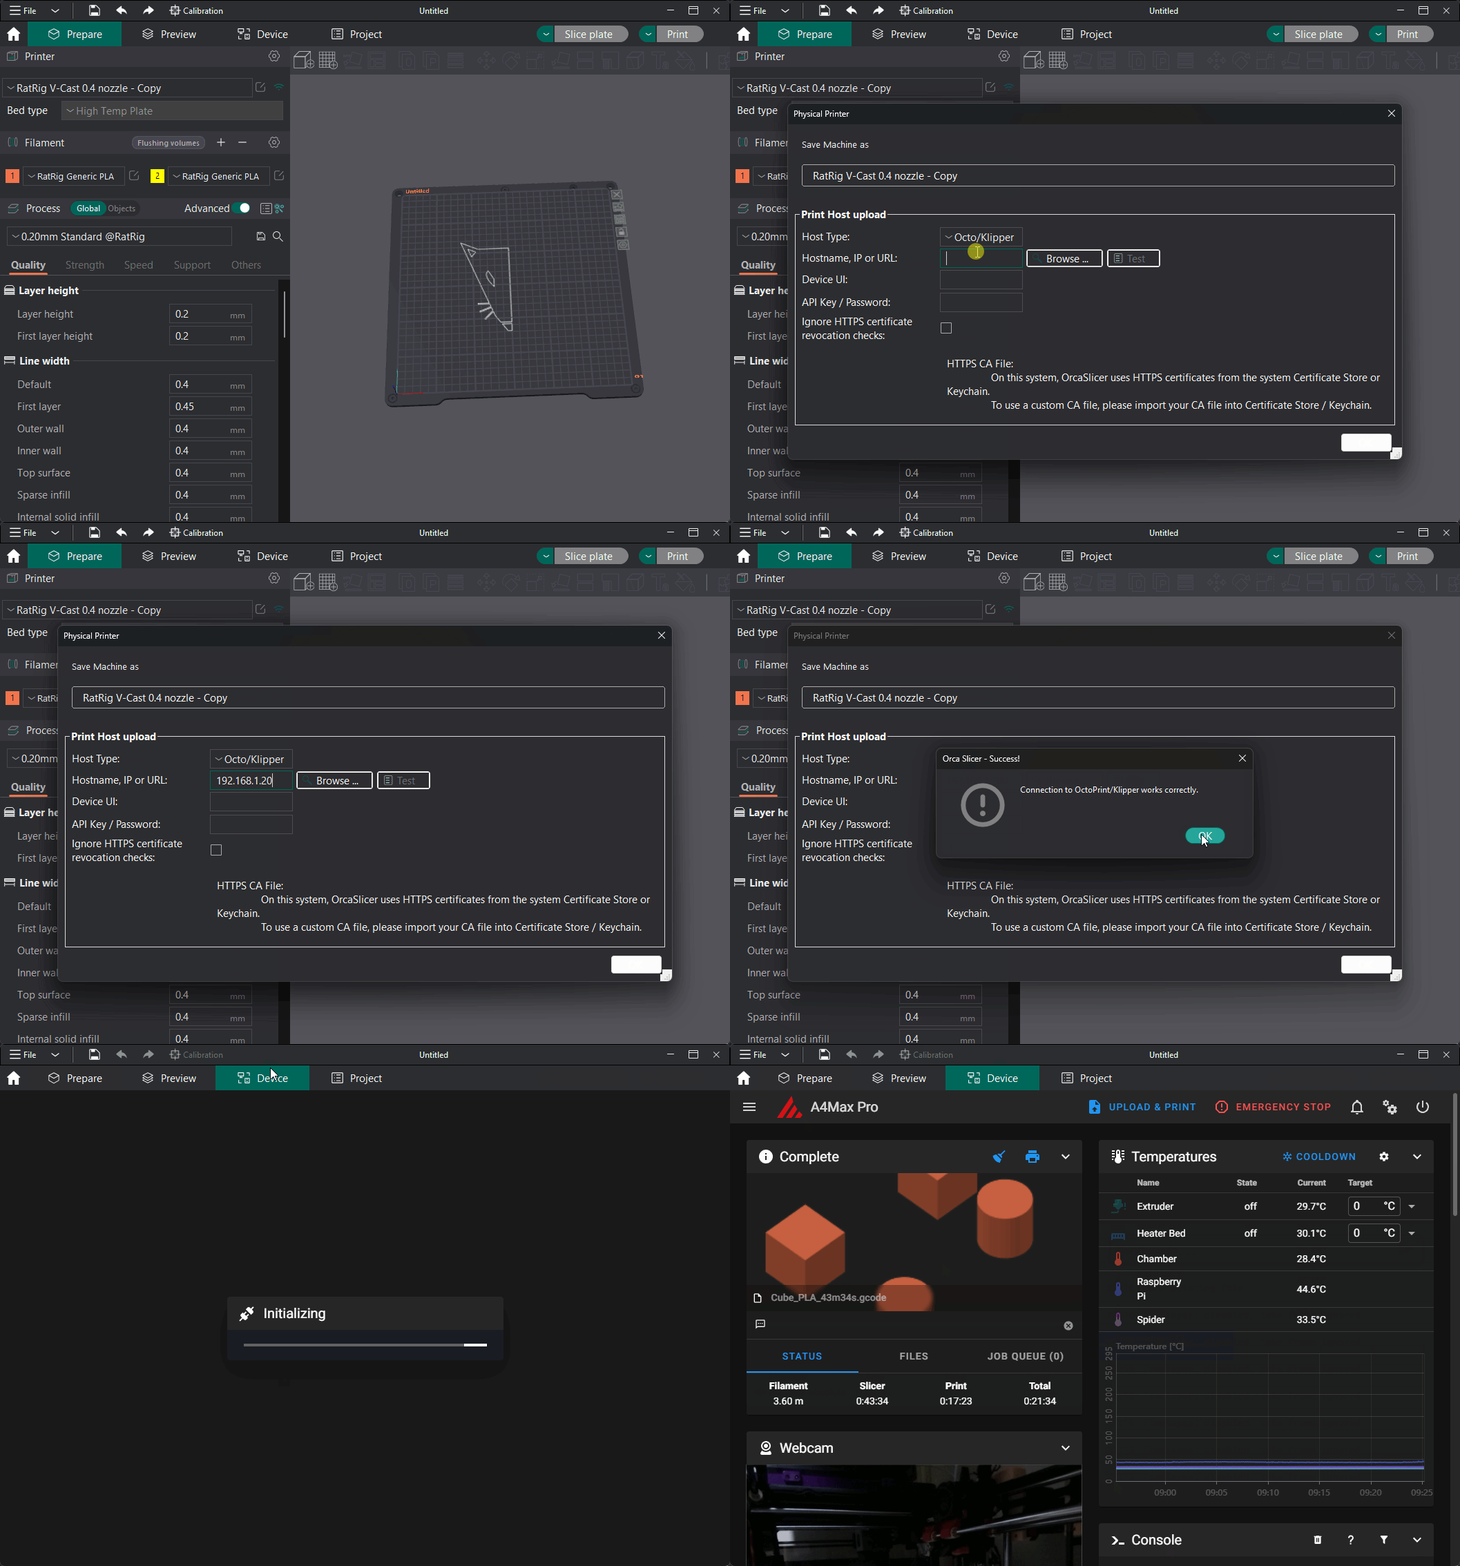
To send jobs without going through the card, press the Connection button (the signal icon next to the Printer block). The physical printer window opens, where you choose the Host type and enter the printer’s address and, if needed, its API key. The list is long:
- Klipper: natively through Moonraker or through OctoPrint compatibility (Octo/Klipper option).
- Other servers and firmware: OctoPrint, PrusaLink and PrusaConnect, Duet, Repetier, MKS, ESP3D, FlashAir and AstroBox.
- Brand or cloud services: CrealityPrint, Elegoo Link, Flashforge, Obico, SimplyPrint and 3DPrinterOS.
- Bambu Lab printers: they are controlled through an optional Bambu Lab network plug-in that is not open source. OrcaSlicer works without it if you don’t have a Bambu.
- By USB or card: by exporting the file, as we saw earlier.
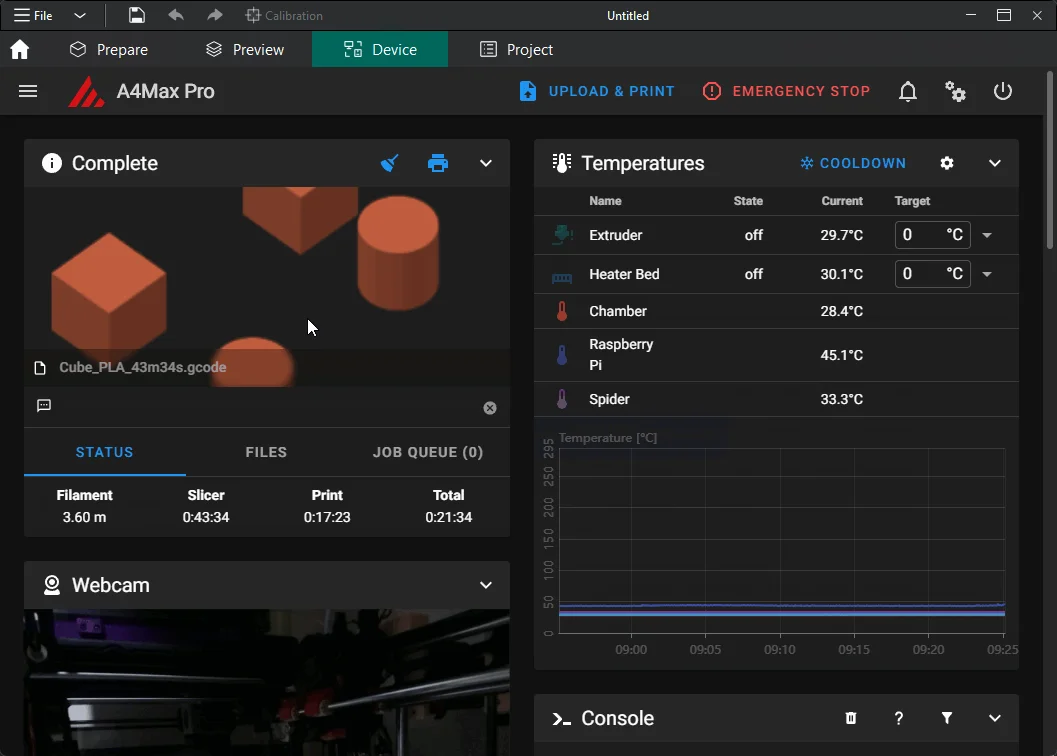
With the connection set up, the button on the right lets you upload the file or upload and print, and the Device tab shows the printer’s control interface (on Klipper, the Mainsail or Fluidd you have installed).
Auto-orient and arrange
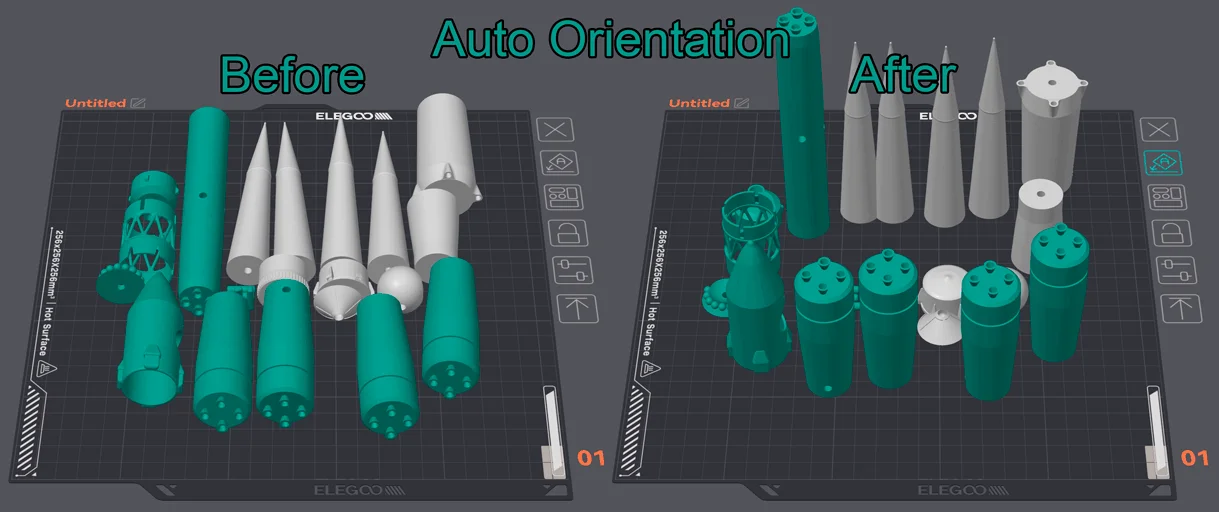
The auto orientation feature analyses the geometry of each part and picks the position with the fewest overhangs and the best supporting base. It works well in most cases, but the wiki itself points out that it doesn’t always get complex models right and that a part’s strength changes with its orientation, so check what it proposes. Arrange spreads the parts over the bed using as little space as possible, and by right-clicking a part you can add instances (copies) or fill the bed with instances.
Several beds in one project
A project can have several beds (Add plate in the top bar). Each one is sliced separately with Slice plate or all together with Slice all, and each bed has its own surface type and print sequence settings, which follow the global ones by default. It’s very handy for keeping a project that needs several print batches ready in a single file.
Per-object settings and modifiers
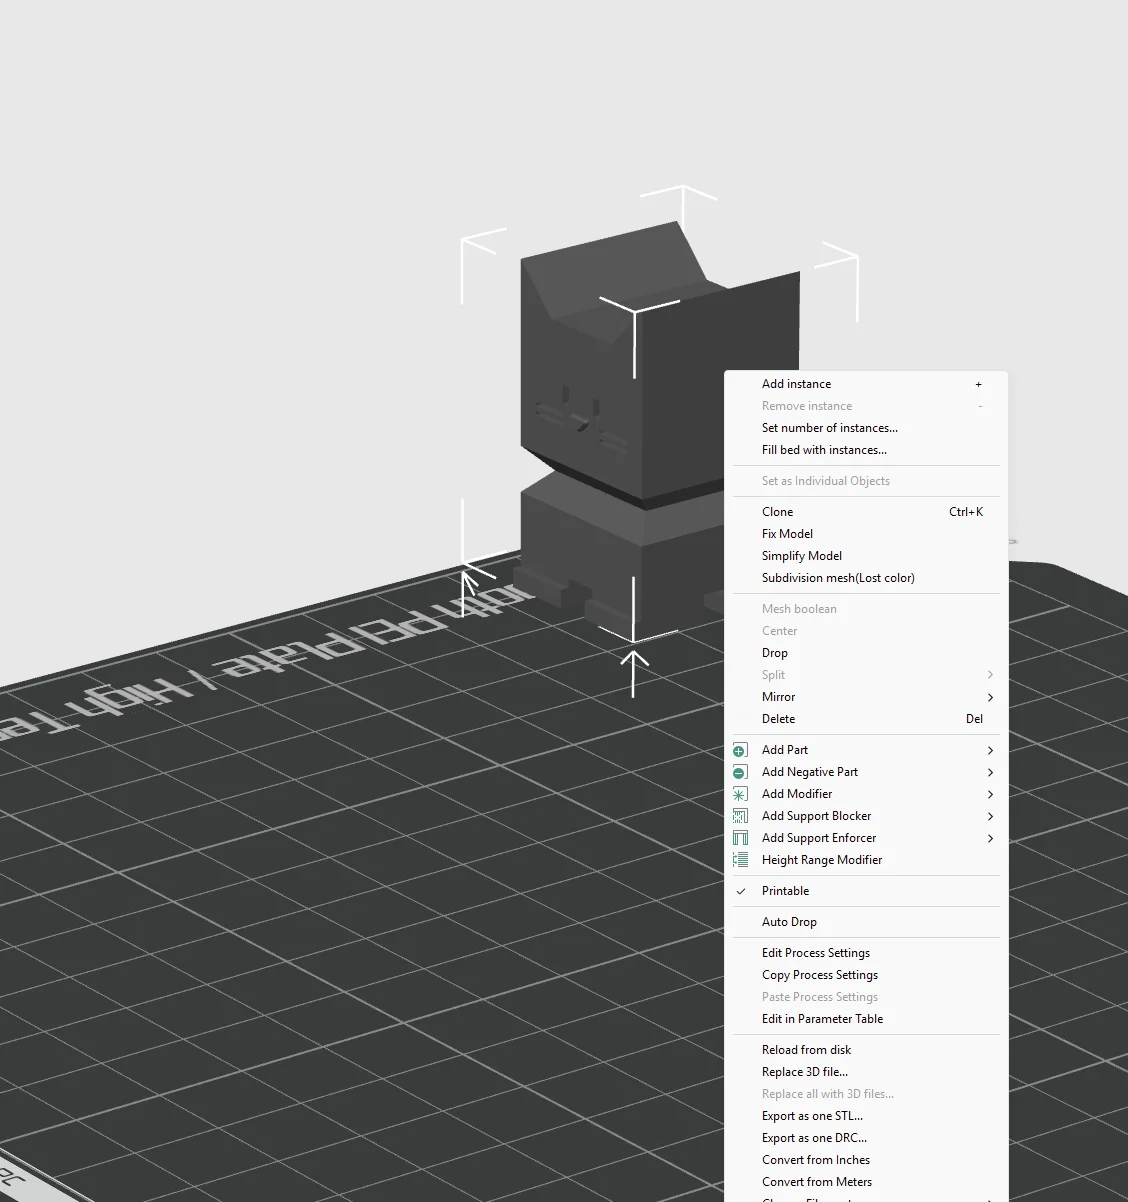
With the Global / Objects switch in the Process block you can change settings for just one part: more walls on one, a different infill on another. Right-clicking a part also lets you add parts, modifiers (volumes that change settings only inside them) or a height range modifier, which changes settings between two heights. It’s the way to reinforce only the area of a part that will take the stress.
Cutting large parts
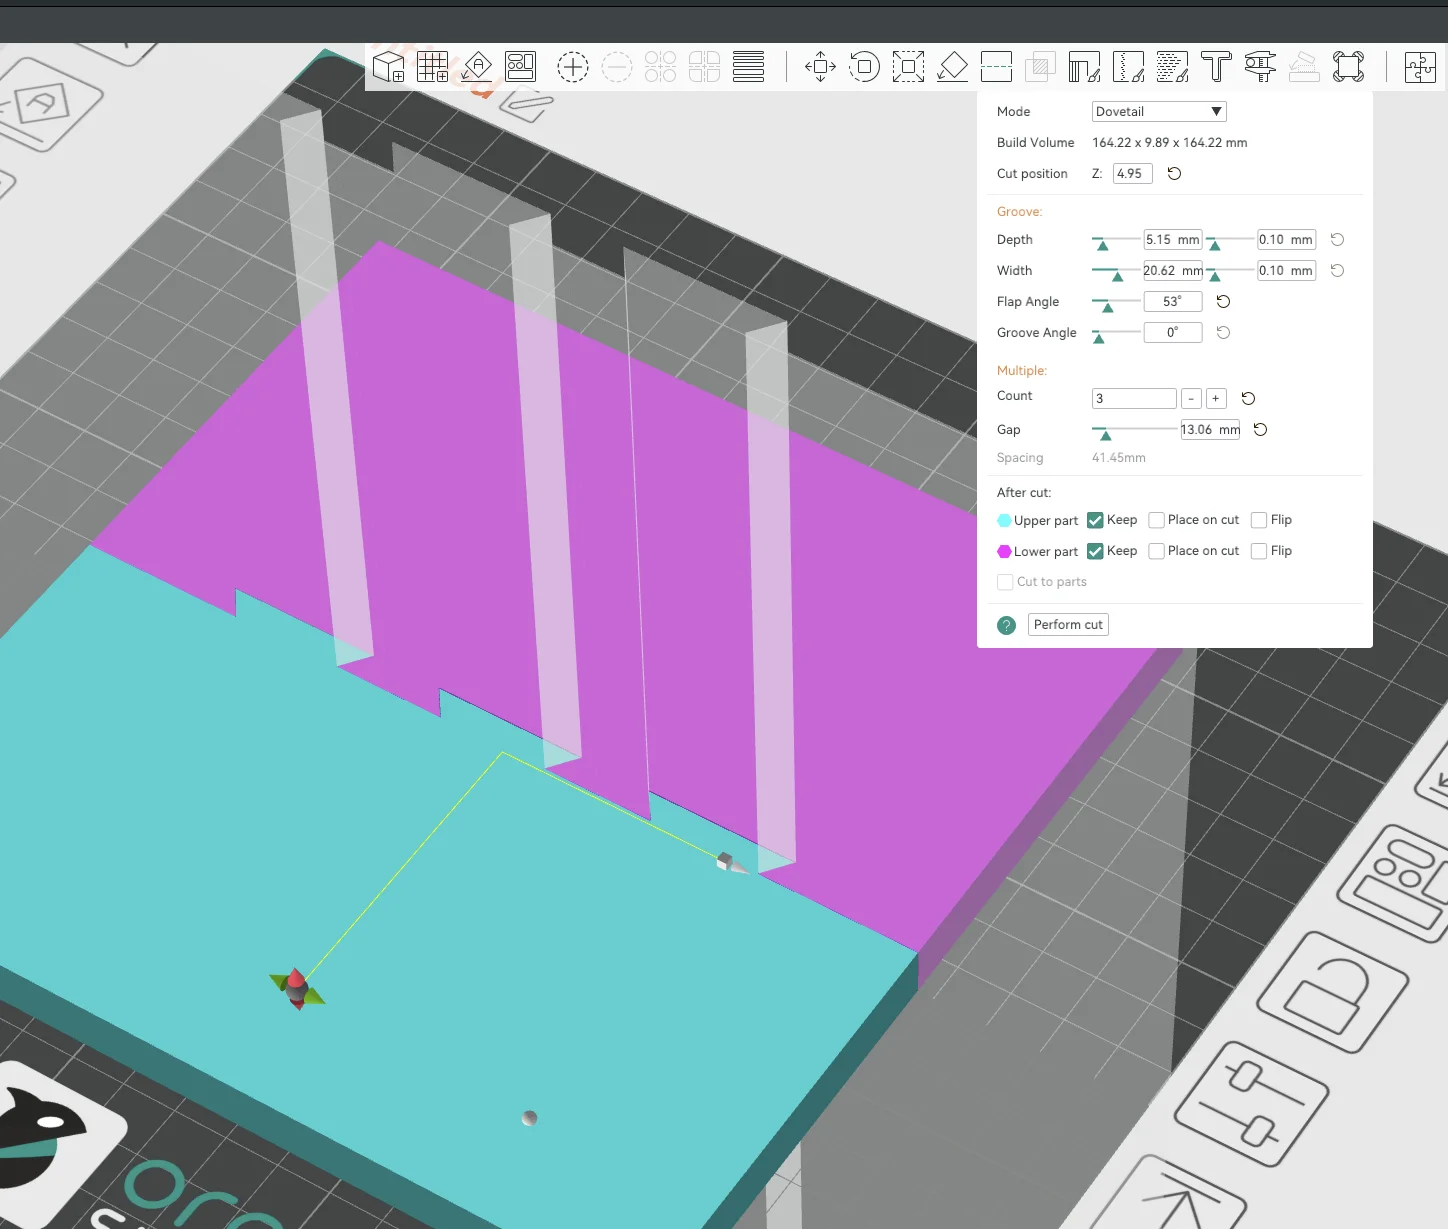
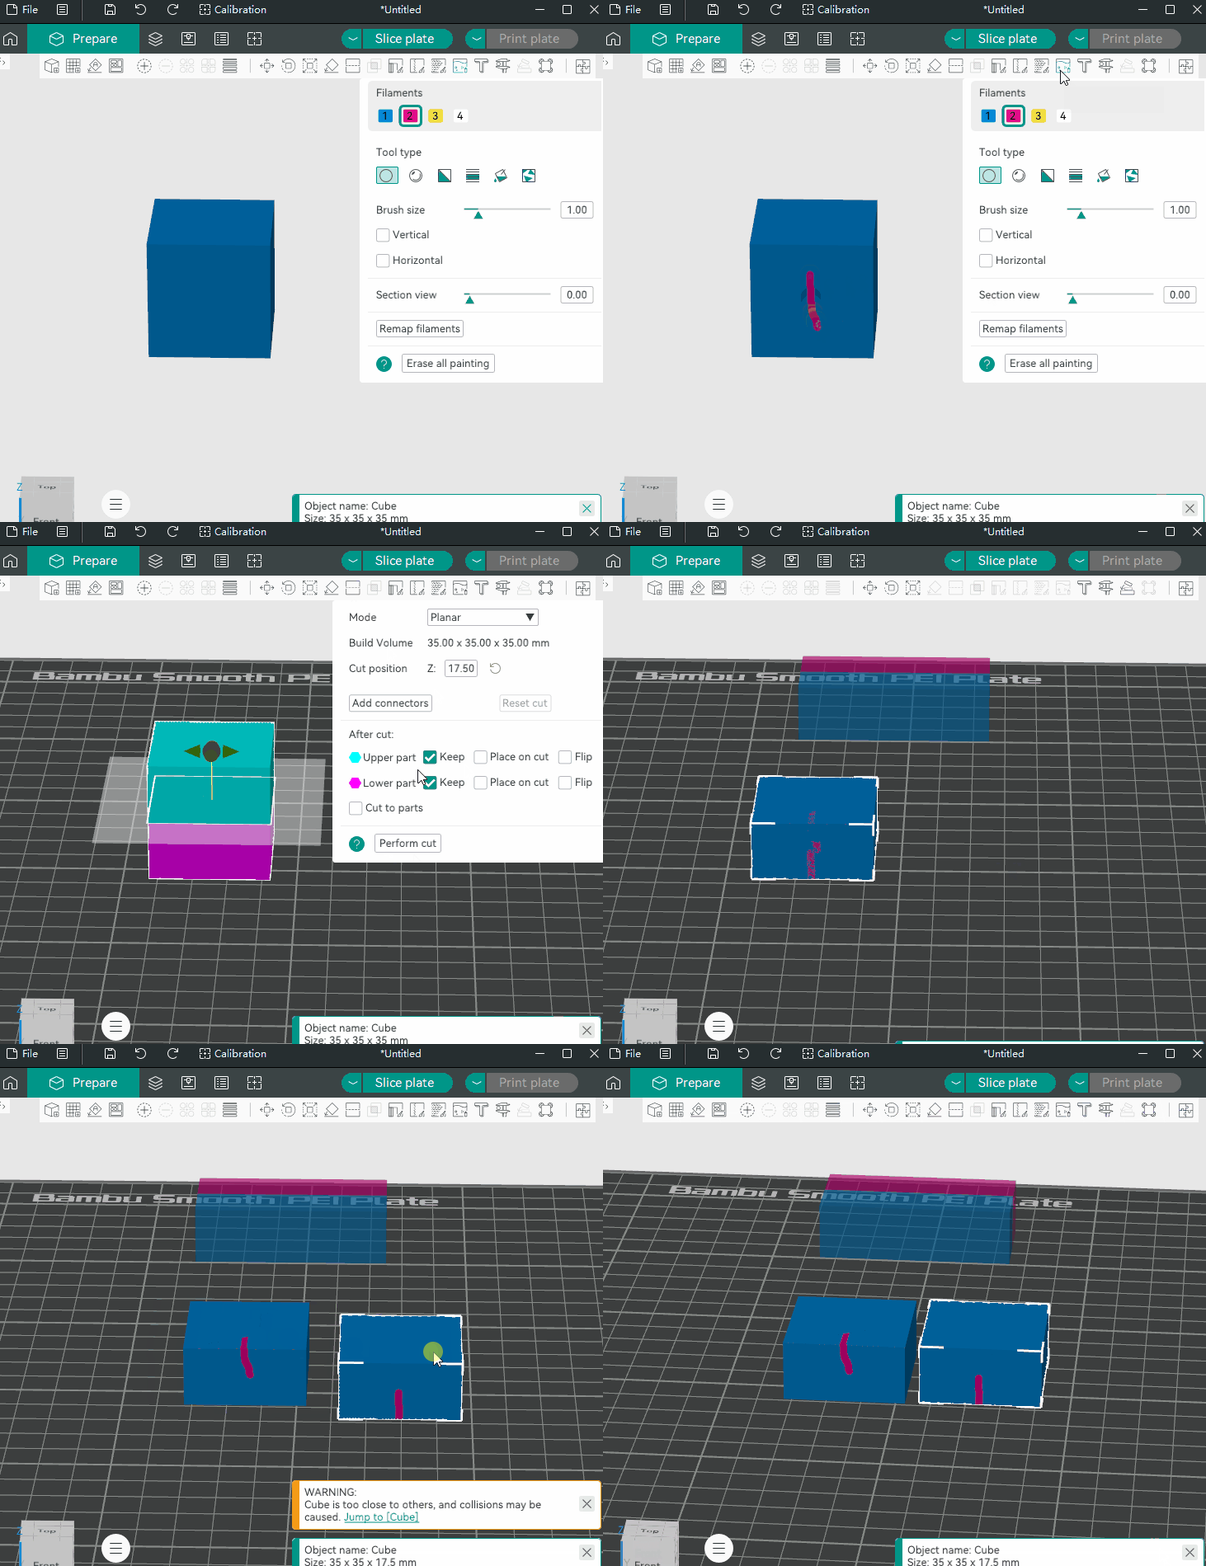
The Cut tool splits a model that doesn’t fit on the bed, that needs a different orientation for one section, or that would use too much support in one piece. The cutting plane can be moved and rotated freely, and OrcaSlicer can add connectors (pegs, for example) or a dovetail joint so you can assemble the parts afterwards. Since the 2.4 series, an experimental option in Preferences (developer section) lets you keep painted data, such as supports, seams or colours, when cutting or splitting a part.
3MF projects
With File > Save Project as you save the parts, beds, profiles, per-object settings and anything you’ve painted in a single 3MF file. It’s the best habit you can pick up: save the project of everything you slice and you’ll be able to repeat or tweak a part months later without guessing which settings you used. Many models from repositories like Printables or MakerWorld are already distributed as 3MF with their settings.
Advanced features worth knowing
This part is for people who already print confidently and want better quality, shorter times or more possibilities. Several of these tools only appear in Advanced and Expert modes.
Variable layer height
Uses fine layers where there are smooth curves or detail and thick layers on straight sections, with smooth transitions between them. The result approaches the quality of fine layers in considerably less time. The Variable layer height tool calculates the profile automatically and lets you adjust and smooth it by hand. If you prefer more control, a height range modifier changes the layer height only between two Z heights.
Painted supports
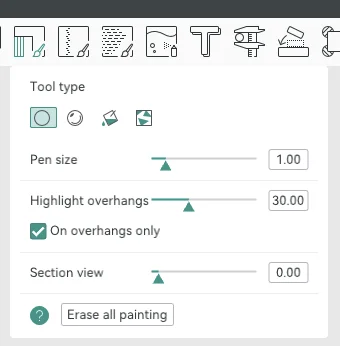
With the support painting tool you mark directly on the model where you want supports and where you don’t. With a manual support type, they are only generated where you’ve painted; with an automatic one, you can paint blockers to avoid supports in specific areas, such as a visible face. Combined with tree supports, it’s the most effective way to hold up figures and organic parts without ruining the finish.
Seams: painting and scarf joint
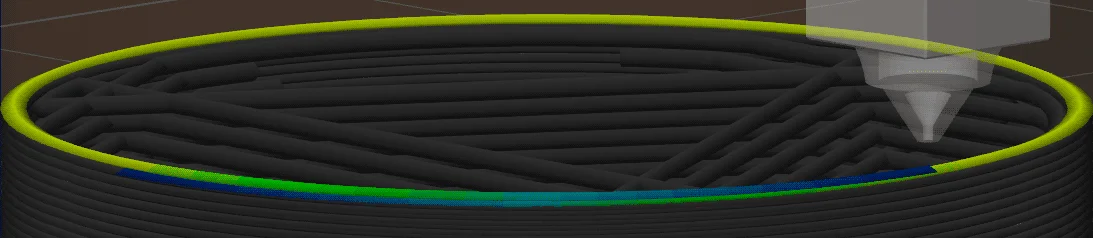
The seam is the point where each perimeter starts and ends, and it usually leaves a small mark. OrcaSlicer gives you three tools to control it:
- Seam position: nearest, aligned, aligned back, back or random, among others.
- Seam painting: mark on the model where you want to force or block it, to hide it on an edge.
- Scarf joint (scarf joint seam): instead of starting and ending the perimeter at the same point, it overlaps the start and end in a ramp, varying height and flow. On cylindrical or rounded parts it can make the seam almost invisible. It has quite a few parameters, so it’s best to try it first on a small part.
More precise perimeters
The Quality tab has several settings that improve dimensional accuracy and finish. The Wall generator can be Classic or Arachne; Arachne varies the line width to fill thin walls and small details better. The Precise wall setting adjusts the spacing of the outer wall to improve dimensions, the Inner/Outer/Inner order (“sandwich mode”) improves the outer finish without losing accuracy, and the convert holes to polyholes option makes holes come out at their true size.
Ironing and fuzzy skin
The Ironing (ironing) makes an extra pass over the top surfaces with very little flow to leave them smooth, at the cost of more time. The Fuzzy skin (fuzzy skin) does the opposite: it adds random jitter to the outer perimeters to give a texture that hides the layers and offers good grip. It can be applied to the whole part or painted only on specific areas.
Multicolour and per-feature filament
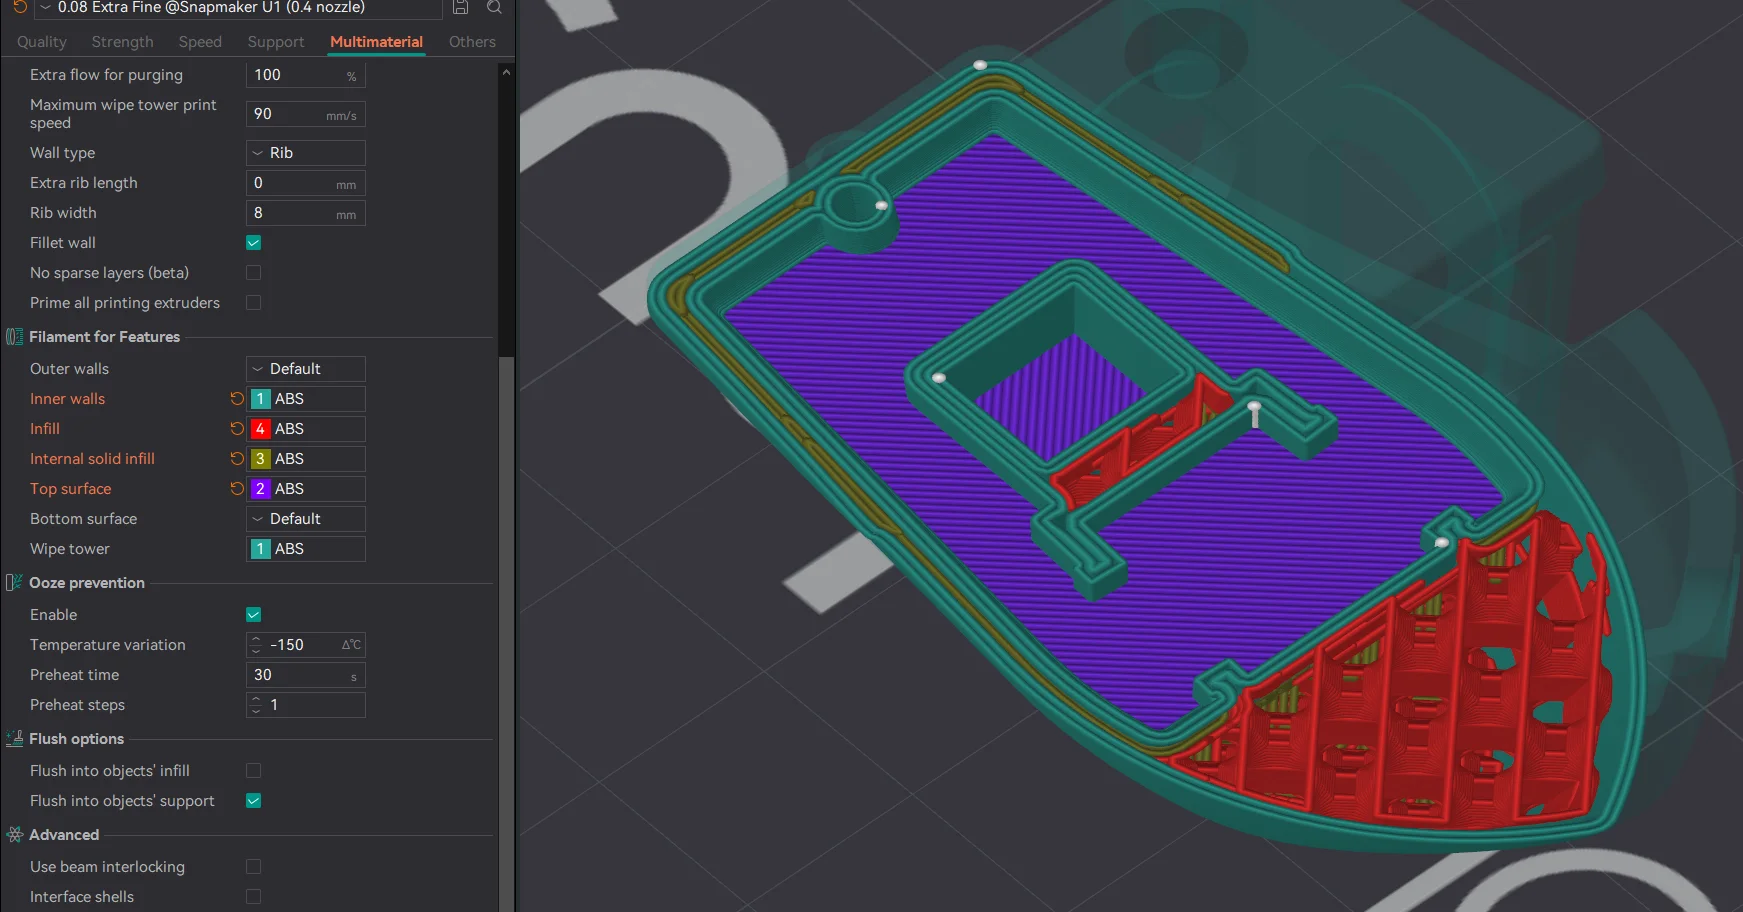
If you have a multicolour printer, whether with a filament changing system, several heads or a tool changer, OrcaSlicer offers:
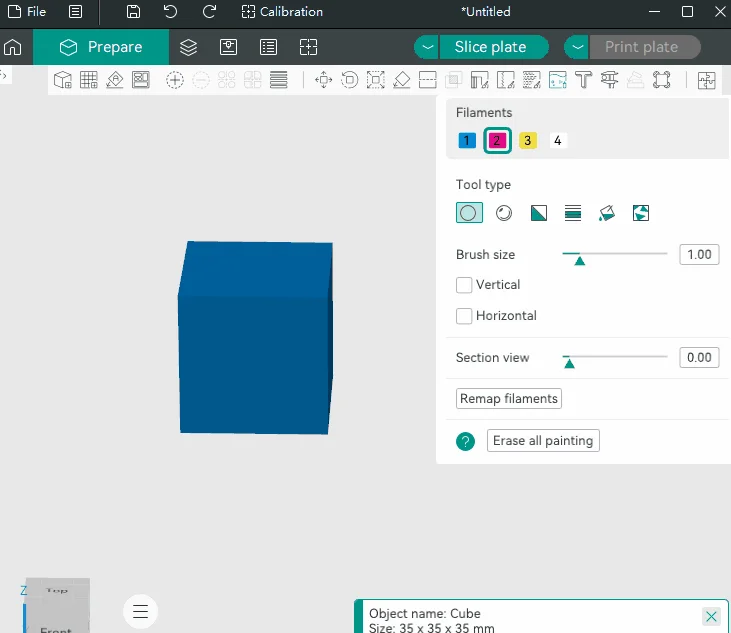
- Colour painting: you assign filaments by painting on the model, or per part from the object list.
- Per-feature filament (Multimaterial tab): assigns a different filament to each part of the print, such as outer and inner walls, infill, top or bottom surface. It allows things like printing only the outer walls in one material and the rest in another.
- Prime tower and flushing volumes: the tower collects the material from each change, and the flushing volumes table sets how much is purged between each pair of colours. To waste less, you can purge into the infill or into the part’s own supports.
Text, boolean operations and other tools
OrcaSlicer includes simple editing tools that save you from opening a CAD program: adding embossed or engraved text on a part, mesh boolean operations (union, subtract or intersect parts), simplifying the model if it has too many triangles, and the Measure tool to check distances between points, edges and faces.
What the current OrcaSlicer series brings
OrcaSlicer releases several stable versions a year, and the current 2.x series brings important changes. These are the ones you’ll notice most:
- Orca Cloud: the project’s free, optional service for syncing profiles between computers, with version history for each profile and profile bundles that the community can share and you can subscribe to. If you subscribe to one, OrcaSlicer notifies you when its author publishes an update. For now the data is hosted in the United States. It replaces syncing through the Bambu Lab cloud, which is no longer used for profiles (it is still used to control Bambu printers).
- Z contouring (ZAA): an Expert mode feature for curved or sloped top surfaces, which we explain just below.
- Expert mode: the mode selector now has three positions, to separate experimental options from everyday tuning ones.
- Improved bridges: a dedicated line width for bridges and bridge direction relative to the model, among other changes.
- Expanded per-feature filament, which now also works on single-extruder printers with filament changing.
- Realistic view: new rendering options with Phong shading, ambient occlusion and cast shadows on the bed, which help you see the shape of parts better.
- Native Moonraker for sending jobs to Klipper without going through OctoPrint emulation, plus an option to send jobs as 3MF instead of G-code.
- Troubleshooting centre (Help menu): gathers logs, system information and the option to rebuild the profile cache, useful if something breaks and you want to report it.
- More platforms: native Windows on ARM64 version and an installation channel on the Microsoft Store.
Z contouring: top surfaces without steps
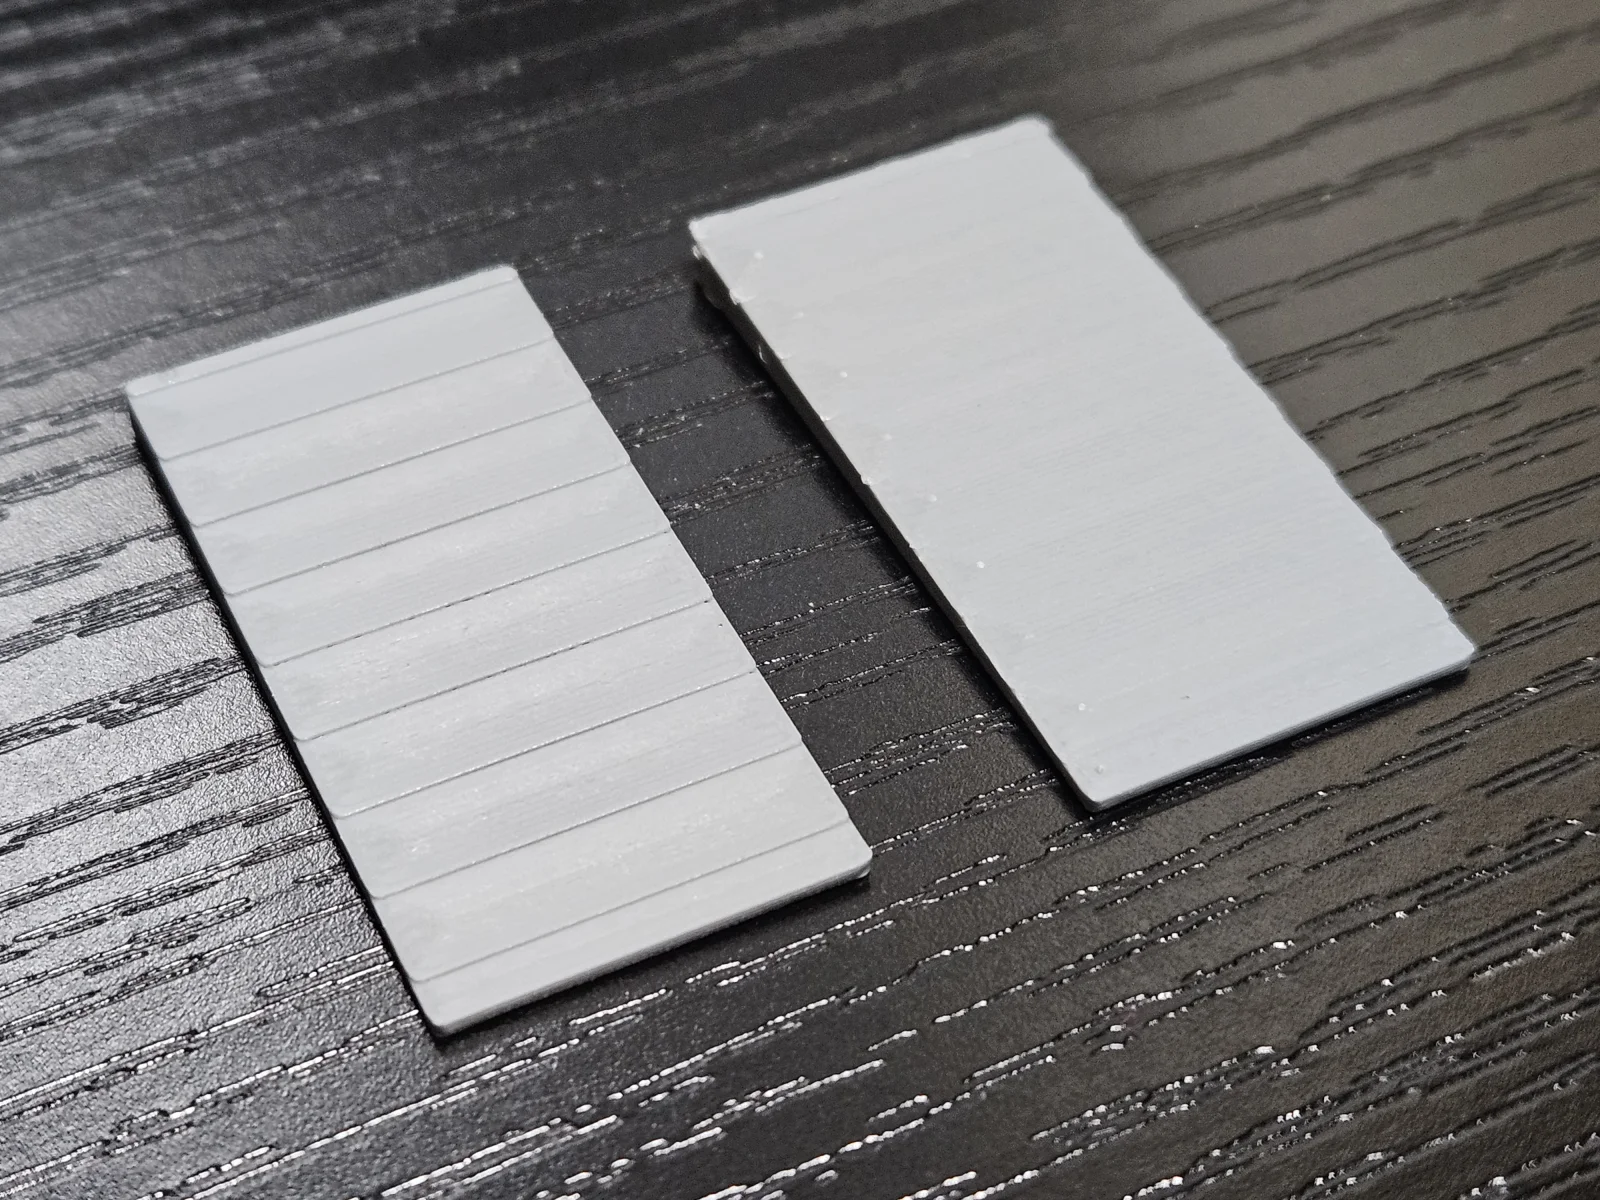
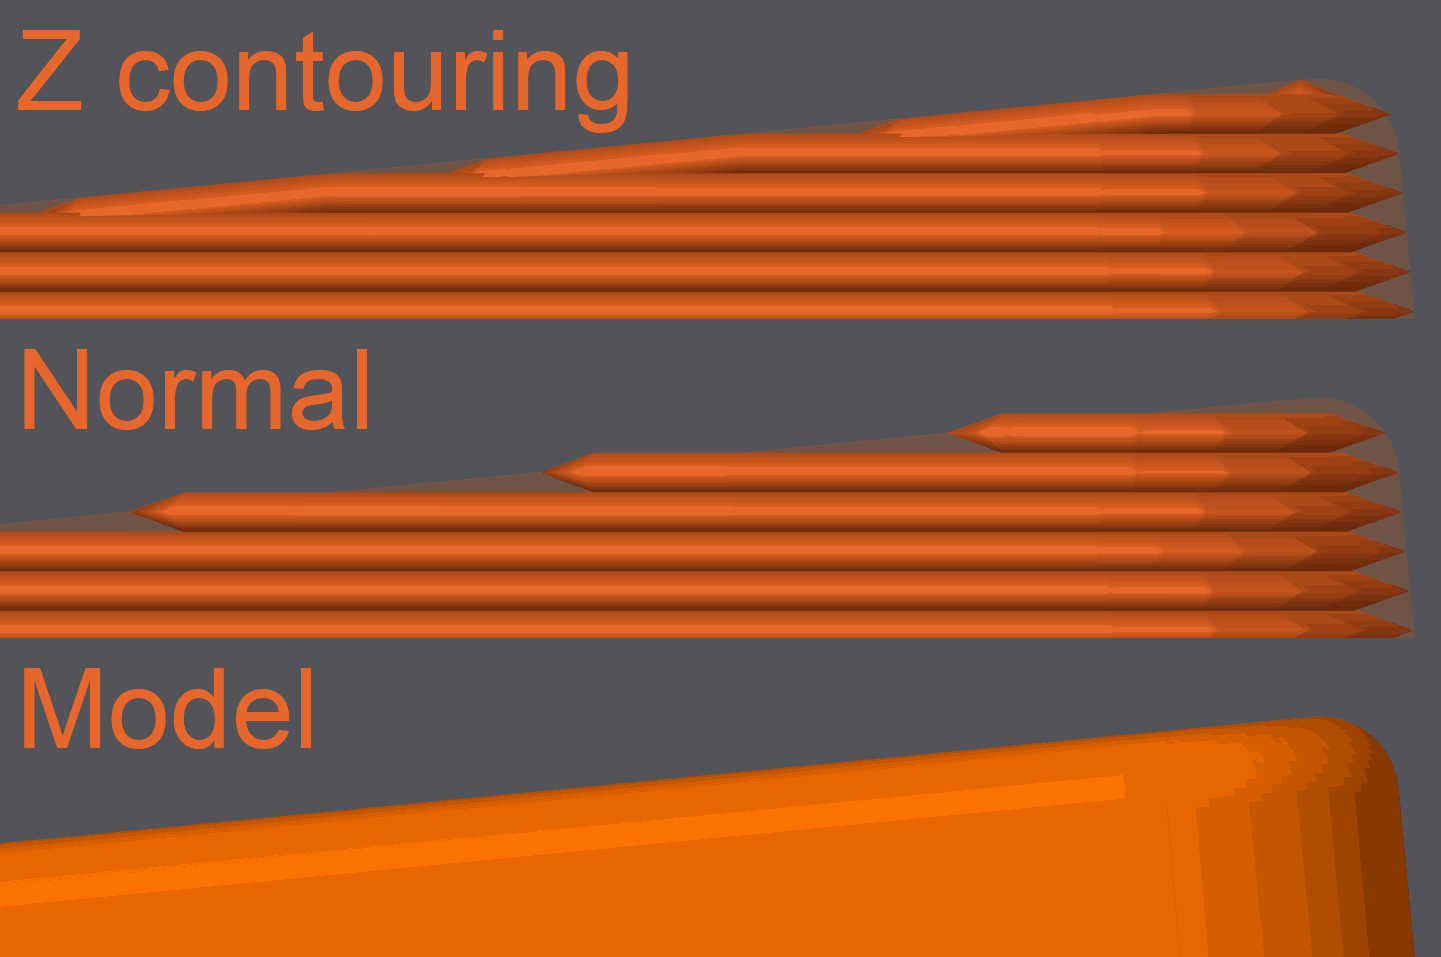
In any slicer, a dome or a gentle ramp comes out with steps, because each layer is printed at a fixed height. Z contouring (also called ZAA, Z anti-aliasing) adjusts the height of each point of the top toolpaths to follow the true surface of the model, so within a single layer the nozzle moves slightly up and down. It smooths domes, chamfers and gentle slopes without changing the layer height for the rest of the part. It’s in the Quality tab in Expert mode, and the wiki clarifies that it only works on upward-facing surfaces: downward-facing curves don’t benefit.
OrcaSlicer, PrusaSlicer and Bambu Studio: which one suits you
OrcaSlicer is not alone. Today there are two other free reference slicers, and all three share the same origin: Bambu Studio is a fork of PrusaSlicer, and OrcaSlicer is a fork of Bambu Studio and PrusaSlicer. That’s why they look so alike in how they work and share a project format. None of them wins at everything: each is designed for something different.
- OrcaSlicer: the most versatile and the one most tied to the community. It doesn’t belong to any manufacturer, collects profiles from a huge number of brands and comes with the widest set of built-in calibrations. The downside is that it changes fast and the number of options can be overwhelming.
- PrusaSlicer: the one that integrates best with Prusa printers (finely tuned profiles, Prusa Connect and Printables), with very complete official documentation and more widely spaced stable releases. It works with printers from many other brands.
- Bambu Studio: a similar philosophy, but its strong point is integration with Bambu Lab printers: remote control and monitoring, the AMS multicolour system and calibrations guided by the printer itself.
Point-by-point comparison
| Criterion | OrcaSlicer | PrusaSlicer | Bambu Studio |
|---|---|---|---|
| Licence | AGPLv3 (the network plug-in for Bambu Lab printers is optional and not open source) | AGPLv3 | AGPLv3 (the Bambu Lab network plug-in is optional and not open source) |
| Platforms | Windows (x64 and ARM64), macOS and Linux (Flathub and AppImage) | Windows, macOS and Linux (Flathub) | Windows, macOS and Linux (AppImage and Flathub) |
| Tie to a manufacturer | None: community project | Prusa Research: Prusa Connect, Printables and system profiles | Bambu Lab: remote control, AMS and MakerWorld |
| Profiles from other brands | More than 60 manufacturers in its stable version | More than 30 manufacturers | 11 manufacturers besides Bambu Lab |
| Network sending to other printers | Klipper (Moonraker), OctoPrint, PrusaLink, Duet and services from several brands | Klipper (Moonraker), OctoPrint, PrusaLink, Duet and others | OctoPrint, PrusaLink and other legacy PrusaSlicer hosts |
| Multicolour and multimaterial | Colour painting, per-feature filament and prime tower | Multimaterial painting and ColorMix (virtual extruders) | Colour painting, AMS and mixed filaments |
| Supports | Normal (grid and snug) and tree (slim, strong, hybrid and organic), with painted supports | Grid, snug and organic, with paintable supports | Normal and tree (slim, strong, hybrid and organic), with painted supports |
| Built-in calibrations | Temperature, max volumetric flow, pressure advance, flow, retraction, cornering, input shaping, VFA, adaptive pressure advance and tolerances | Not built in on 2.x; 3.x, in alpha, adds flow and temperature towers | Guided calibrations with Bambu Lab printers and tests for other printers |
| Community and documentation | Official wiki open to contributions and official Discord | Official Prusa knowledge base, very complete | Official Bambu Lab wiki, focused on its printers |
Manufacturer counts are based on the profiles included in each program’s latest stable version and change with every update.
When to choose each one
- You have a printer from any brand (Creality, Elegoo, Anycubic, QIDI, a Voron…) or you like fine-tuning with calibration tests: OrcaSlicer is the most flexible option.
- You have a Prusa or want a well-documented slicer with more measured stable releases: PrusaSlicer.
- You have a Bambu Lab and want to get the most out of the AMS, remote control and guided calibrations: Bambu Studio, although OrcaSlicer also works with them through the network plug-in.
Nothing stops you from having all three installed: they all open STL and 3MF, and it’s common to use one or the other depending on the printer or the job.
Our verdict
After years of using it, OrcaSlicer is the slicer we recommend most to anyone with a printer that isn’t a Prusa or a Bambu Lab, and one of the most complete for anyone who wants to understand and fine-tune their machine. It’s free, open source, cross-platform, doesn’t force you to create an account and doesn’t depend on any manufacturer. The built-in calibrations alone justify trying it: they turn into a couple of clicks what used to require downloading models and editing G-code by hand.
What to keep in mind:
- The number of options is overwhelming if you don’t start in Simple mode with a system profile.
- It evolves very quickly. That’s an advantage, but between versions names, options or the location of a setting sometimes change, so it’s worth reading the release notes before updating.
- The quality of the profiles depends on each manufacturer or whoever contributes them: some are very well tuned and others are a starting point.
- The Spanish translation of the interface has some unnatural terms, such as «unión de bufanda» or the «Fuerza» tab.
- Download it only from orcaslicer.com or GitHub: fake sites exist.
If you’re just starting out, install it, pick your printer in the wizard and run the temperature tower and the flow test with your usual filament. You’ll notice the difference from the first part.


