


PrusaSlicer is one of the most complete slicers out there, it is free, and although it is developed by Prusa Research, it is not exclusive to Prusa printers: it ships with profiles for printers from many other brands and lets you configure any FDM machine by hand. The integration with its own brand’s printers is obvious (fine-tuned profiles, Prusa Connect, Printables), but it works just as well with a printer running Marlin or Klipper.
At 3Dwork we have used it since its early versions, and this guide covers what is worth knowing to get the most out of it. The first part is for people just starting out: what a slicer is, how to install PrusaSlicer and how to go from an STL to a file ready to print. The second is for users with some mileage: the everyday features and the advanced tools that make a difference. Menu and button names are those of the English interface.
What a slicer is and what it does
A 3D printer does not understand 3D models. What it runs is a list of very simple commands: move to this point, at this speed, extruding this much plastic, at this temperature. That list is called G-code and it is generated by a program called a slicer.
A slicer does three things:
- It cuts the model into horizontal layers of the thickness you choose (the layer height).
- It calculates the toolpaths for each layer: the outer walls (perimeters), the interior infill, the solid top and bottom layers and, if needed, the supports for the areas that would otherwise hang in the air.
- It translates everything into G-code using the settings for your printer and your filament: temperatures, speeds, fan, retractions.
That is why the same STL can come out very well or very badly depending on how you slice it. Mastering the slicer is half of the result.
Where PrusaSlicer comes from
Its origin is Slic3r, a project that Alessandro Ranellucci started in 2011. Prusa created its own branch, Slic3r Prusa Edition, in November 2016, and in May 2019 renamed it PrusaSlicer 2.0, because it had already drifted a long way from the original Slic3r. It is free software under the AGPLv3 license, its code is on GitHub, it does not require you to create an account, and it works for both FDM and resin (SLA), although this guide focuses on FDM.
In the first version of this guide, in 2020, we compared it with Simplify3D, which was then the paid reference. Today that comparison no longer makes sense.
Where to download PrusaSlicer: versions and systems
Always download it from official sources: the PrusaSlicer page on prusa3d.com, Prusa’s Drivers & Apps package, or the releases section of the GitHub repository.
- Windows: .exe installer, or a .zip if you prefer not to install. The Drivers & Apps package also includes test models and drivers; you can install only PrusaSlicer.
- macOS: .dmg image. You install it by dragging the application into the installer window.
- Linux: the official channel is Flatpak through Flathub. Install Flatpak, add the Flathub repository and install PrusaSlicer from your distribution’s software center or from the terminal. If you do not have administrator permissions, you can do everything with the
--useroption.
Two branches coexist today. PrusaSlicer 2.x is the stable one and the one you should use to print (the latest version is 2.9.6, from June 2026). PrusaSlicer 3.x is in alpha: it brings a new interface, but it is not finished yet; we summarize it at the end. Test versions keep their profiles in a different folder, so they can be installed without messing up the configuration of the stable one.
Getting started with PrusaSlicer
The configuration wizard
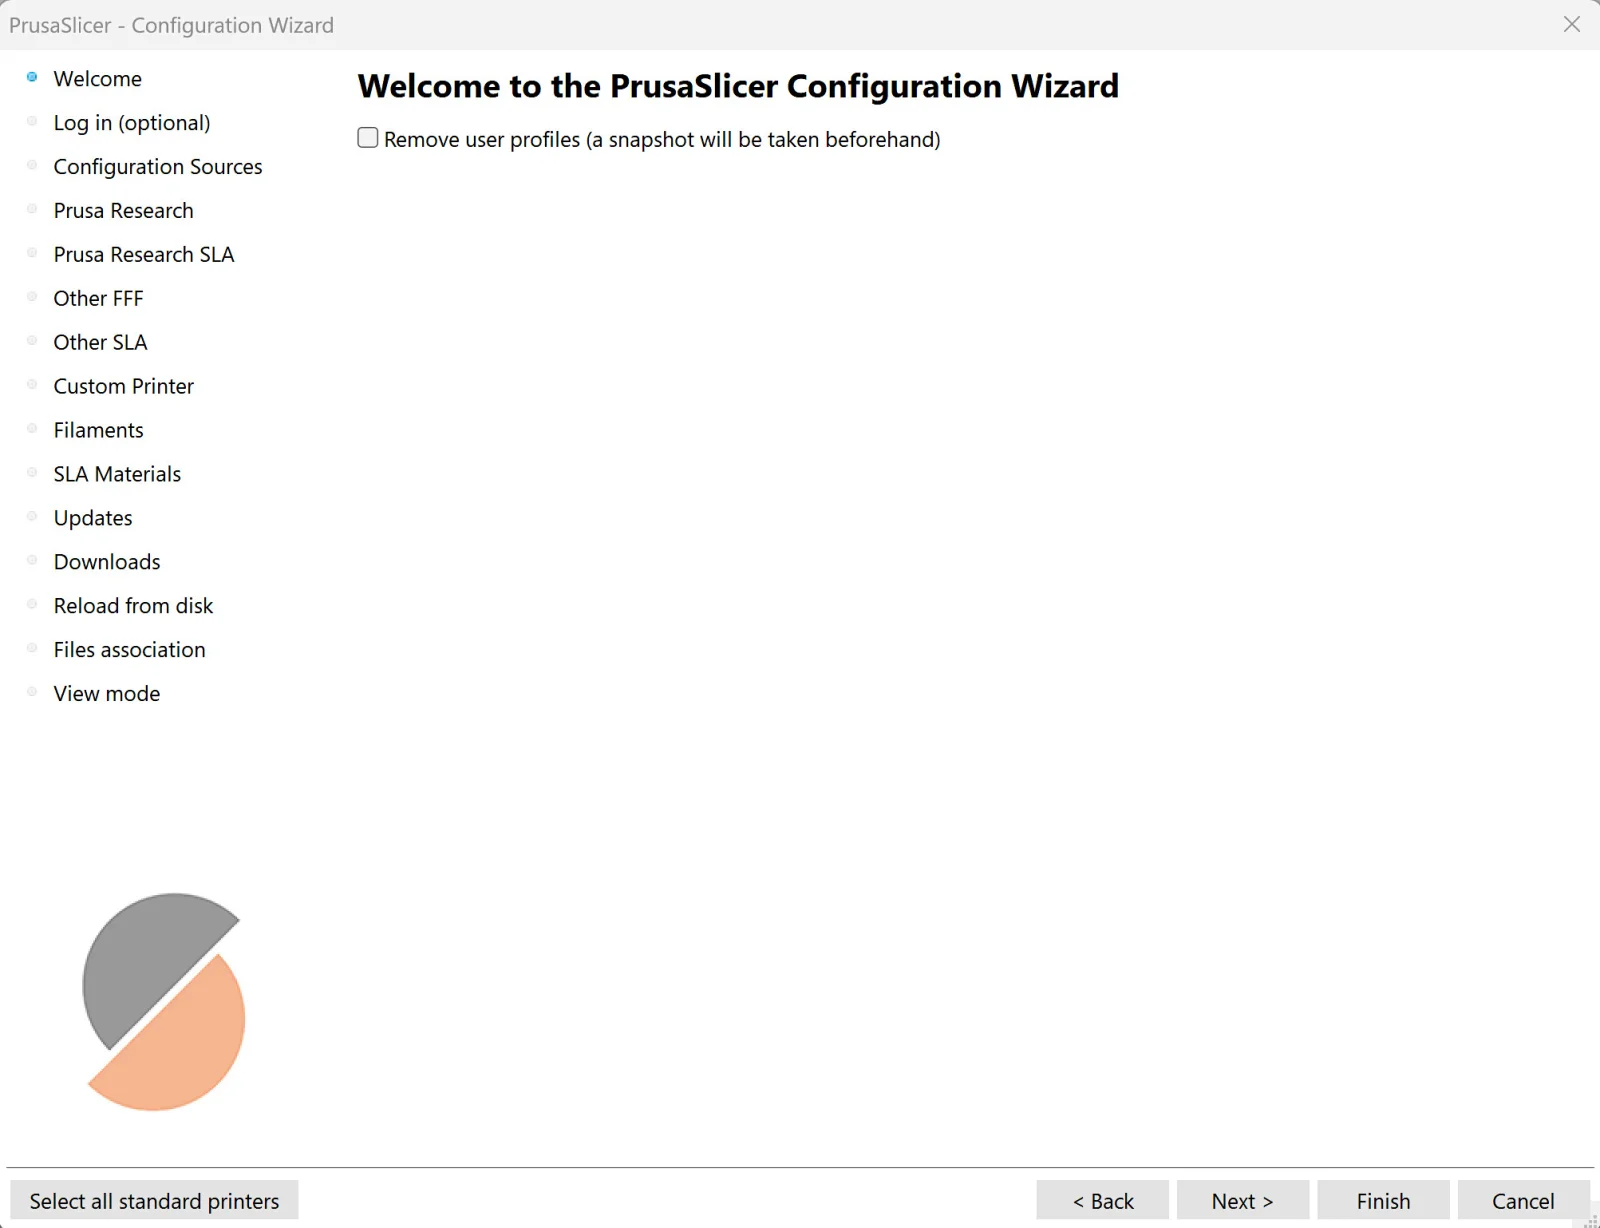
The first time you open PrusaSlicer, the Configuration Wizard appears (on macOS, Configuration Assistant). To get back to it later, for example to add another printer, go to Configuration > Configuration Wizard. Yes, it goes by two different names depending on the platform. Its steps:
- Welcome. It includes an option to delete all user profiles, useful if you want to start from scratch.
- Log in with Prusa Account (optional). If you log in, PrusaSlicer downloads profiles automatically and enables Prusa Connect. You can skip it.
- Configuration sources. If you have not logged in, you choose between Prusa’s online sources or loading profiles from a local file.
- Printer profiles. There are pages for Prusa printers, another one for printers from other manufacturers (you pick the brand and then the model) and an option to define a custom printer if yours does not appear.
- Filaments. Grouped by compatible printer, material type and manufacturer. Those marked with an asterisk are not compatible with one of your printers.
- Updates, downloads and file association. Update checks, opening Printables.com models with one click, and PrusaSlicer as the default program for 3MF and STL.
- View mode. Level of detail of the interface, and metric or imperial units.
Everything you choose here can be changed later, so there is no need to get it right the first time.
The interface, piece by piece
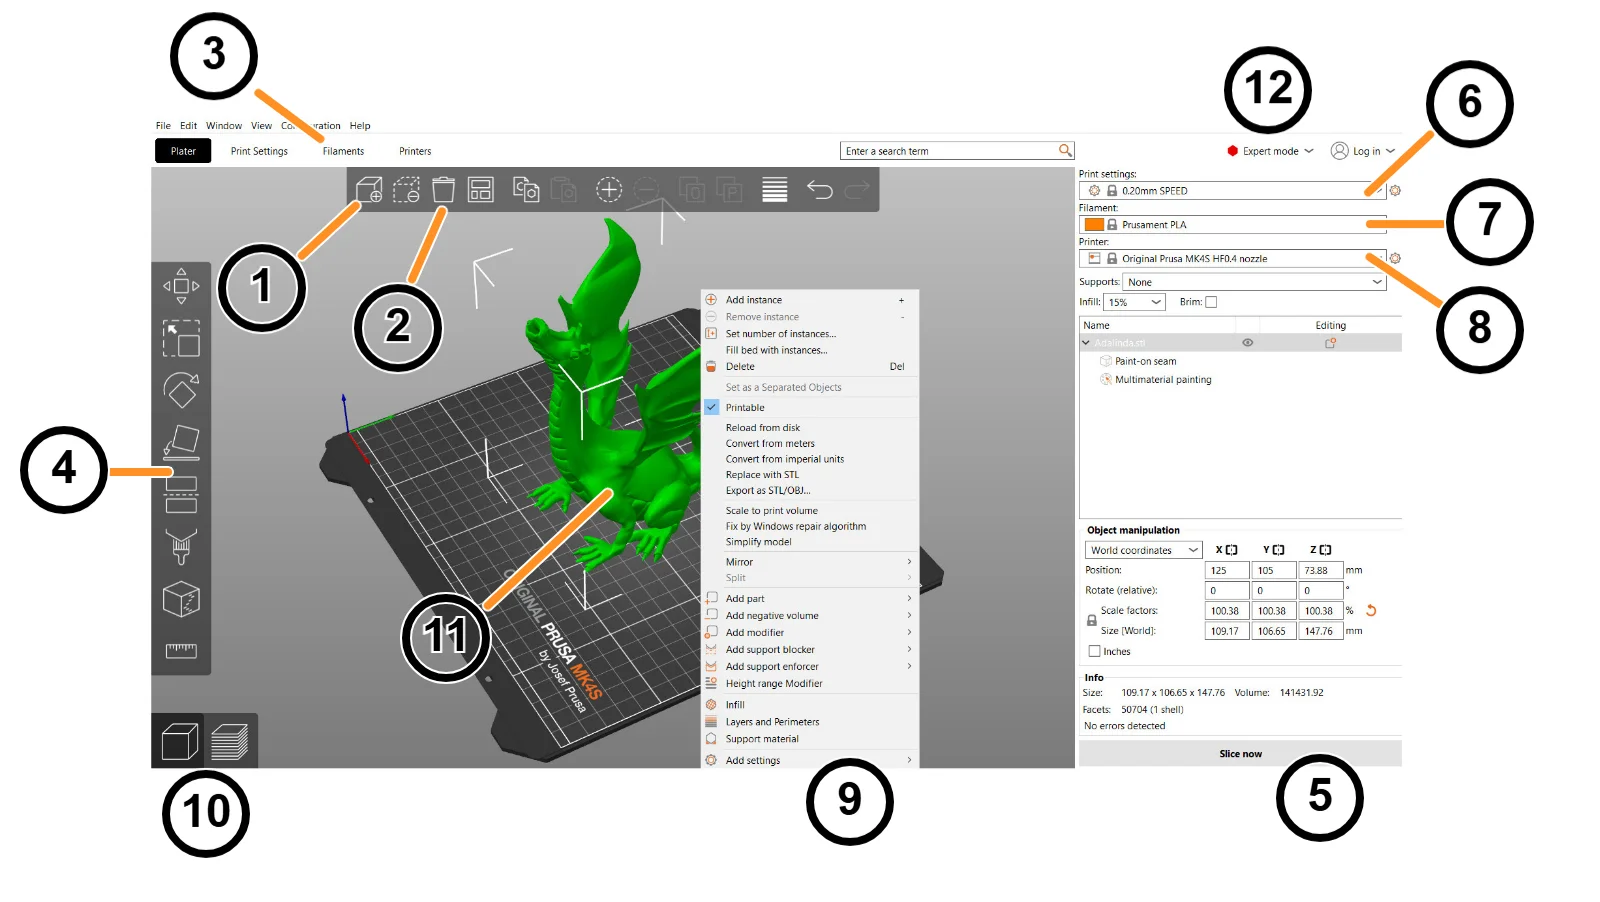
At the top left are the tabs that organize the program: Plater, where you prepare your parts; Print Settings, Filaments and Printers, where the profiles are edited in depth; and Printables, the built-in model browser. In the Plater, the 3D view takes up almost the whole screen and around it you will find this:
- Top bar: Add, Delete, Delete all, Arrange, copy and paste, instances, variable layer height, Undo and Redo.
- Left bar: Move, Scale, Rotate, Place on face and Cut, plus the painting tools (supports, seams, multimaterial) and the measure tool.
- Right panel: the three profile selectors and the most-used quick settings (Supports, Infill and Brim), the object list with its position and size, and the Slice now button.
- Bottom left corner: the switch between the 3D view and the layer preview. It can also be toggled with the Tab key.
- Top right: the mode selector and the Prusa Account login.
Two notes on the Spanish translation of the interface: the Brim option (extra loops around the first layer to improve adhesion) appears there as Balsa, which is not the same as a real raft, and the print bed almost always appears as “base”.
Importing the model
Drag the file into the window, use the Add button in the top bar, or go to File > Import. PrusaSlicer supports STL, STEP, 3MF, OBJ and AMF. If the model comes from Printables, you can open it directly from the Printables tab (we cover it below).
Move, scale and rotate
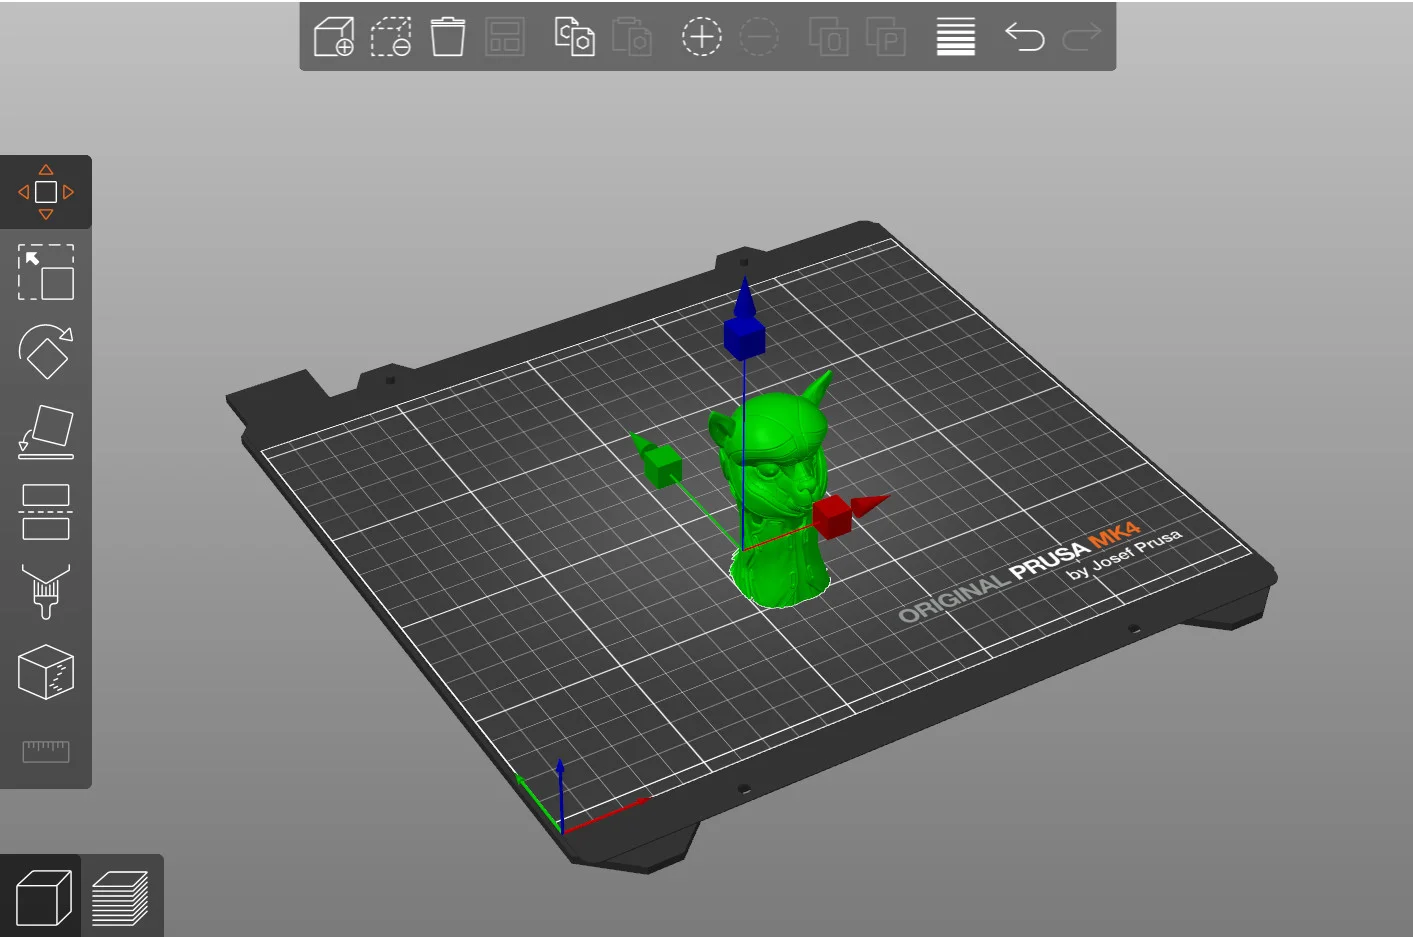
- Move (M): drag the part or use the arrows for each axis. You can even sink part of the model below the bed to print only what remains above it; the Drop to bed button puts it back in place.
- Scale (S): the corners scale uniformly and the handles on each axis scale separately. With the F key, the part is fitted to the printer’s maximum size.
- Rotate (R): when you choose an axis, two circular guides appear: the short ticks rotate in 5-degree steps and the long ones in 45.
If you prefer exact values, the right panel shows the position, rotation, scale and size of the selected part, and you can type them in directly.
Place on face
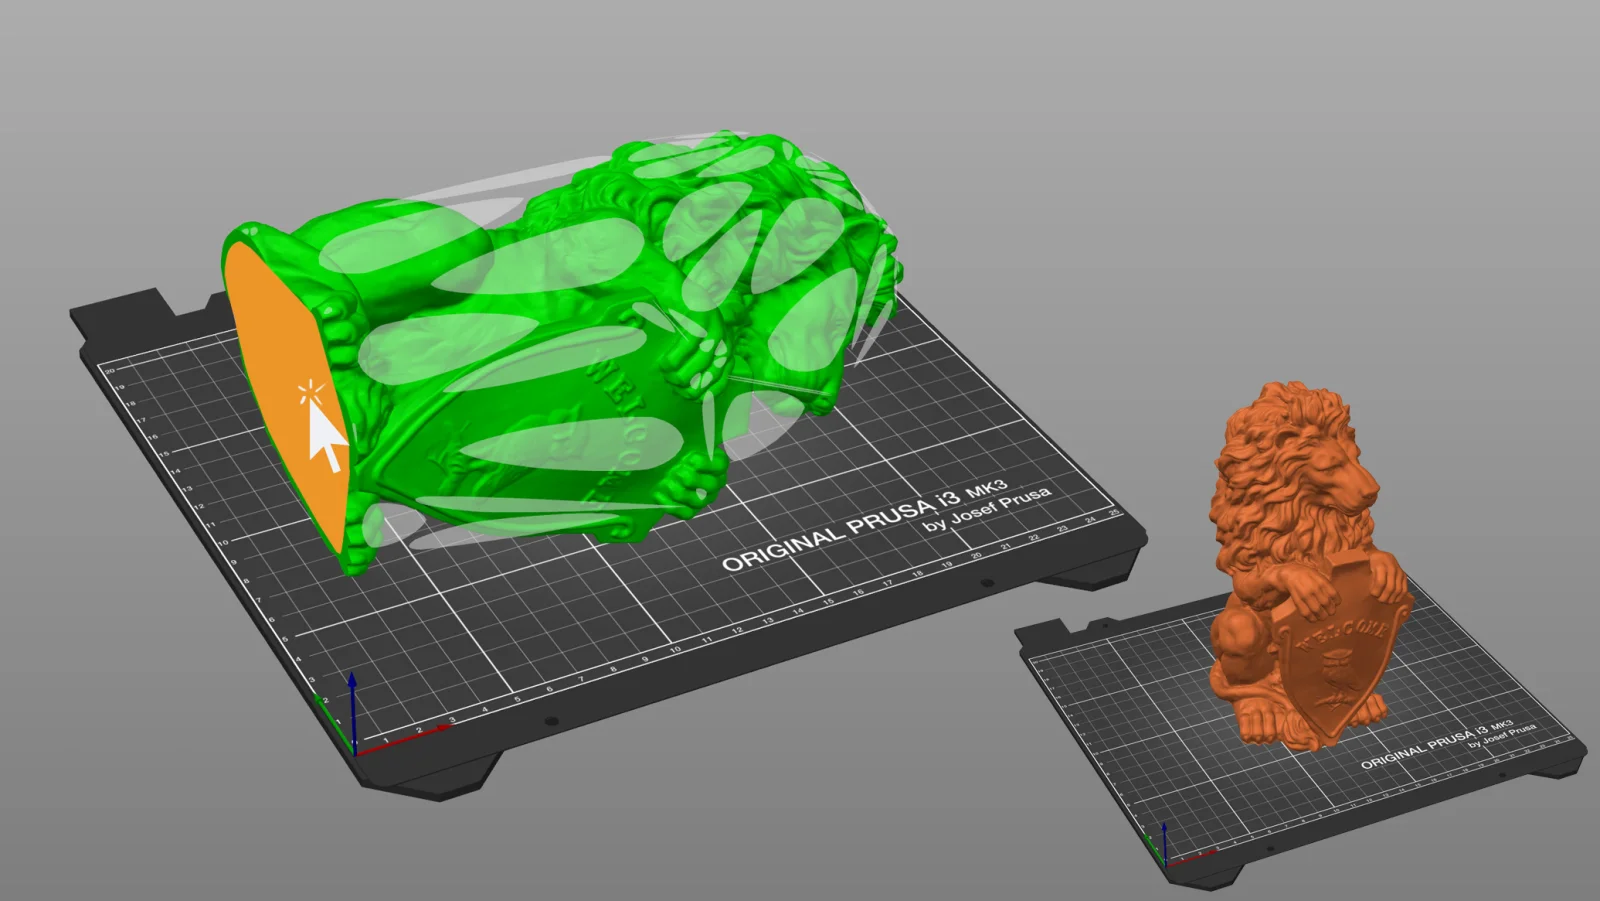
It is the fastest way to orient a part that was imported lying down or upside down. Select the model, press the F key or choose Place on face in the left bar, and click one of the white planes that appear: that face now rests on the bed. A good orientation reduces supports, improves the finish and makes the part stronger in the direction that matters.
Slicing and checking the preview
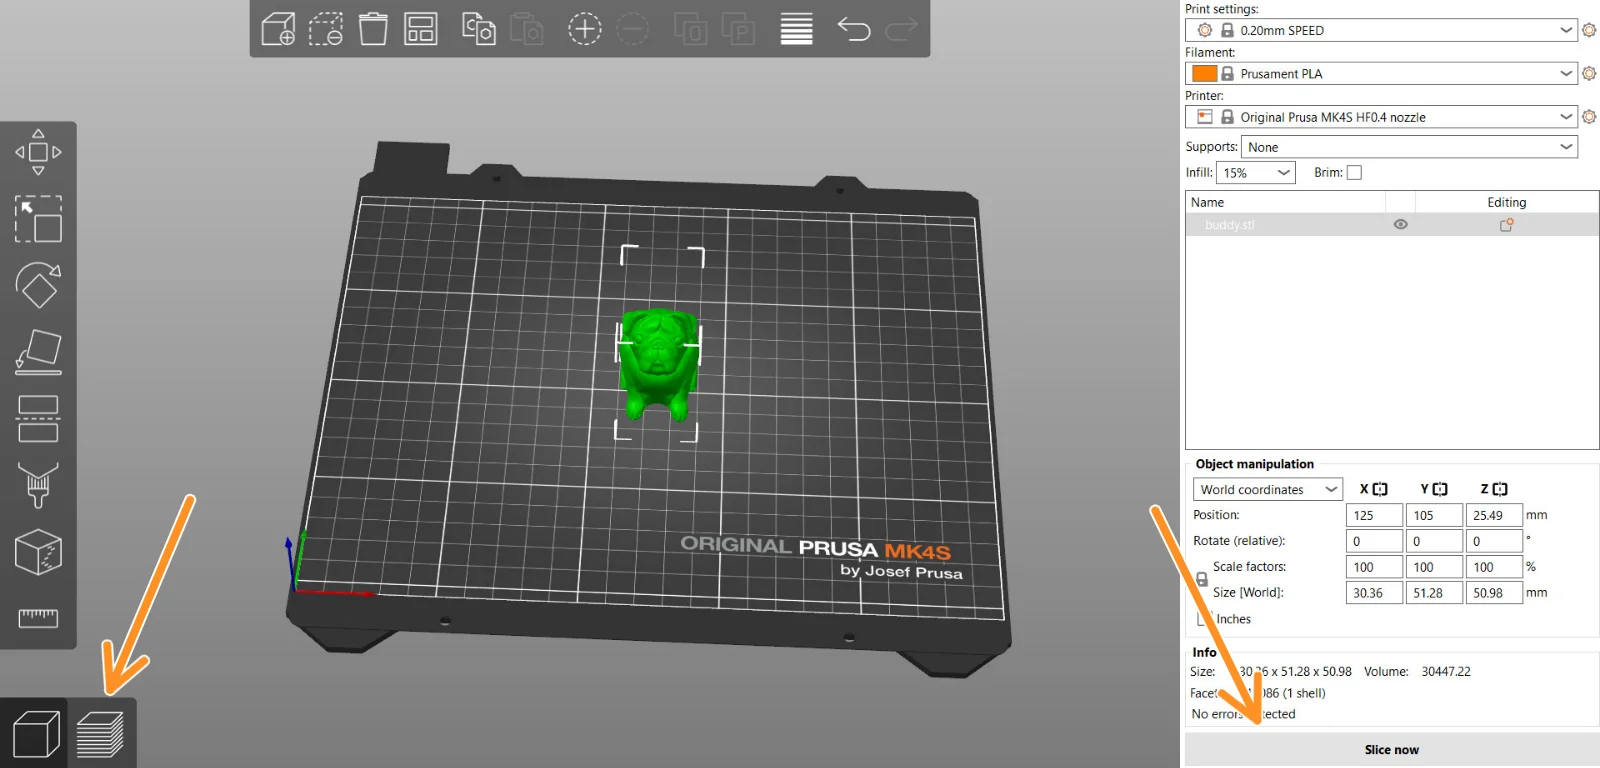
- Check the three profiles in the right panel: print, filament and printer. If you chose them in the wizard, they will already be fine; we explain them in depth in the next section.
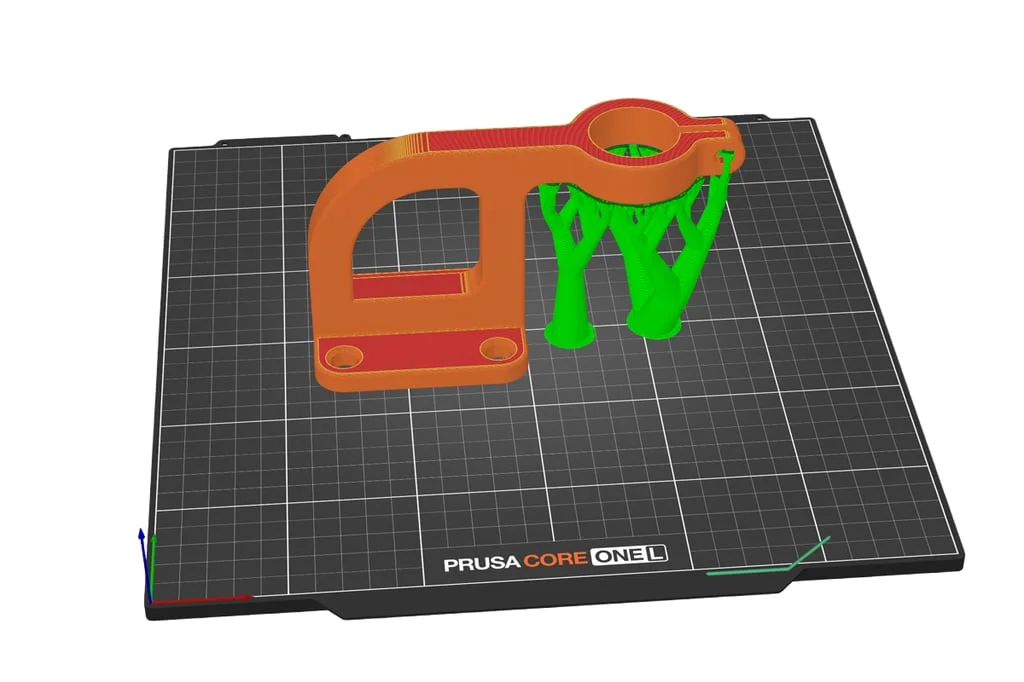
- Decide whether you need supports. In the Supports dropdown, choose Everywhere or Support on build plate only if the part has areas that would hang in the air.
- Adjust infill and brim. The Brim checkbox adds loops to the first layer, useful if the base of the part is small or the material tends to lift.
- Press Slice now. PrusaSlicer generates the G-code and switches to the preview on its own.
- Review layer by layer with the vertical slider on the right. Check that the shape matches the model and look for areas that start printing in mid-air. The legend shows the print time and the percentage taken up by each extrusion type (perimeters, infill, supports…), and its labels let you show or hide each type.
Exporting the G-code
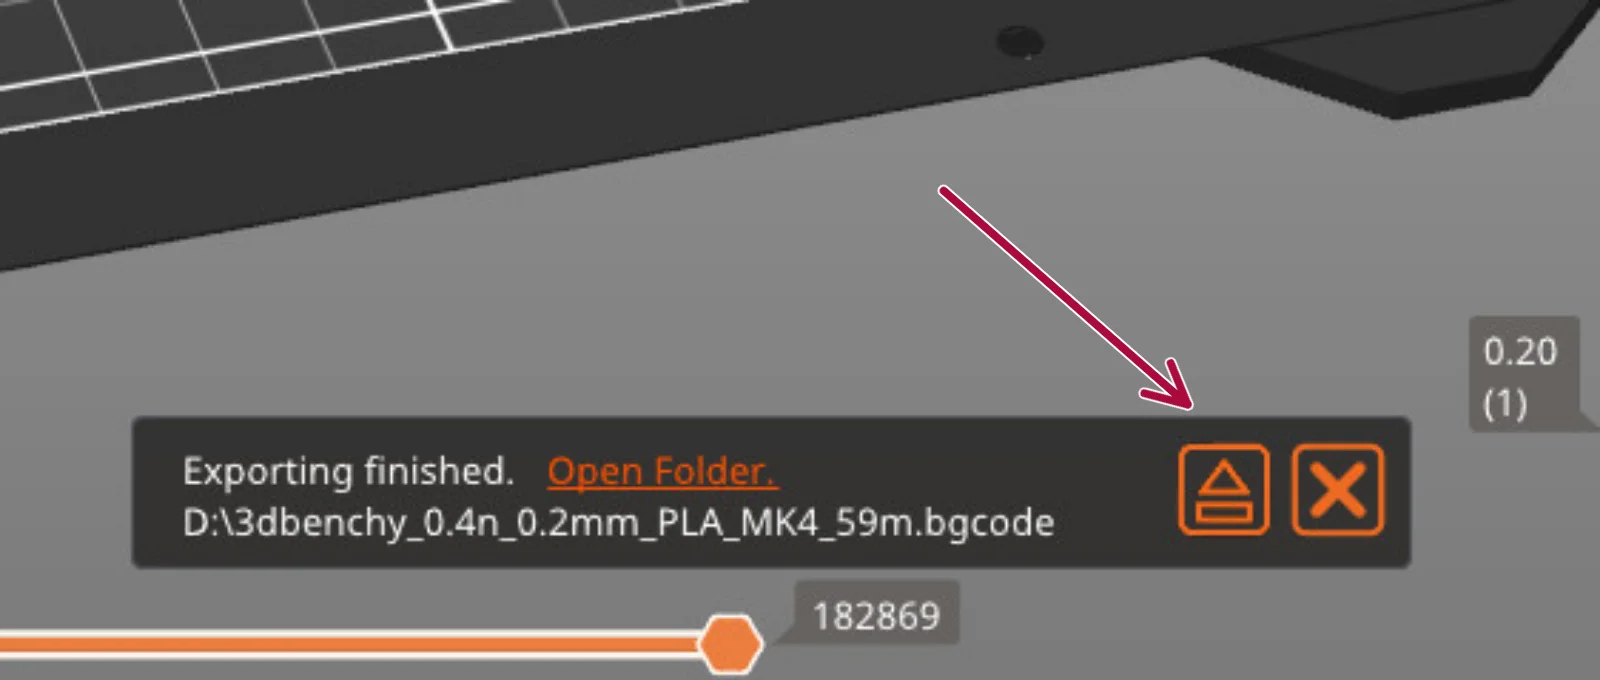
Press Export G-code to save the file. If PrusaSlicer detects an SD card or a USB drive, the Export to SD card / Flash drive button appears next to it, which targets that drive directly, and a button to eject it when finished. If your printer is on the network, you do not need to go through the card: we explain that in the everyday features.
PrusaSlicer profiles: print, filament and printer
Everything PrusaSlicer needs to know in order to slice is split across three profiles, which are always active and are chosen in the right panel: print, filament and printer. Separating them has a huge advantage: if you change material you only change the filament profile, and if you want more quality on a specific part you only touch the print profile, without redoing everything else. The network connection is separate, in the physical printer, which is not part of these three profiles.
Each profile is edited in depth in its own tab (Print Settings, Filaments and Printers), with its settings grouped into pages on the left. If this is your first printer, the logical order is: printer (once), filament (one per material) and print (the one you choose for each job).
Print profile: how the part is printed
It defines the printing strategy. Its pages are Layers and perimeters, Infill, Skirt and brim, Support material, Speed, Multiple Extruders, Advanced, Output options, Notes and Dependencies. It is the profile you will change the most: it is normal to have several (a fast one, a detail one, a strong one) and choose according to the part. These are the settings worth mastering first.
Layer height (Layers and perimeters)
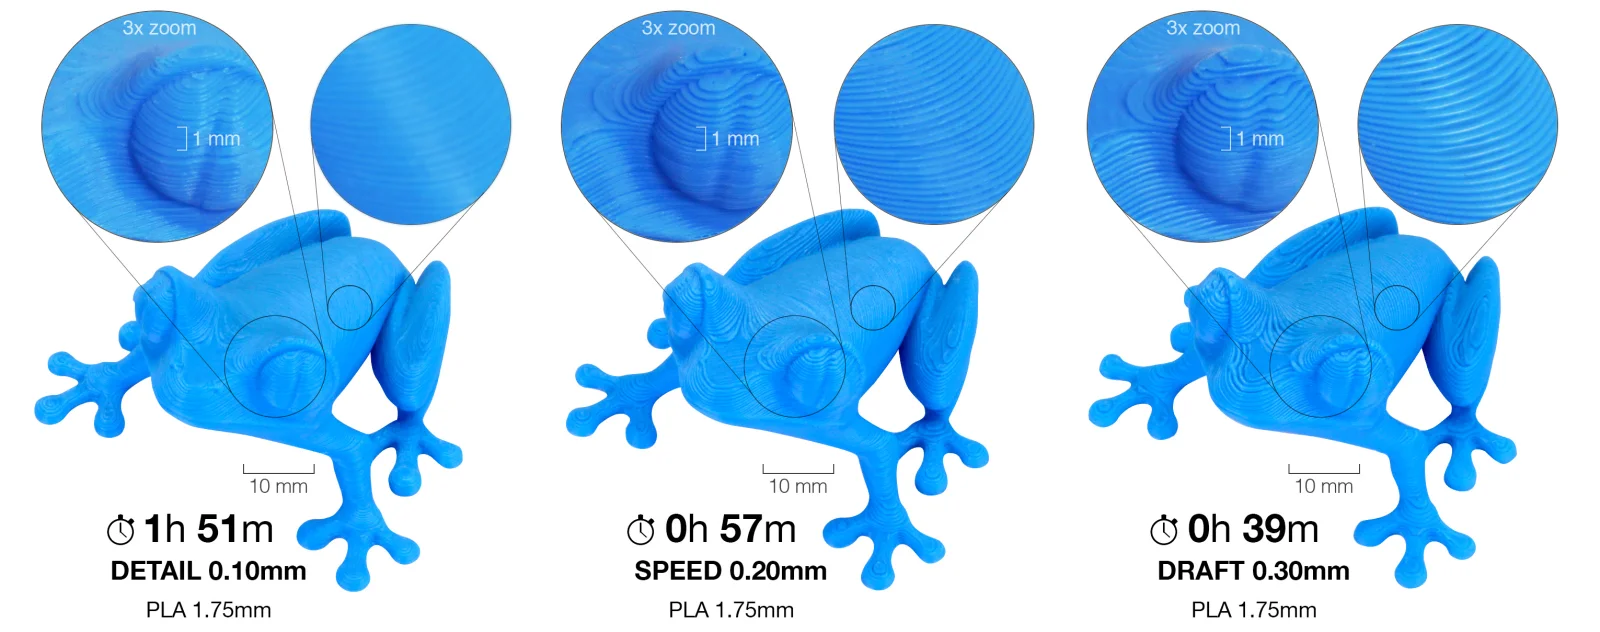
- What it controls: the thickness of each layer. It is what most affects print time and vertical resolution: taller layers print much faster, but they are more noticeable.
- When to change it: depending on the part. To start with, Prusa’s help recommends 0.15 or 0.20 mm; it advises against going below 0.10 mm, because the improvement is small and the time skyrockets, and it notes that the layer should stay below 80% of the nozzle diameter.
- A nuance: layer height only changes the vertical resolution. Embossed text parallel to the bed looks the same with any layer height; to gain detail in the XY plane you need a finer nozzle.
Perimeters (Layers and perimeters)
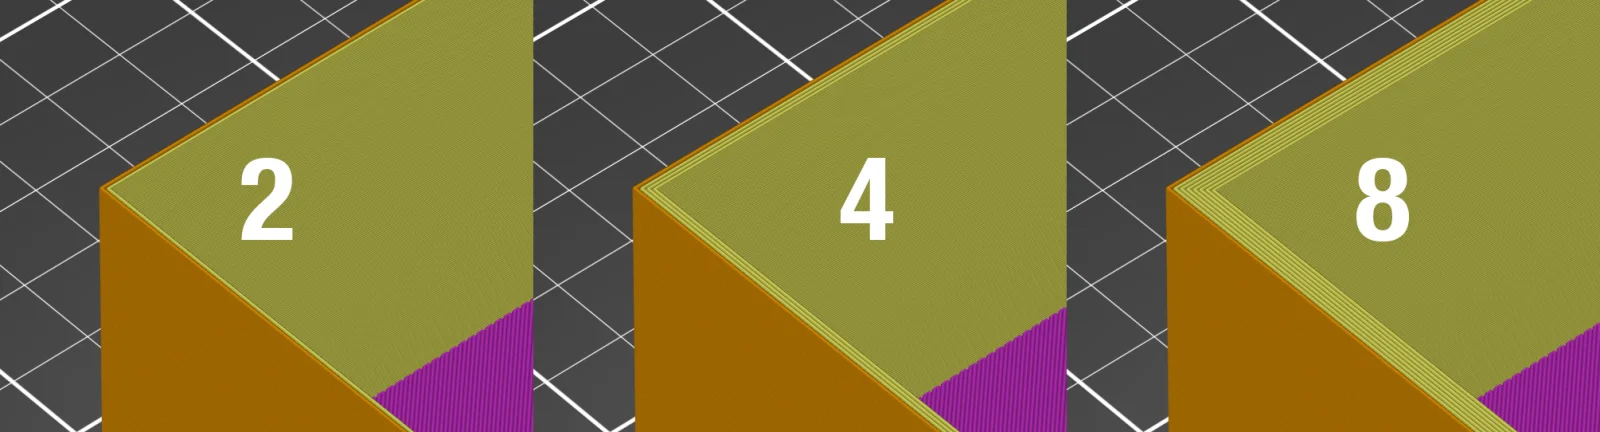
- What it controls: the minimum number of lines that make up the wall of the part.
- When to change it: when you need strength. According to Prusa, strength depends mostly on the perimeters and not on the infill, so it is the first thing to increase for a stronger part. On the same page are the top and bottom solid layers, which close the part at the top and bottom.
Infill: density and pattern (Infill)
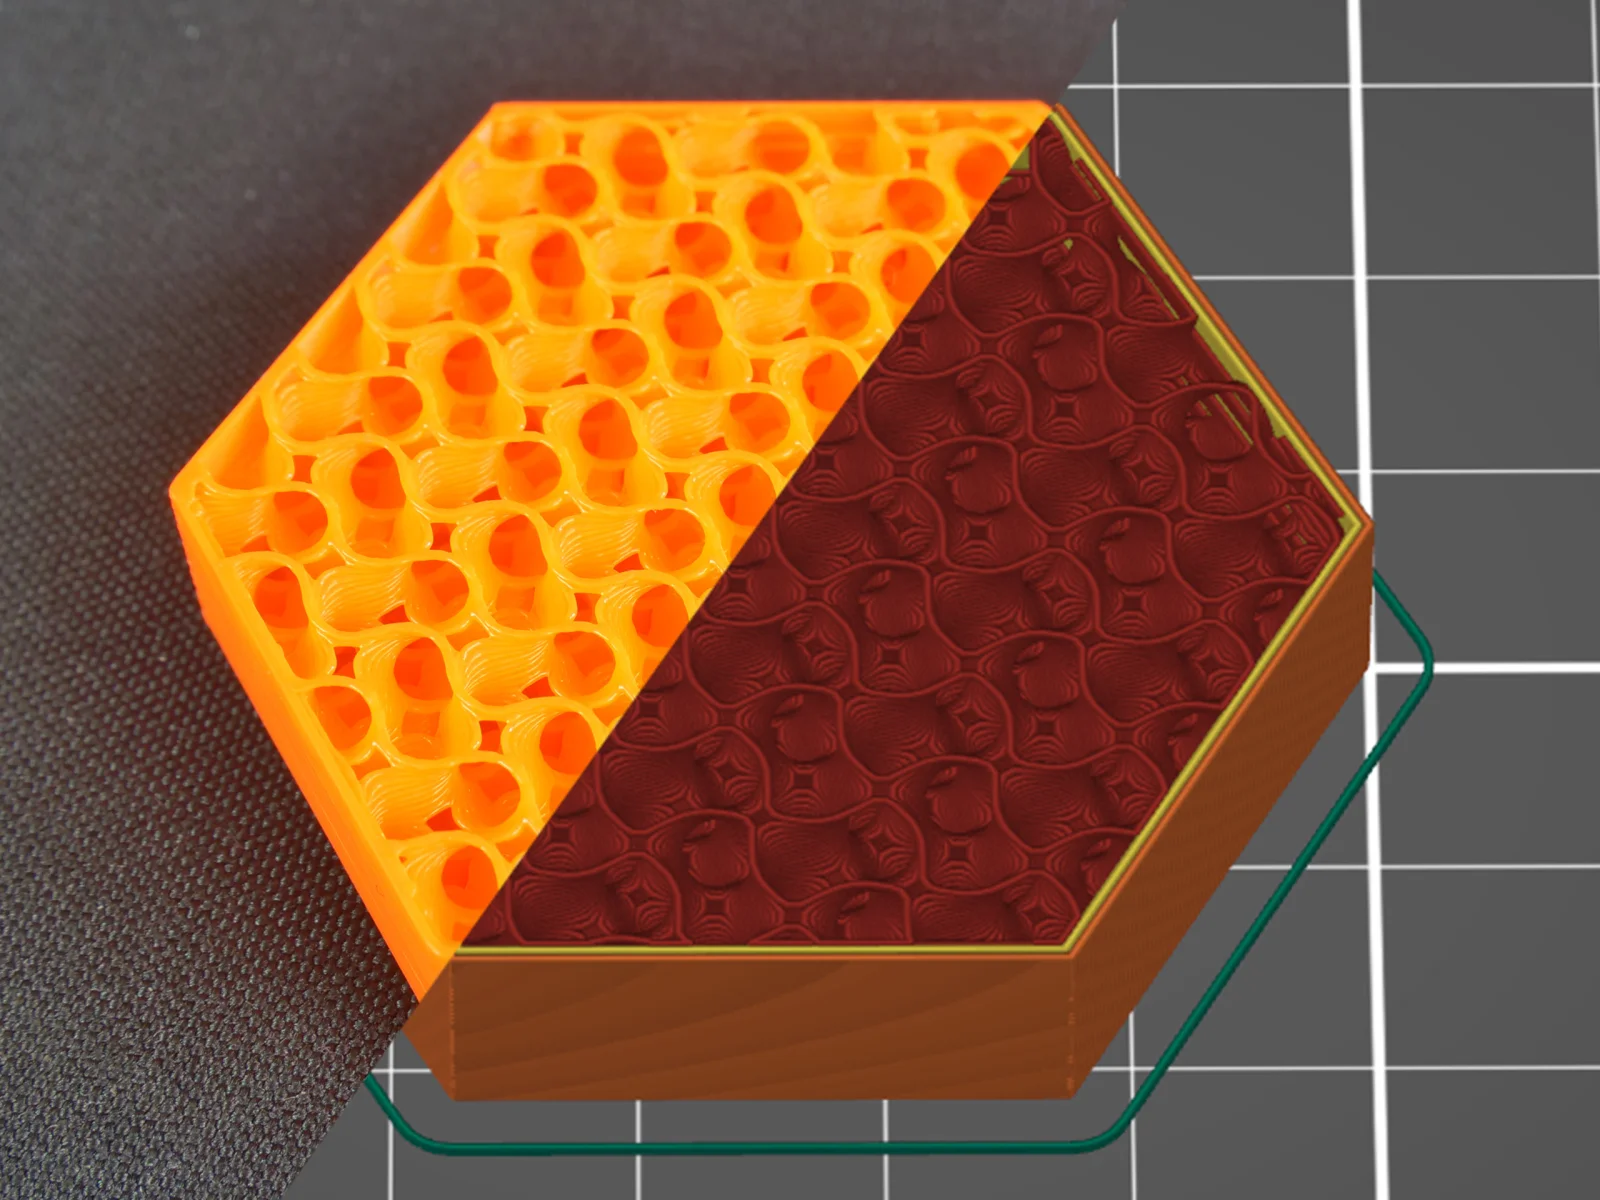
- What it controls: how much of the interior is filled and with what pattern. The infill supports the upper layers and affects time, filament use and stiffness.
- Density: according to Prusa’s help, most models print well with 10 to 15%, and it is rarely necessary to go above 30%. Raise it if you are after more weight, stiffness or compression resistance. At 100% the pattern switches to rectilinear and the appearance may get worse.
- Pattern: there are many. Gyroid is Prusa’s favorite: strong in all directions, fast, and with no crossings within the same layer. Adaptive cubic puts more infill near the walls and less in the center, useful on large parts. For visible faces there are dedicated top and bottom layer patterns.
Supports (Support material)
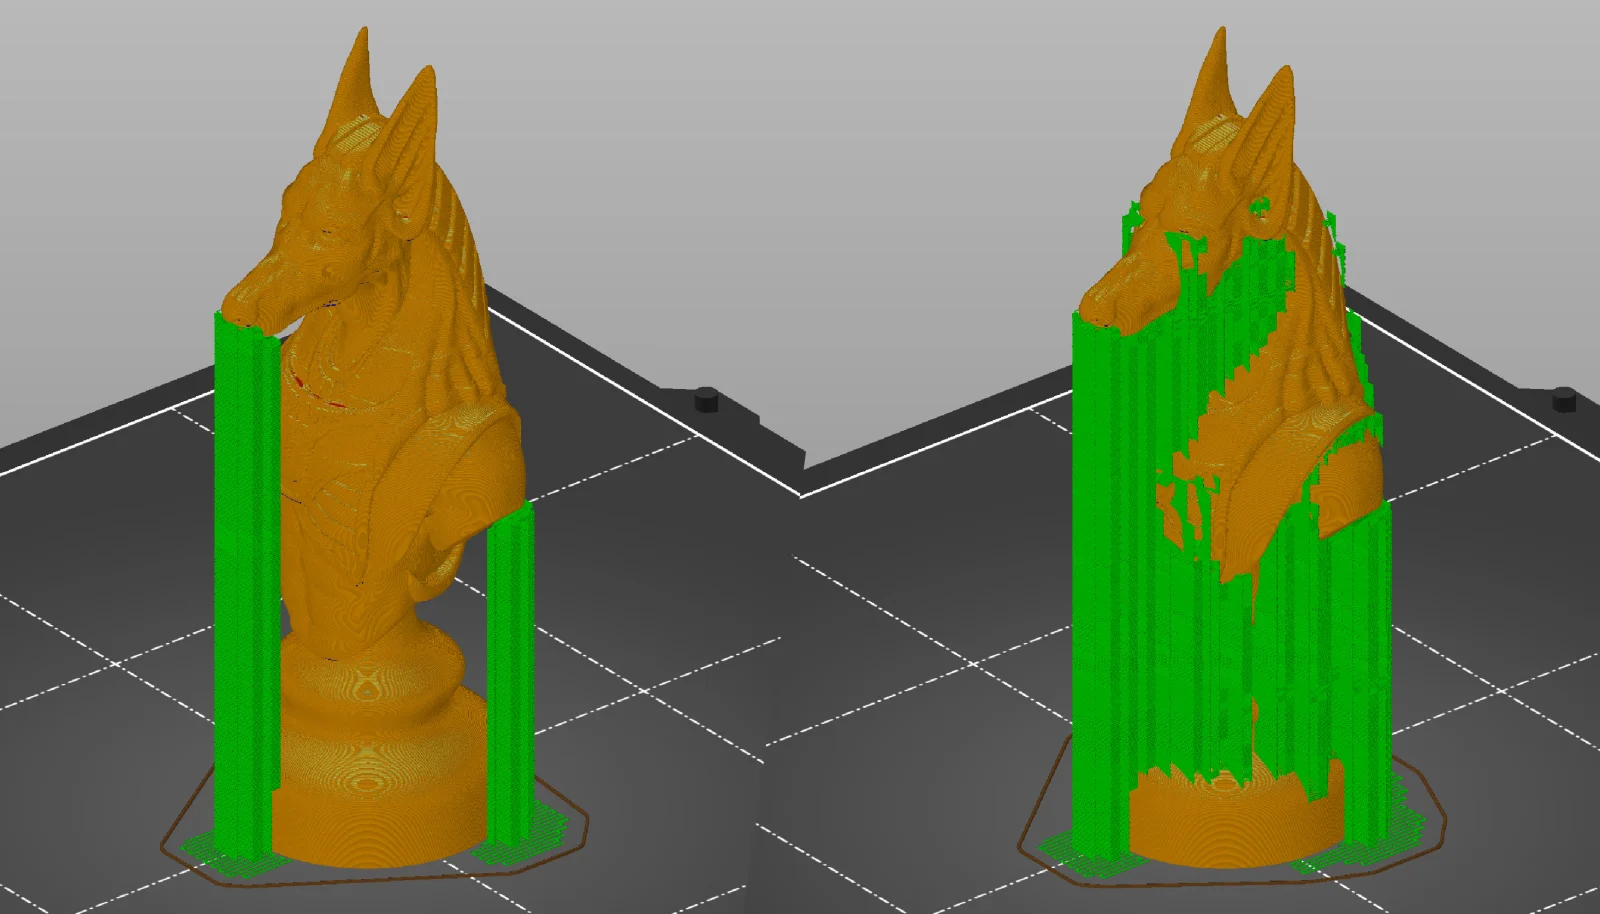
- What it controls: whether structures are generated under the areas that would hang in the air, and what they look like.
- Modes: Everywhere (supports can also start on the part itself, and leave marks where they rest), Support on build plate only (they only grow from the bed) and For support enforcers only (only where you mark them).
- Style: Grid, Snug or Organic. Organic grows like a tree and touches the part only where needed.
- When to change them: before enabling them, Prusa recommends trying to reorient or split the model to reduce overhangs. If supports appear in areas that do not need them, adjust the Overhang threshold or use blockers and paintable supports.
Skirt and brim (Skirt and brim)
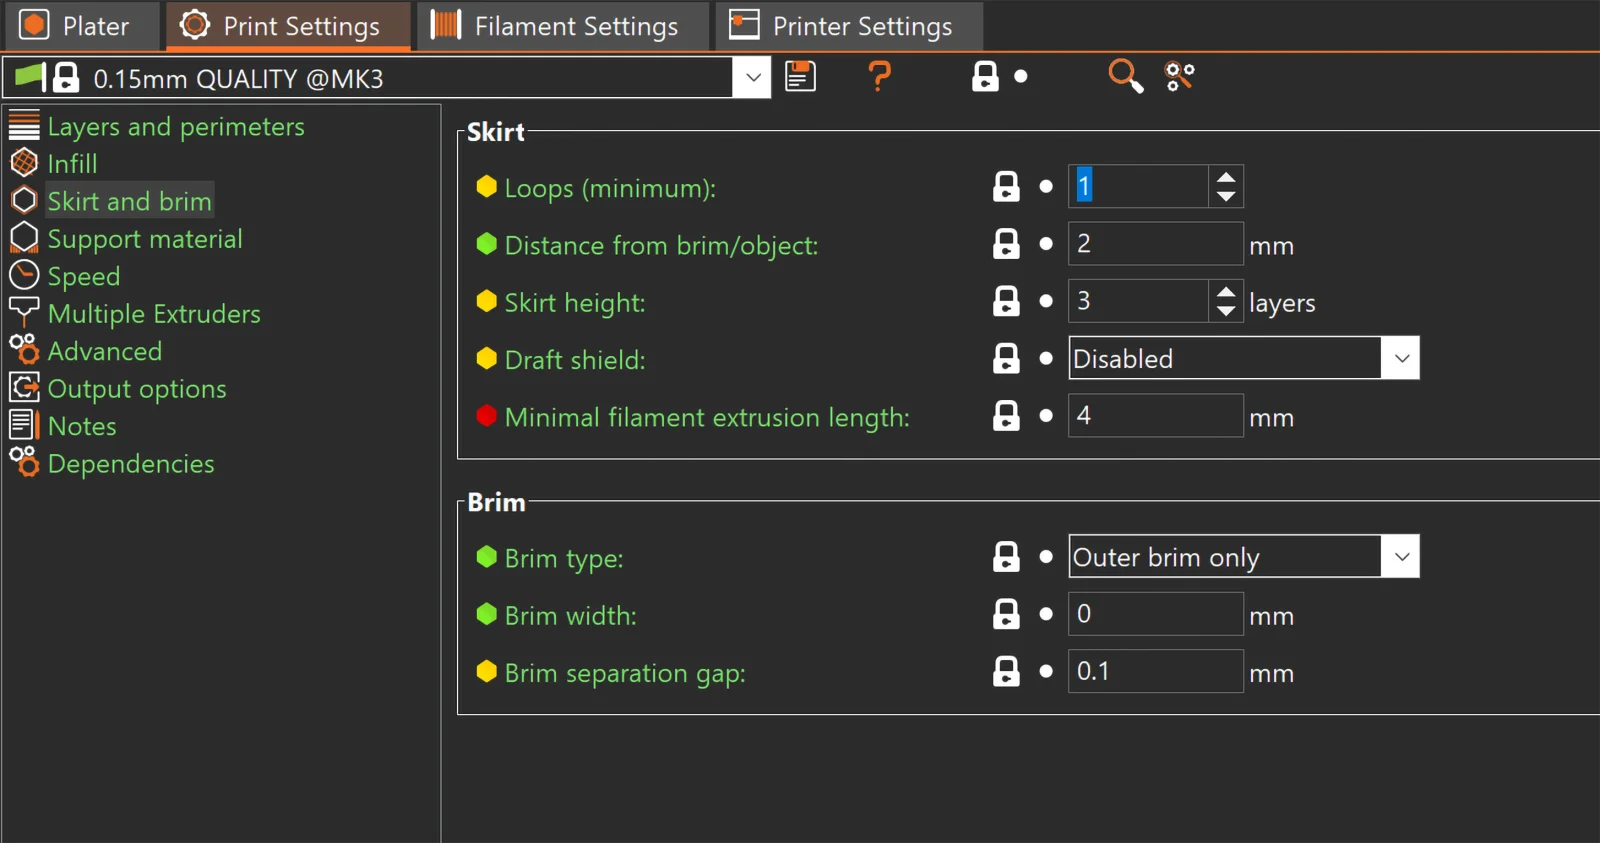
- Skirt: an outline printed around all the parts before starting. It serves to stabilize the flow and to check the first layer: if it does not stick or is too squished, you can correct the height before the parts begin. Prusa uses a three-layer skirt in its profiles, because a single-layer one is hard to peel off.
- Brim: remember that in the Spanish translation brim is called Balsa. These are extra loops attached to the first layer of each part that increase the gripping surface. Prusa recommends using it on tall parts with a small base and when printing many small parts at once, with a width of at least 3 mm. You can choose outer brim, inner brim or both, and leave a small gap so it comes off more easily.
Extrusion width (Advanced)
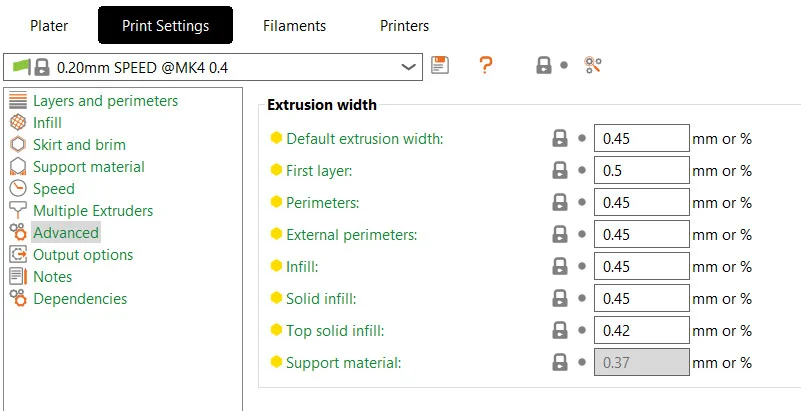
- What it controls: the width of the lines that are deposited. If you leave it at 0, PrusaSlicer calculates it from the nozzle diameter.
- When to change it: mainly when changing nozzles, because changing only the diameter in the printer profile does not make the lines thicker. Prusa suggests around 110% of the nozzle diameter as a general reference.
Printer profile: the machine
It describes your printer and is configured once. Its pages are General, Custom G-code, Machine limits, one page for each extruder, Notes and Dependencies. If your model appears in the wizard, start from that profile and check the following; if you create one from scratch, copy what you can from a reliable profile for your printer.
Size and print area (General)
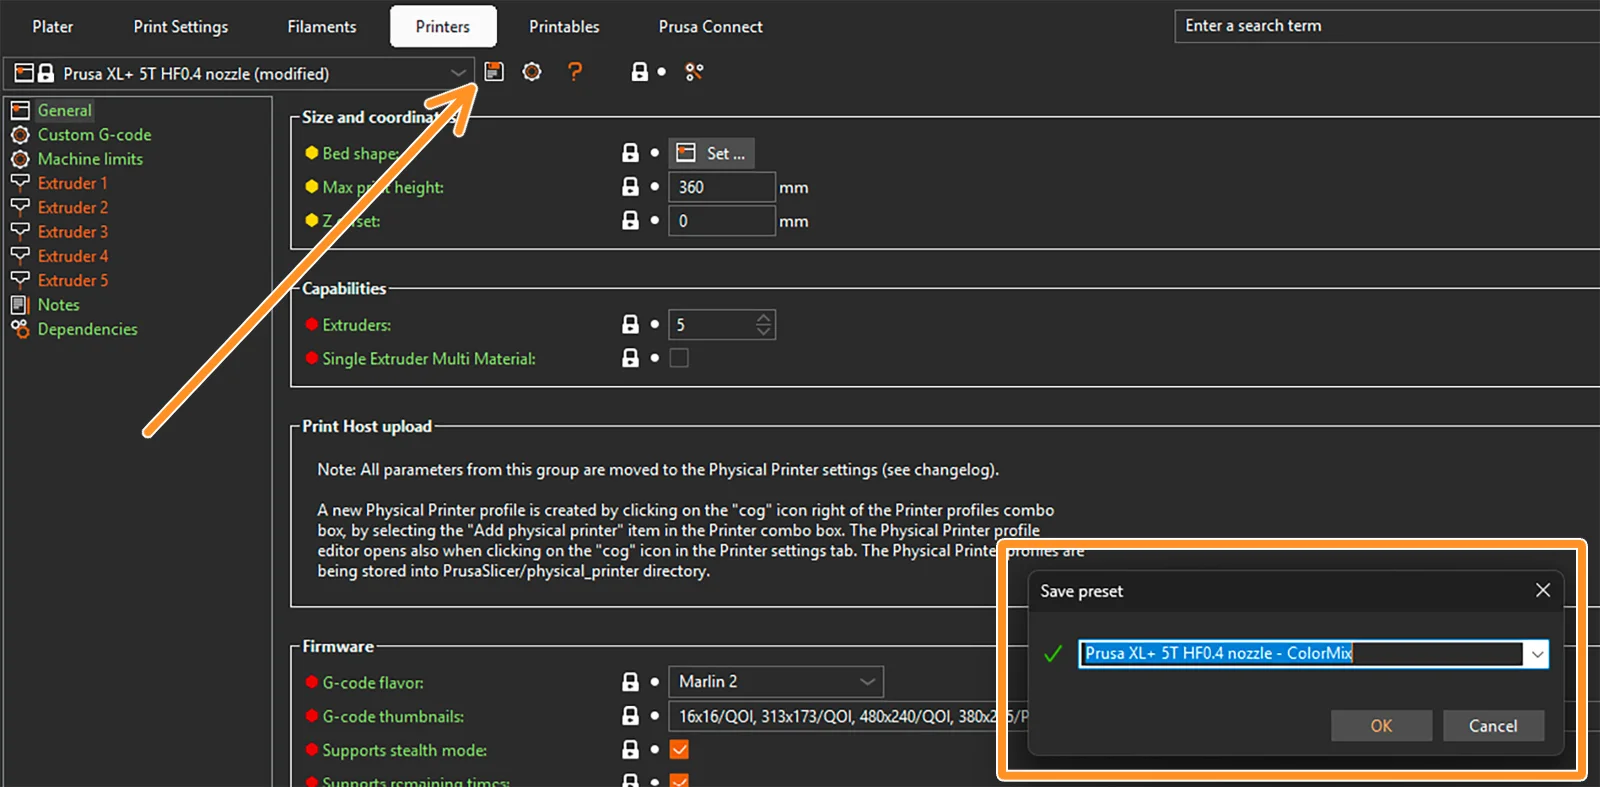
- What to check: the Bed shape (size and origin of the bed, with the button to configure it and even load a 3D model of your bed), the Max print height and the number of extruders.
- Firmware: on the same page is the G-code flavor (Marlin 2, Klipper, RepRapFirmware…). Choose the one that matches your firmware.
Nozzle (Extruder 1)
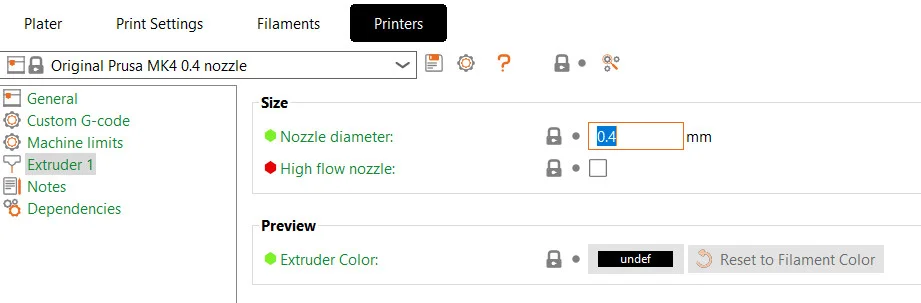
- What to check: the exact Nozzle diameter and whether it is high flow. PrusaSlicer mainly uses it as a limit: for example, it does not let you set a layer height greater than the nozzle. On the same page are the layer height limits.
- When changing nozzles: also adjust the extrusion width in the print profile (see above). For Prusa printers there are system profiles for several diameters, which are enabled from the wizard.
Retraction (Extruder 1)
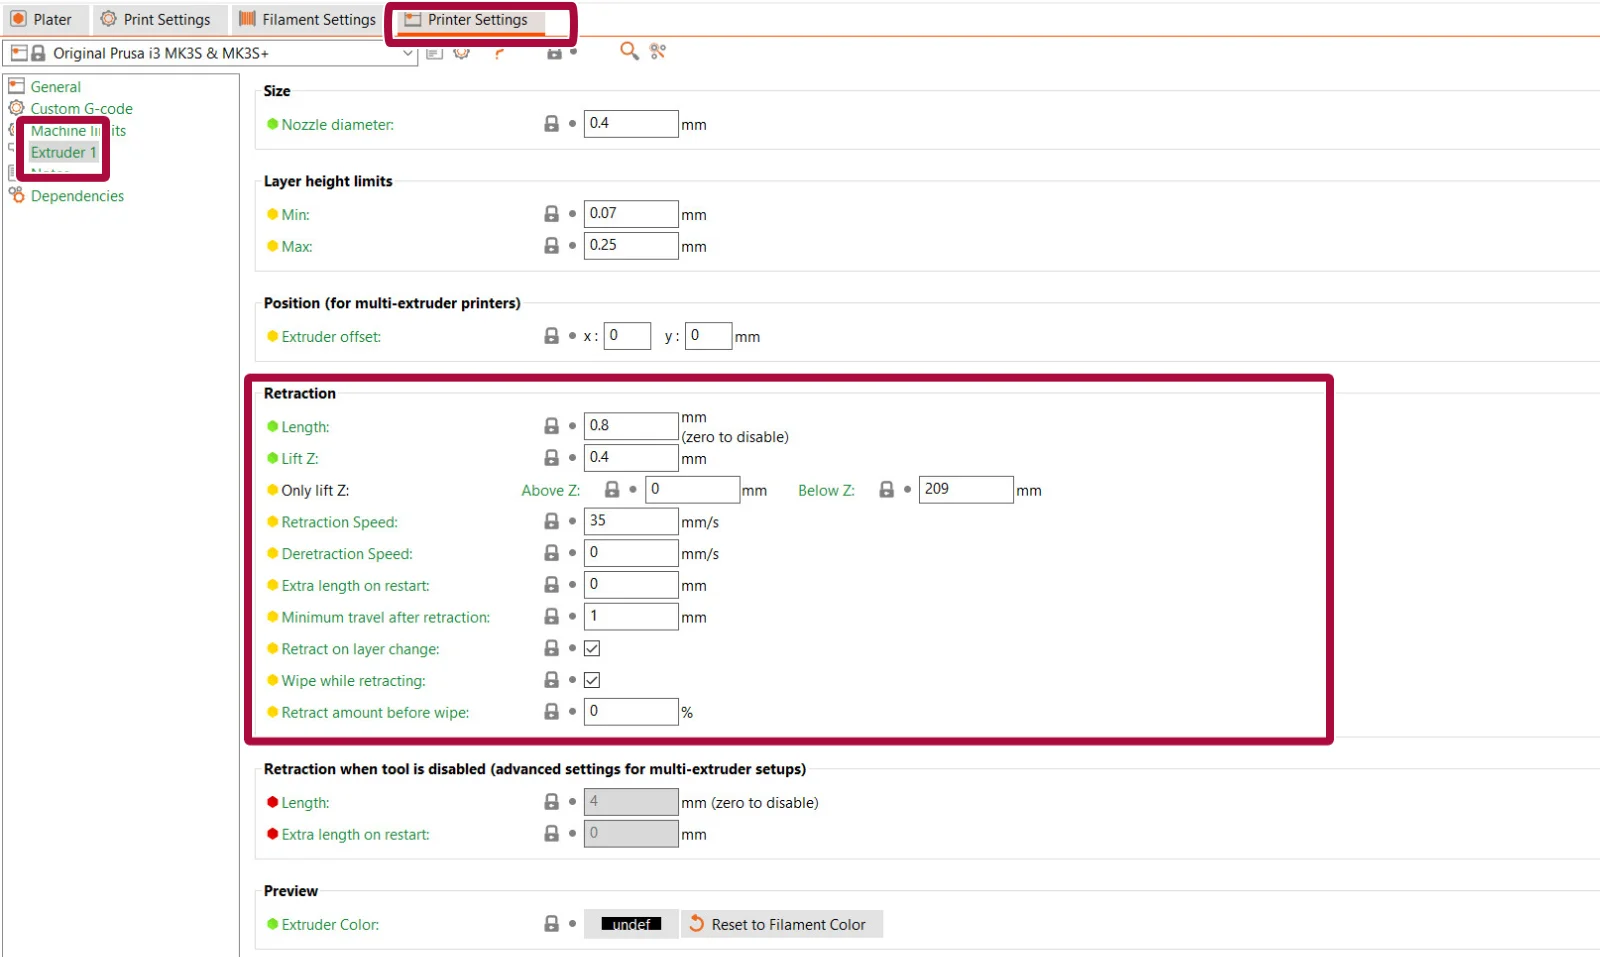
- What it controls: how much and how fast the filament is pulled back during travel moves to avoid stringing, whether the nozzle is lifted (Lift Z), the minimum travel that triggers a retraction, and whether it retracts on every layer change (Retract on layer change) or wipes the nozzle while retracting (Wipe while retracting).
- What to check: that the length makes sense for your extruder (Bowden setups need considerably more than direct-drive ones) and tune it with a retraction test. Flexible filaments usually need different values; that is what the Filament Overrides page of the filament profile is for.
Start and end G-code (Custom G-code)
- What it controls: the commands that run before starting (Start G-code, for example heating, homing the axes and purging) and when finishing (End G-code: turning off the heaters, parking the print head).
- What to check: that it matches your printer and your firmware. If your model has a profile in PrusaSlicer, use it as is; if not, copy the manufacturer’s. Prusa warns that custom G-code is for advanced users: some commands can overwrite printer values or drive the nozzle into the bed.
Speed and acceleration limits (Machine limits)
- What it controls: the maximum feedrate and the maximum accelerations of each axis. With How to apply limits you decide whether they are written into the G-code (Emit to G-code), only used to calculate the time (Use for time estimate) or ignored.
- What to check: that they reflect what your printer can really do. If they are unrealistic, the estimated time will not resemble the real one. On Marlin 2, the maximum junction deviation is also here, which we cover in the advanced features.
Filament profile: the material
It defines how each material behaves. Its pages are Filament, Cooling, Advanced, Filament Overrides, Custom G-code, Notes and Dependencies. Ideally you have one per material and, if you fine-tune, per brand or color, because behavior changes from one spool to another. Always start from a system profile for the same type of material (PLA, PETG…) and adjust it with the calibrations in the next section.
Temperatures, flow, density and cost (Filament)

- Nozzle and bed temperatures: each with one value for the first layer and another for the rest. Change them if the material does not stick to the bed, if there is stringing or if the layers do not bond well; Prusa suggests lowering the nozzle temperature in steps of 5 or 10 °C to reduce stringing. The orderly way to choose it is a temperature tower.
- Extrusion multiplier: adjusts how much plastic comes out. Do not touch it by eye: it is calibrated with a flow test when you see gaps between lines or excess material.
- Diameter: that of the filament you use.
- Density and cost: they do not affect printing. PrusaSlicer uses them to calculate the filament weight and estimate the cost of each part in the slicing information. Fill them in with your spool’s data if you want those estimates.
Layer fan (Cooling)
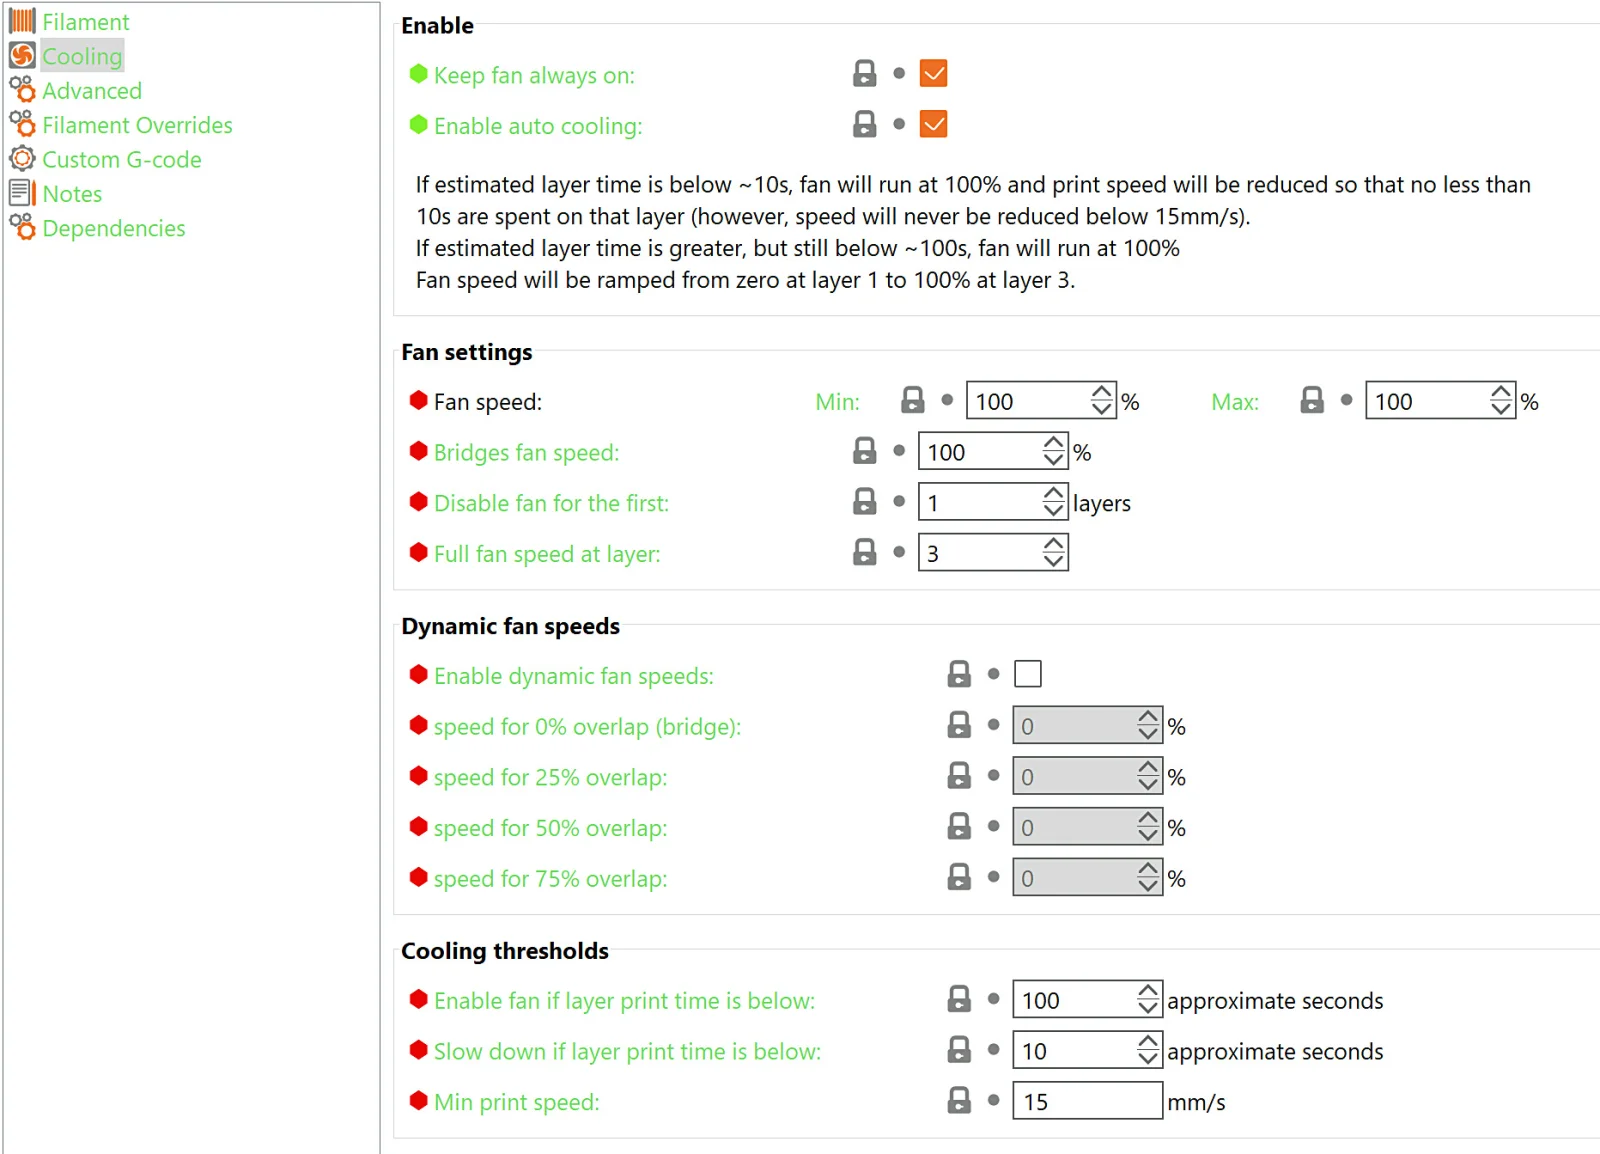
- What it controls: the fan that cools the plastic as it leaves the nozzle. It is key on overhangs and bridges, but with some materials cooling too much causes warping or layers that separate.
- Keep fan always on: according to Prusa, it is usually enabled for almost all materials, except ABS, ASA, PC and some flexibles.
- Speeds and thresholds: with auto cooling, the fan and the speed adapt to the time each layer takes. Above the settings there is a text that explains in plain language the result of what you configure; it is the easiest way to understand how they combine.
- Bridges fan speed and Disable fan for the first (layers): the usual approach is more fan on bridges and none on the first layers, so the part does not come loose. Prusa mentions between 1 and 5 layers without fan depending on the filament.
Filament Overrides
- What it controls: it lets the filament profile replace retraction settings of the printer profile, such as the length or the Z lift.
- When to use it: with materials that need a different retraction from the usual one, such as flexibles, without having to create another printer profile.
System profiles and your own profiles
The profiles that PrusaSlicer ships with, the system ones, appear with a padlock and are updated online. They are not overwritten: to change one, click the cog next to the selector, choose Edit preset, make your changes and save them with the save icon and a name of your own. That way you have your version without losing the original, and you can go back to it if something goes wrong.
The print and filament profiles have a Dependencies page that indicates which printers they are compatible with; PrusaSlicer uses it to show you only what fits the selected printer. If you are missing a filament, most likely it is not marked as compatible. To take your profiles to another computer, File > Export lets you save the current configuration or the complete set of settings.
Normal and advanced settings: the view modes
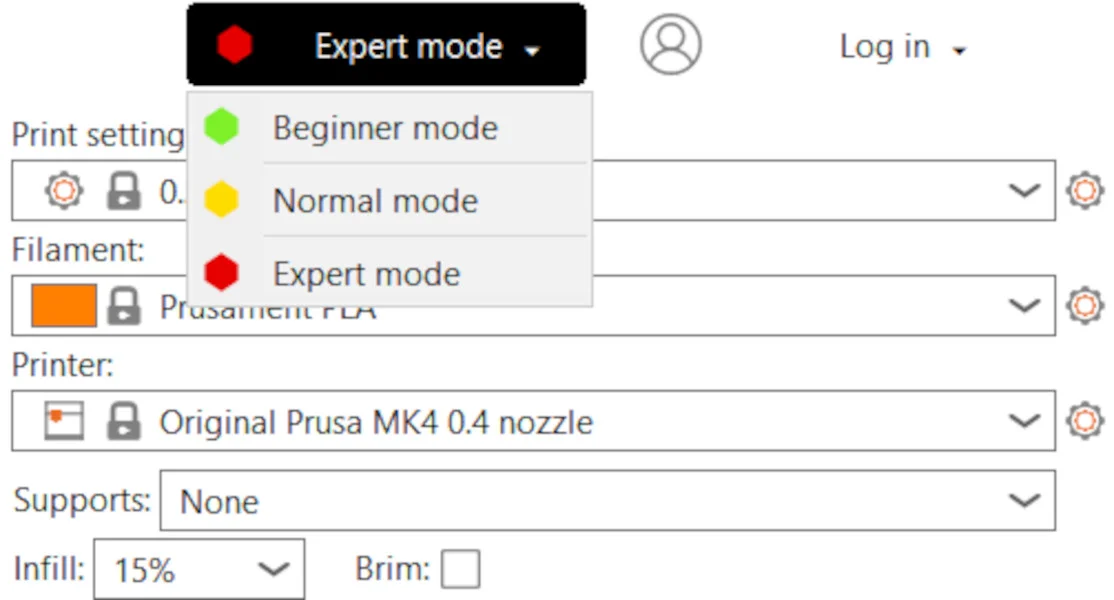
Each profile has hundreds of parameters, and PrusaSlicer does not show them all at once. What you see depends on the view mode, which is changed in the dropdown in the top right corner (available in all tabs) or on the View mode page of the configuration wizard.
- Beginner mode (in the wizard, Simple mode): only the most-used settings. Complex features such as modifiers are hidden.
- Normal mode (in the wizard, Advanced mode): more parameters and tools such as paintable supports and seam painting, which only appear from this mode up.
- Expert mode: everything, including the settings meant for creating the profile of a new printer. Several of the infill, skirt and brim, or supports options we have seen only appear here.
The names change depending on where you look: the 2.x dropdown uses Beginner, Normal and Expert; the wizard, Simple, Advanced and Expert; and Prusa’s official help, Simple, Advanced and Expert. They are the same three levels. In addition, each parameter carries a colored dot: green for what a beginner can touch without fear, yellow for experienced users and red for expert settings.
Our advice: start in Beginner mode with a system profile and move up a level when you need a specific setting. If you do not know what a parameter does, hover over its name and an explanation will appear.
Profiles in 3.x
The 3.x alpha changes this system quite a bit. Profiles move to YAML format and adapt to the real configuration of the machine: on a multi-head printer, for example, the diameter of each nozzle is chosen in the printer selector itself instead of creating one profile per combination. A fourth profile appears, the tool print (ToolPrint) profile, with the print settings that can differ on each head; with single-head printers it stays hidden. In addition, each bed in a project can have its own configuration, and colors are saved in the project instead of in the profiles.
Tests and calibrations
System profiles are a good starting point, but they do not know your filament. Prusa says it clearly in its help: the ideal flow value changes with each material and each color, and even from one spool to another. Calibrating means printing test parts designed for one specific parameter, looking at the result and carrying the best value over to the profile. It is what most sets apart a correct print from a very good one.
Here we explain how it is done in PrusaSlicer. The complete procedures, the test models and the starting values for each case are in the 3Dwork Labs FDM calibration guide, which runs through the tests from basic to advanced.
What PrusaSlicer calibrates today and what 3.x brings
PrusaSlicer 2.x does not ship with built-in calibration parts. The 3.x notes themselves acknowledge this: other slicers added them earlier and PrusaSlicer had fallen behind in this area. That does not stop you from calibrating: you load a test model and use the slicer’s tools to vary the parameter.
- Change the value in the profile and print one version of the test for each value.
- Add G-code at a layer from the preview, to change a parameter from a certain height. It is the way to make a temperature tower.
- Height range modifier, which changes infill, layers and perimeters, speed or extrusion width settings between two heights. Temperature is not among them.
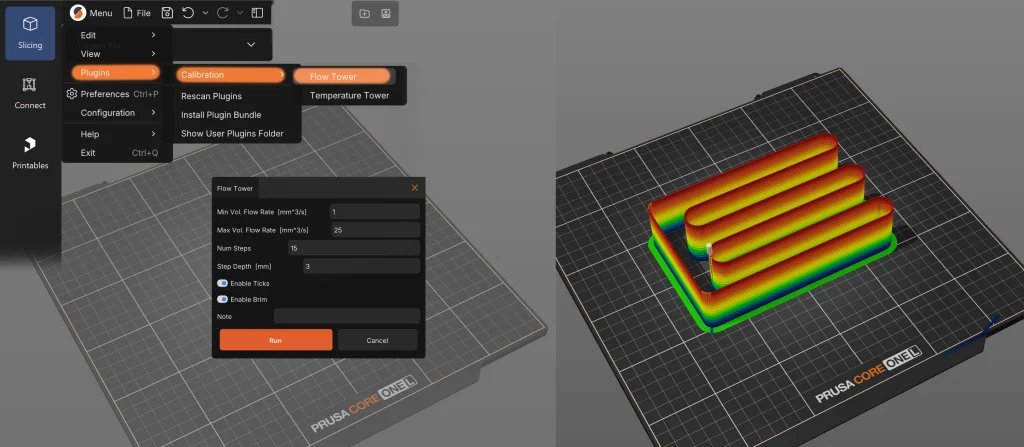
The 3.x alpha adds built-in calibration: a flow tower and a temperature tower, in the plugins menu. You choose the test, adjust its parameters in a dialog and PrusaSlicer generates a project with the object and the configuration ready to slice. They are built as Lua plugins, with an API that Prusa describes as experimental. You will see it in the 3.x section, further down.
How to run a test inside the slicer
- Get the test model. The 3Dwork Labs guide links the usual ones for each parameter.
- Import it and slice it with the profiles you normally use, so that only what you want to measure changes.
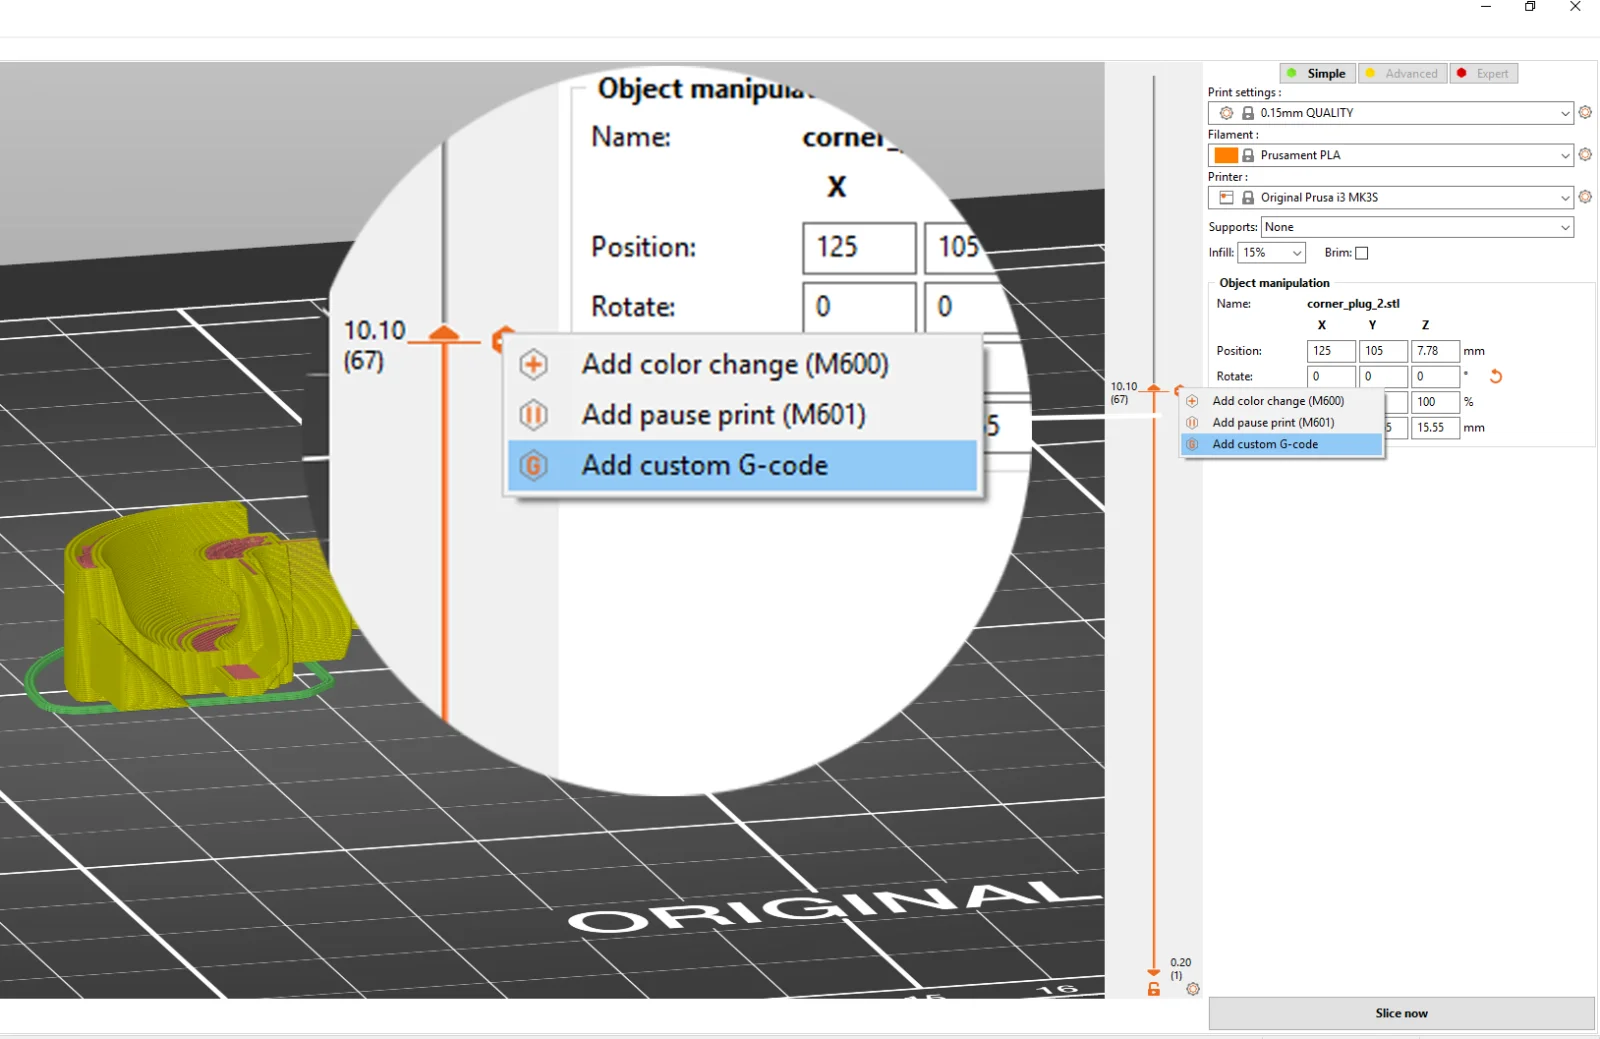
- Assign a value to each block. If the test changes the parameter by height, go to the preview, move the layer slider to the start of each block, right-click the orange icon and choose Add Custom G-code. The code is applied before that layer and stays in effect until the next change. If the parameter cannot be changed this way, print several copies of the test, each with its own value.
- Note which value corresponds to each block before printing. It sounds obvious, but it is the most common mistake.
- Print, interpret and save. Pick the block that best meets what you are after, carry that value over to the profile (usually the filament one) and save it with a name of your own.
Prusa warns that custom G-code is a tool for advanced users: double-check what you insert, because some commands can overwrite printer values or drive the nozzle into the bed.
Flow test (extrusion multiplier)
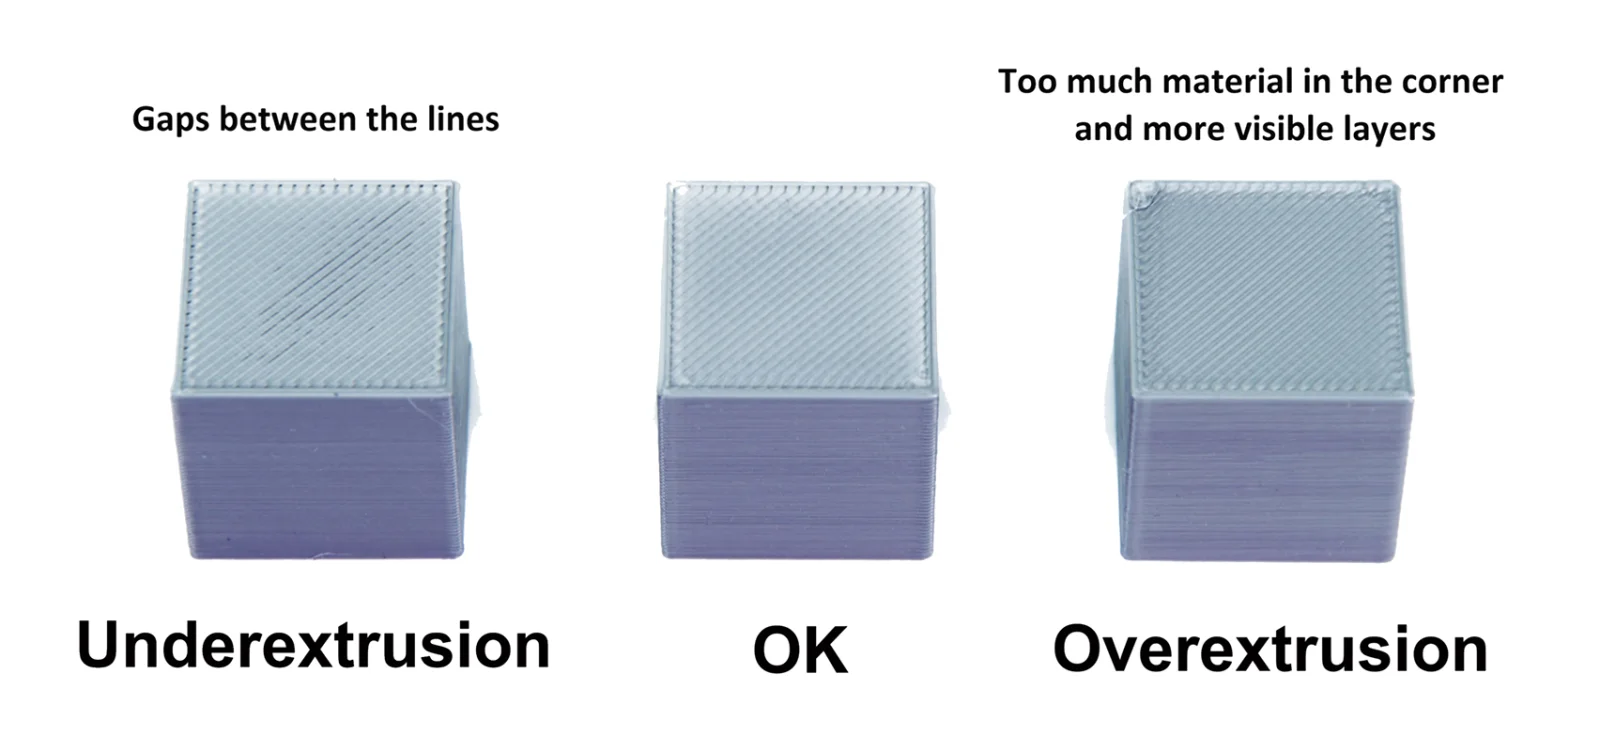
It adjusts how much plastic comes out of the nozzle. In PrusaSlicer it is corrected with the Extrusion multiplier, on the Filament page of the filament profile. Prusa proposes two methods: a precise one, printing a cube in Spiral vase mode (Layers and perimeters) and measuring the wall thickness to calculate the value, and a visual one, observing the top layers.
- What to look for: with underextrusion, gaps appear between the lines or between the perimeters; with overextrusion, excess material at the corners, more pronounced layers and uneven top surfaces.
- When to repeat it: with each filament type and color, because flow can change noticeably from one to another.
Temperature tower
A tower with blocks printed at different temperatures. In PrusaSlicer 2.x it is set up by adding, at the layer where each block starts, a G-code that changes the extruder temperature (the M104 command, according to Prusa’s help). The 3Dwork Labs guide explains another option: a script in the Before layer change G-code of the printer profile that changes the temperature according to the height.
- What to look for: the finish of bridges and overhangs, the sharpness of the numbers and details, the stringing between the parts of the tower and the bonding between layers. To check layer bonding, the 3Dwork Labs guide suggests snapping each block.
- How to choose: the temperature that best balances all of the above. Then carry it over to the filament profile, for the first layer and for the rest.
Retraction test
Retraction pulls the filament back during travel moves so it does not drip. In PrusaSlicer it lives in the printer profile (extruder page, Retraction section), and you can override it for a specific material in Filament Overrides. PrusaSlicer 2.x does not generate a retraction tower, so the usual approach is to print a stringing test model several times, changing the value between prints.
- What to look for: the stringing between the parts of the test and the look of the seams.
- How to choose: there is no formula; each printer and extruder needs its own value, and it depends a lot on the filament. The 3Dwork Labs guide recommends leaving a margin of at least one step beyond the first value with no stringing.
- If it does not improve: before raising the retraction any further, check the filament’s moisture, the extruder and the cleanliness of the hotend.
There are more tests worth doing once you have mastered these three: pressure advance (linear advance or pressure advance), input shaper, tolerances, overhangs and bridges. They are all explained in the 3Dwork Labs FDM calibration guide.
Everyday features
Compatible with Marlin, Klipper and other firmware
In the Printers tab, the G-code flavor setting adapts the file to your machine’s firmware. PrusaSlicer 2.x offers, among others, Marlin 2, Marlin (legacy), Klipper, RepRapFirmware, Repetier, Smoothie, Sailfish, MakerWare, Teacup and Mach3/LinuxCNC. Choosing this setting correctly is the first thing to check if you are configuring a printer that is not a Prusa.
Sending the file over the network, to the cloud or by USB
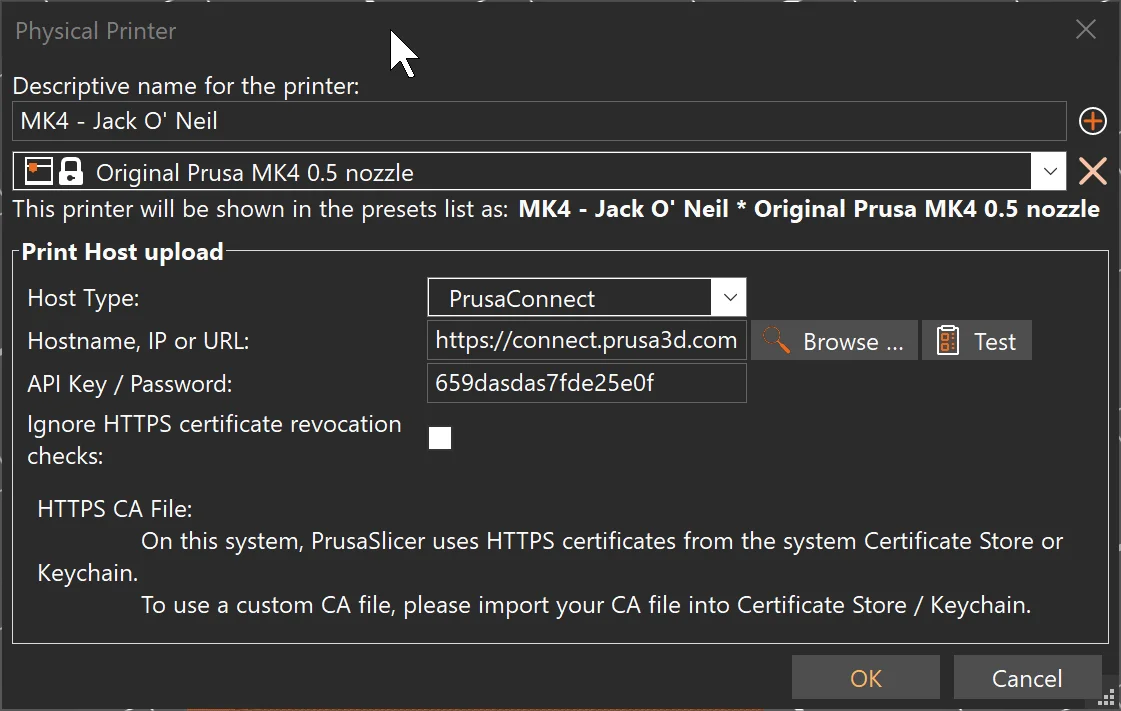
PrusaSlicer separates the printer profile from its connection. To send jobs without touching the card, create a physical printer from the cog in the printer selector (Add physical printer), associate your profile with it and choose the Host Type:
- Over the local network: OctoPrint, Klipper through Moonraker, PrusaLink, Duet, Repetier, AstroBox, FlashAir and MKS.
- To the cloud: Prusa Connect. With Prusa printers, the most convenient way is to log in and use Prusa Connect’s own integration, which shows the Send to Connect button.
- Over USB: by exporting to a USB drive or SD card, as we saw in the previous section.
With a physical printer selected, the Send G-code button appears next to Export G-code.
Arranging parts and instances
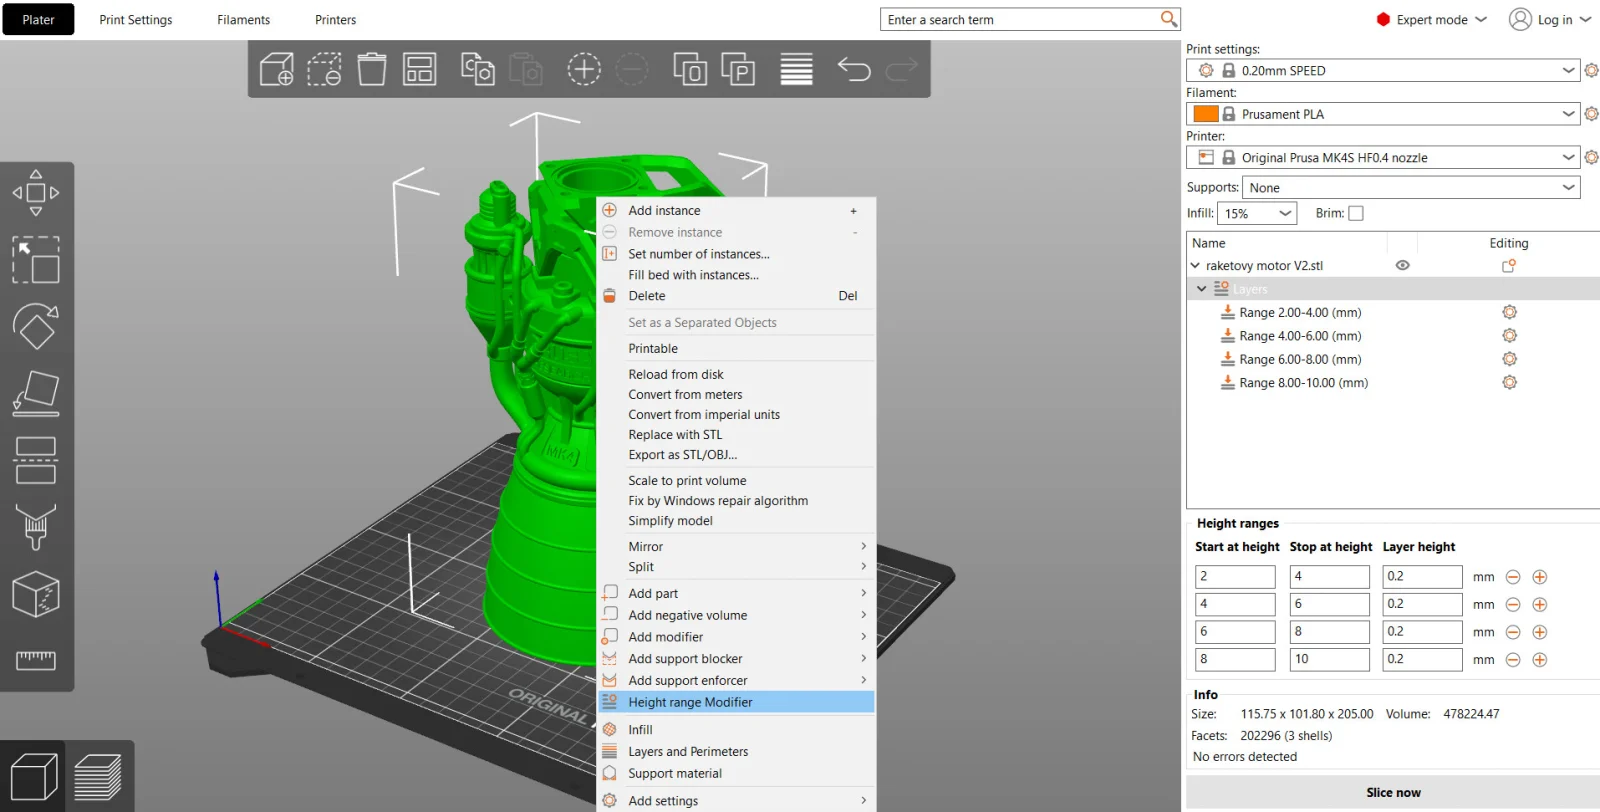
The Arrange button (A key) distributes the parts across the bed using the minimum space. Right-clicking a model opens a menu with more options: adding or removing instances (copies of the same part), filling the bed with instances, adding parts, modifiers, support blockers or enforcers, and per-object settings.
Undo with history
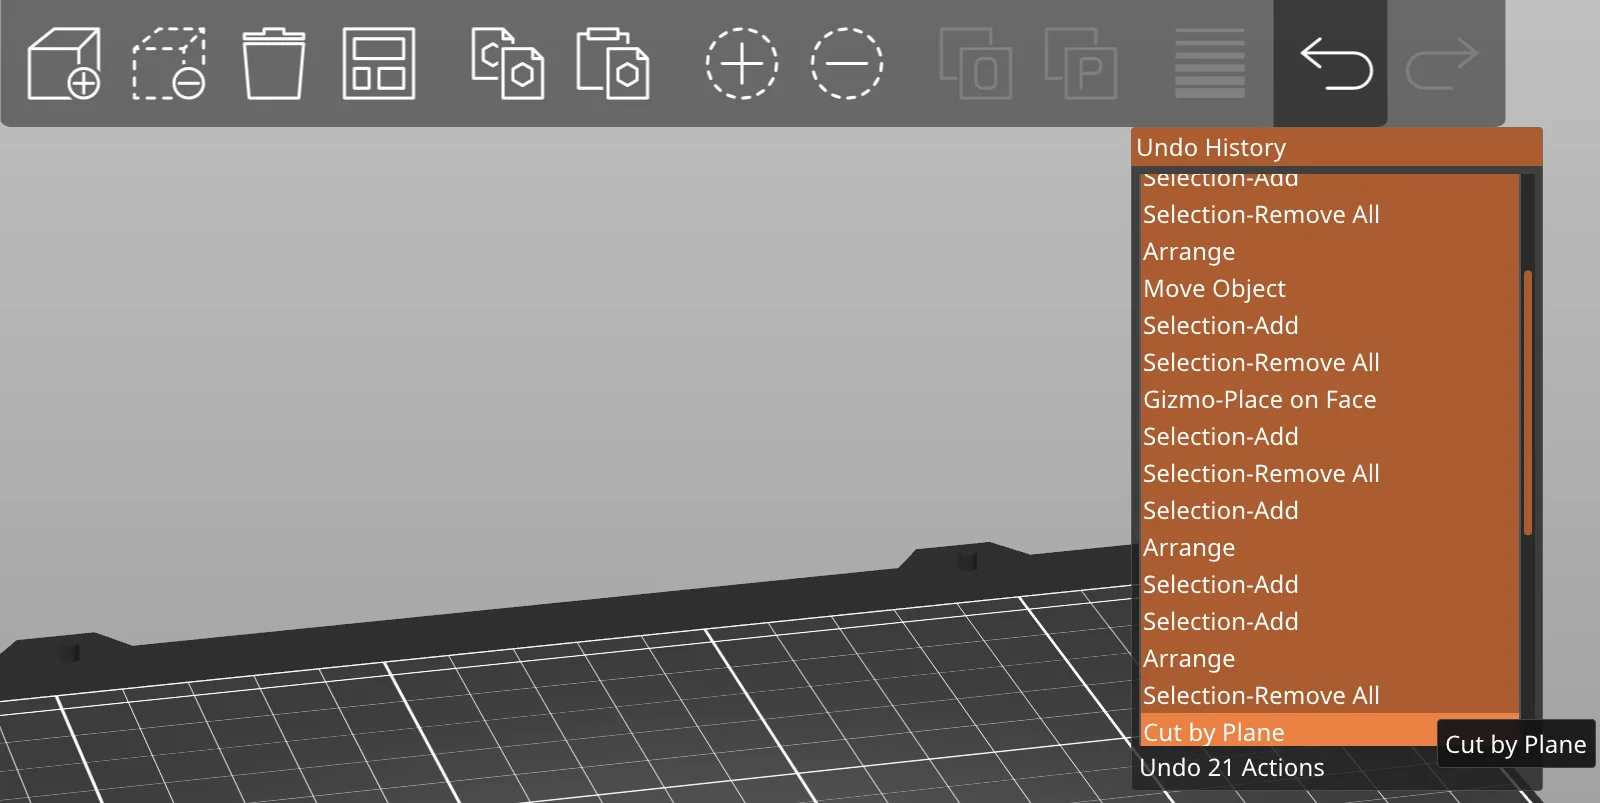
Right-clicking Undo or Redo opens the full history, with a name for each step, and you can go back several operations at once. Almost everything you do in the 3D editor can be undone, except profile changes. With the keyboard: Ctrl+Z and Ctrl+Y.
Cutting large parts
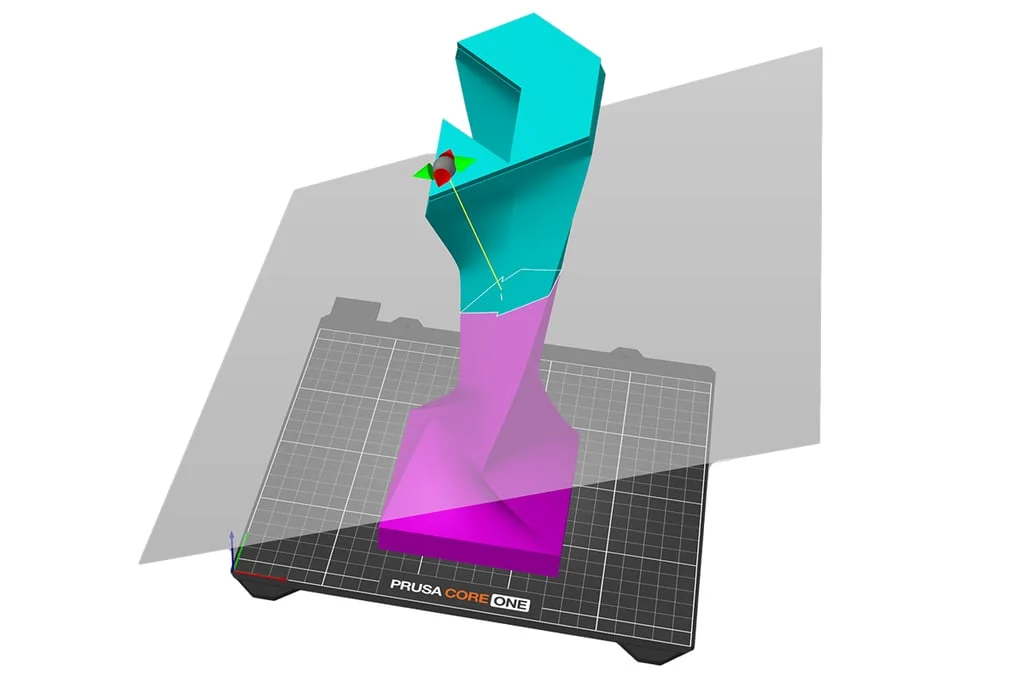
The Cut tool (C key) splits a model that does not fit on the bed, that needs a different orientation in one section, or that would use too much support in one piece. The cutting plane can be placed at any angle, and PrusaSlicer can add connectors (plug, dowel or snap) or a dovetail joint so you can assemble the parts afterward.
Multiple beds in a single project
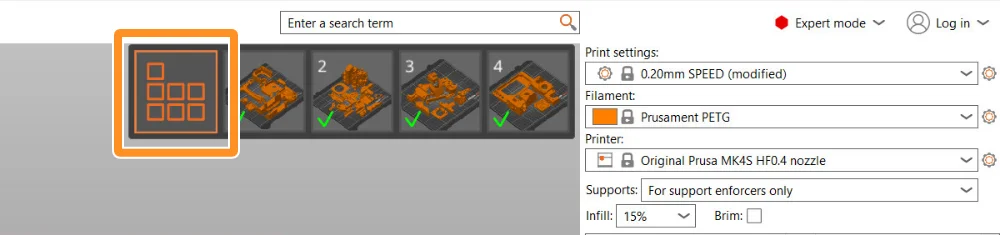
PrusaSlicer 2.x lets you spread a project’s parts across several virtual beds, up to nine. There is no button to add them: drag a model off the bed and a new one appears. Arrange (A key) distributes everything and creates the beds that are needed; arranging only the active bed (D key) sorts just that one. In the preview you see each bed with its statistics, and with the slice-all option (Laminar todo in the Spanish interface) you export them all at once. The limitation is that they all share the same configuration.
Printables inside the program
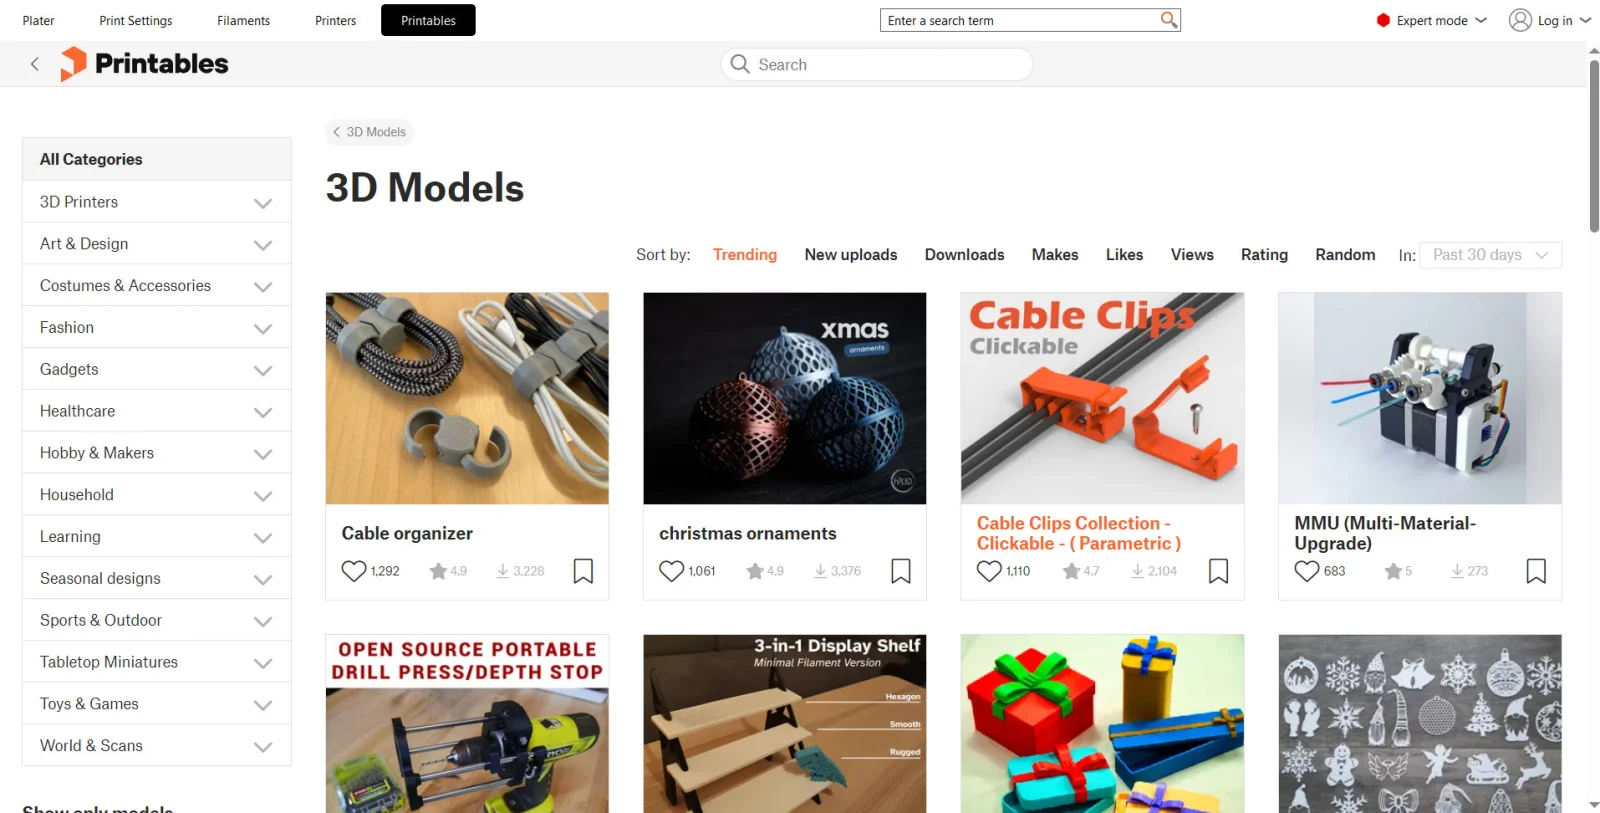
The Printables tab opens Printables.com inside PrusaSlicer: you search for a model and download it, or open it directly to slice it. You do not need an account to browse. If you have a printer on Prusa Connect, you can also send it an already-sliced G-code from there.
Advanced features worth knowing
This part is for those who already print with ease and want to gain quality, time or possibilities. Several of these tools only appear in Normal and Expert modes.
Variable layer height
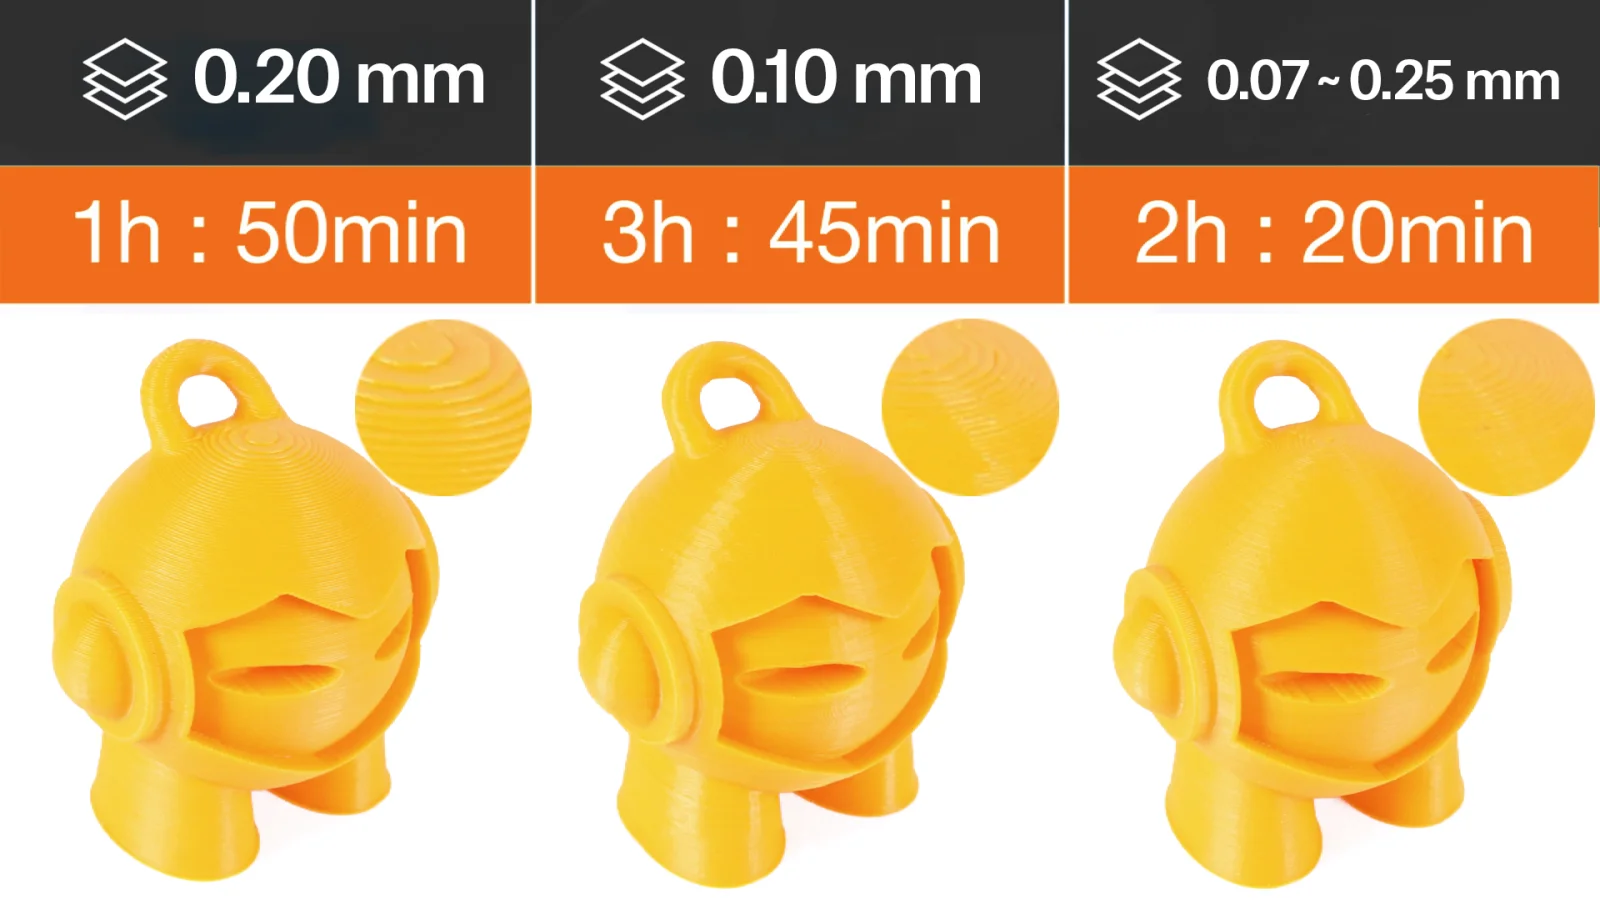
It uses fine layers where there are smooth curves or detail and thick layers in the straight areas, with smooth transitions between them. The result is almost the quality of fine layers in much less time. The tool is in the top bar when you select a model: you can calculate the profile automatically with a quality/speed slider, touch it up by hand, smooth it, or combine both. If you prefer something more controlled, a height range modifier changes the layer height only between two Z heights.
Paintable supports
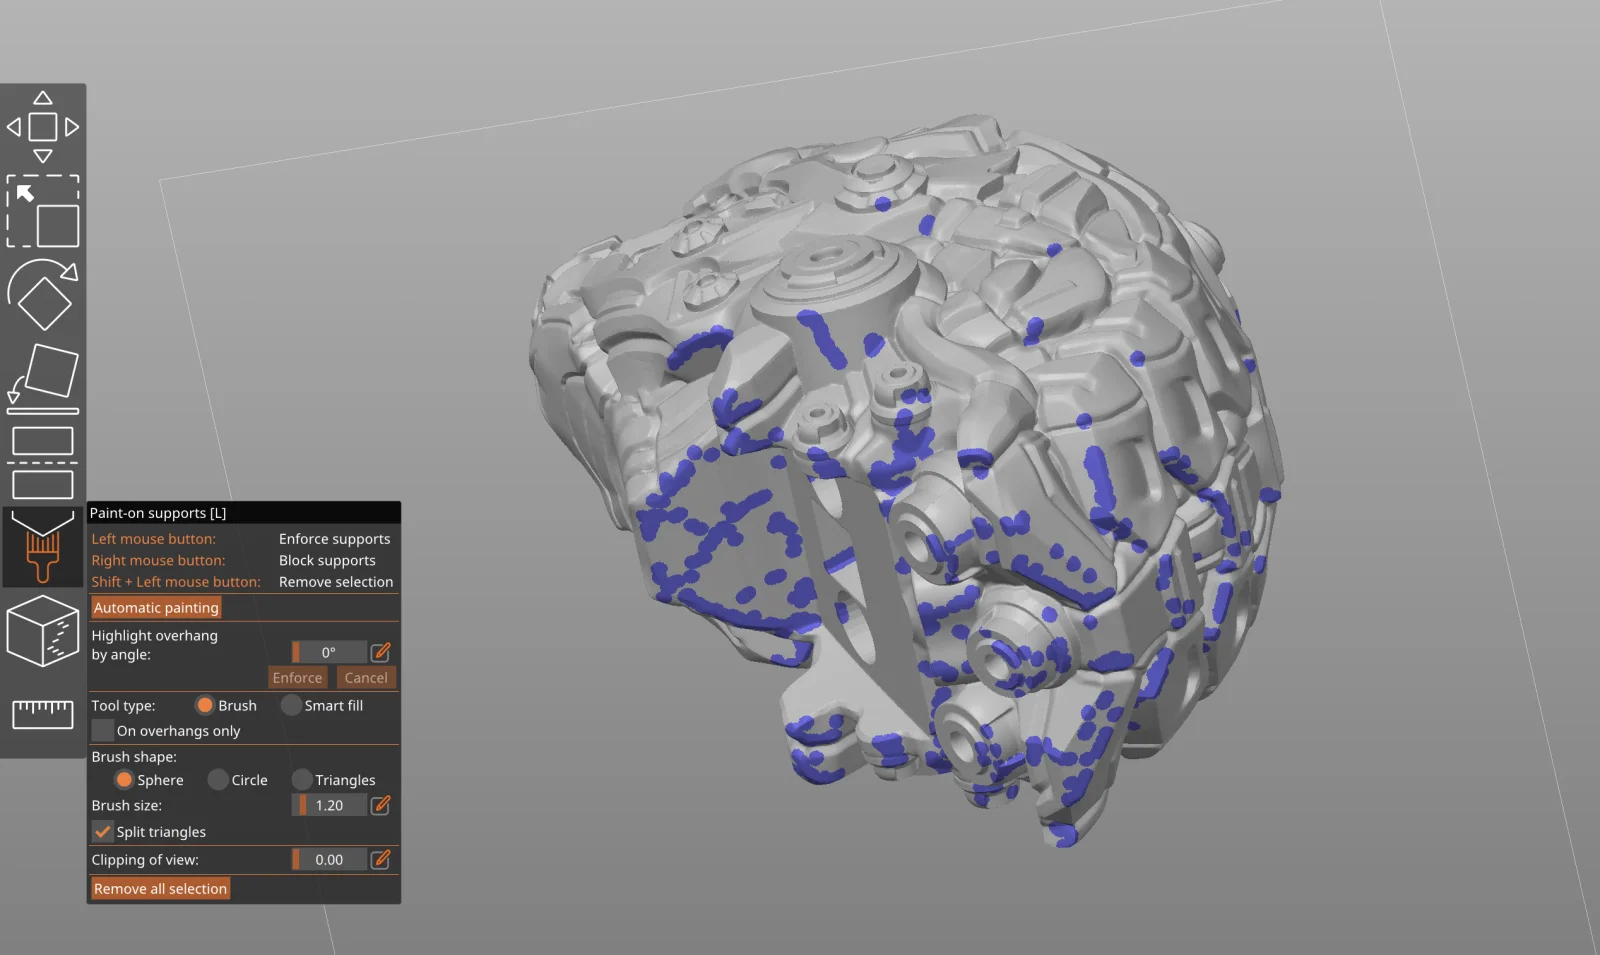
You paint directly on the model where you want supports (left button) and where you do not (right button). To use only what you painted, set Supports to For support enforcers only; to generate automatic supports but block some areas, use Everywhere and paint blockers. With Alt and the wheel you change the brush size, and the clipping plane helps you reach hidden areas.
Seam painting
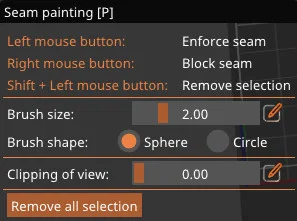
The seam is the point where each perimeter starts and ends, and it usually leaves a small mark. With this tool (P key) you paint where you want to enforce it and where to block it, to hide it on an edge or on the back side. If you use the Aligned seam position, PrusaSlicer places it in the center of the painted area, which lets you draw clean seams.
Multimaterial painting
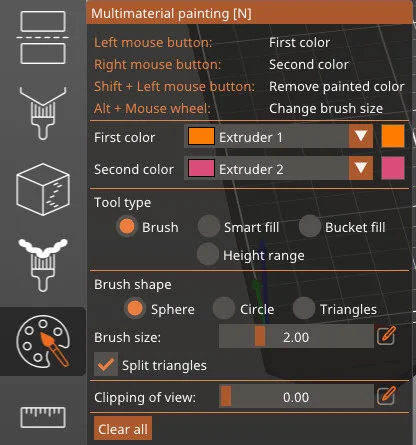
If you have a multicolor printer, you assign colors by painting on the model (N key). Besides the brush you have smart fill (fills up to a marked edge), bucket fill (replaces an area of one color with another) and height range (paints between two heights). Each mouse button is assigned to a different extruder.
ColorMix: more colors with the same filaments
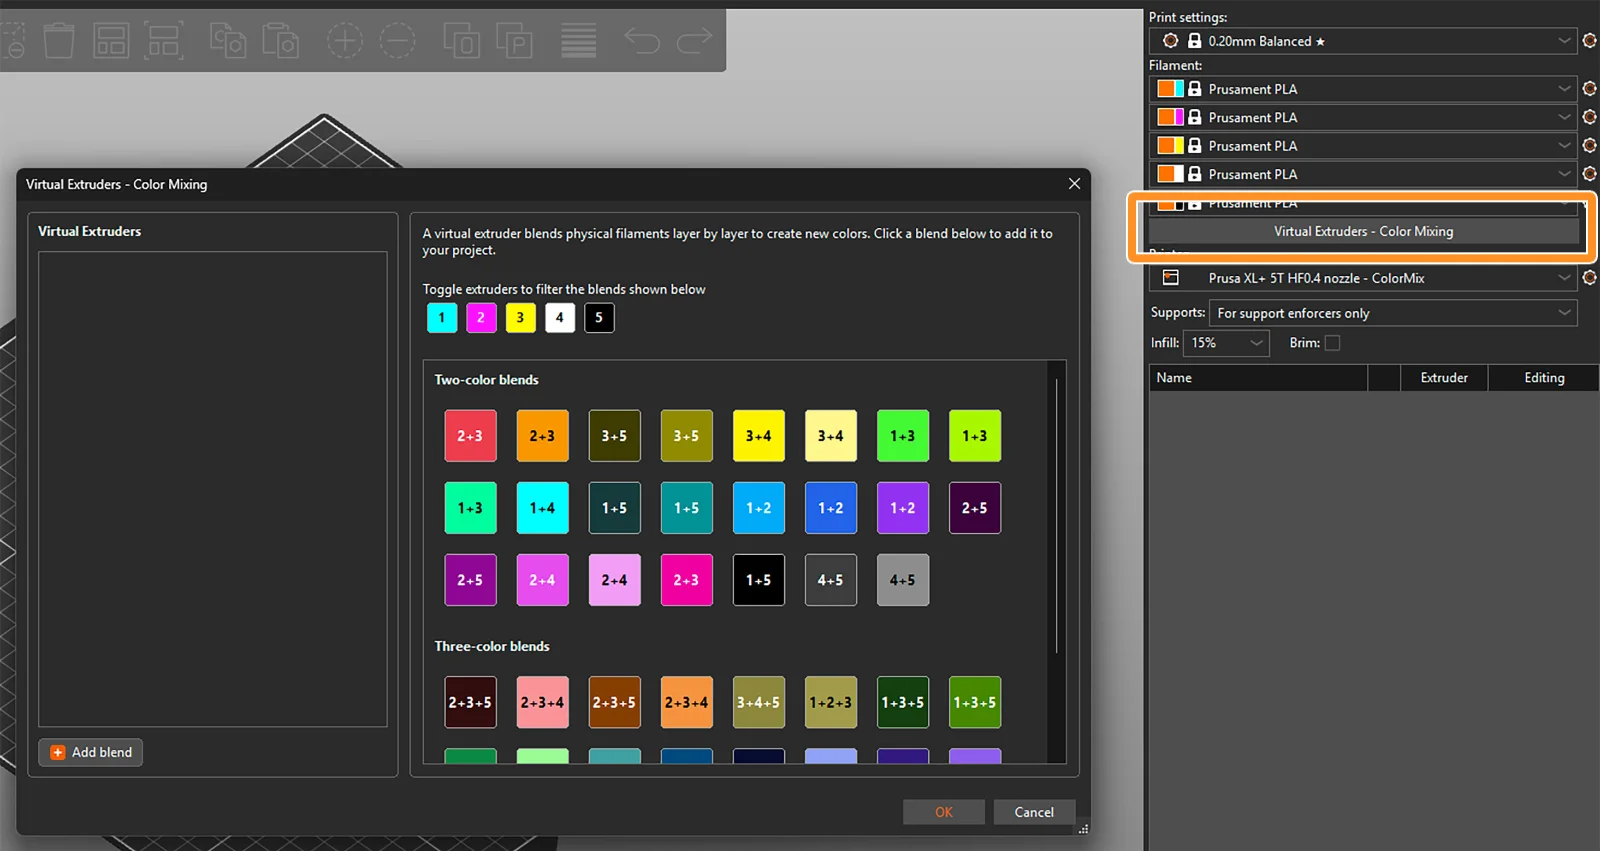
ColorMix creates new shades by alternating, layer by layer, the filaments you already have loaded. At a normal distance, the eye blends the layers: 50% cyan and 50% yellow looks green. It is Prusa’s version of an idea that was born in the community (FullSpectrum), and its color-mixing model is published separately under the MIT license.
- You need a multicolor printer: with an MMU, with several heads, with a tool changer such as INDX, or any other multi-filament system.
- Below the filament selectors, the Virtual Extruders – Color Mixing button appears. There you choose ready-made blends or press Add blend to combine two or three filaments in the proportion you want.
- Each blend is a virtual extruder that is used like a real one, including with the painting tools. In the dropdowns it is marked with [V].
- Prusa gives 25/75, 50/50 and 75/25 as tested proportions for two colors, and 33/33/33 for three, with layers of 0.15 mm at most and 5 to 10% gyroid infill.
- To open a model with virtual extruders use File > Open Project; if you import it, they are all merged into the last physical extruder.
The catch: there are many more tool changes, so more material is wasted than on a normal multicolor part. With a tool changer it is considerably more efficient than with a single-head system.
Tool change order
On printers with several extruders or heads, Print Settings > Multiple Extruders > Advanced, in the tool change order setting (Orden de cambios in the Spanish interface), decides how the changes are chained. You can minimize them, starting each layer with the tool the previous one ended with, or always repeat the same sequence on consecutive layers. The latter means more changes, but multicolor parts usually come out better because each layer has time to cool before printing on top of it.
3MF projects
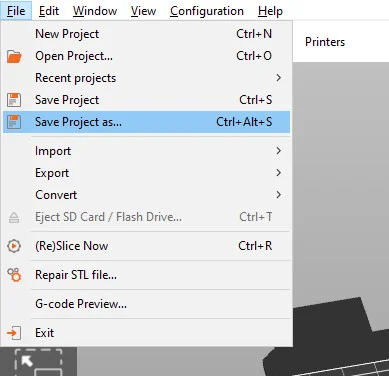
With File > Save Project as you save the objects, the configuration, the modifiers and their parameters in a single 3MF file. Prusa describes it as a complete snapshot: opening it on another computer should give the same G-code. It is the best habit you can adopt: save the project of everything you slice and you will be able to repeat or touch up a part months later without guessing which settings you used. For privacy, by default the 3MF does not store the full path of the original files.
Junction Deviation on Marlin 2
If your printer uses Marlin 2, in the printer profile you have Machine limits > Maximum junction deviation (machine_max_junction_deviation). It turns on Junction Deviation, Marlin 2’s system for managing speed at corners: PrusaSlicer adds the M205 J command to the G-code and its estimator simulates this algorithm, so the estimated time matches the real one better. With the value at 0, the classic Jerk system is used. On the CORE One L it comes enabled by default.
PrusaSlicer 3.x in alpha: what is coming
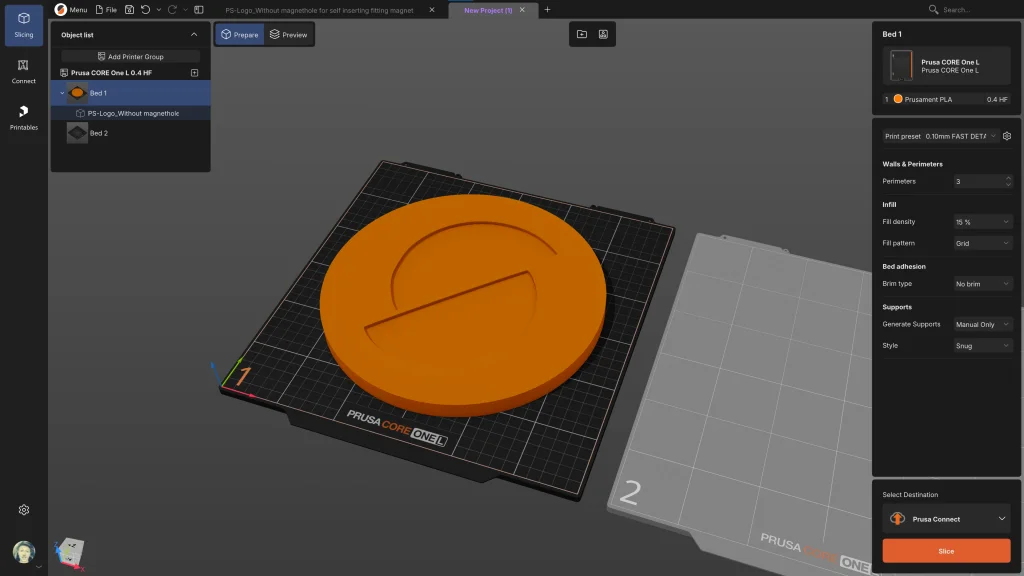
Prusa is preparing the biggest overhaul of the program in years: it has rewritten almost the entire interface and a good part of the internal architecture. The first public alpha came out on September 1, 2026 and the second on September 21. What 3.x brings:
- New interface, with a sidebar for Slicing, Connect and Printables, a right-hand panel that changes depending on what you select, favorite settings and a light mode.
- Multiple beds without the limit of nine, each with its own configuration and even with different printers, and several projects open in tabs.
- YAML profiles instead of .ini, which adapt to the real configuration of the machine, with filtering by filament type and fuzzy search.
- Built-in calibration (flow and temperature towers) through Lua plugins, with an API that Prusa describes as experimental.
- Offline mode: all online services can be disabled, and in fully offline mode the network libraries are not loaded.
- It remains under the AGPLv3 license.
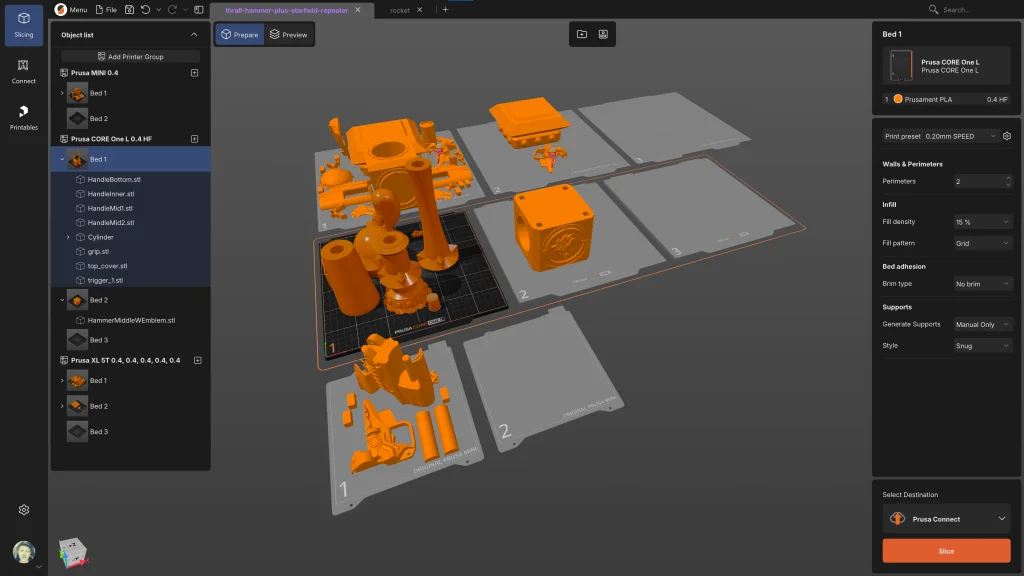
But Prusa itself warns that this alpha is not for production: it is unstable, it does not have all the 2.x features and some will not arrive until 3.1.0. For now it only ships Prusa printer profiles (those of other brands will return later), resin slicing is disabled and, among other things, post-processing scripts, the custom G-code editor and screen reader compatibility are missing. It can be installed alongside 2.x without conflicts, but for printing, and above all if your printer is not a Prusa, stick with 2.x.
PrusaSlicer, Bambu Studio and OrcaSlicer: which one fits you
PrusaSlicer is not alone. Today there are two other reference slicers, and all three share an origin: Bambu Studio is based on PrusaSlicer, and OrcaSlicer started out taking Bambu Studio and PrusaSlicer as its base and has grown with community contributions. That is why they are so similar in the way they work. None of them wins at everything: each one is designed for something different.
- PrusaSlicer: the one that integrates best with Prusa printers (fine-tuned profiles, Prusa Connect and Printables), with very complete official documentation and more widely spaced stable releases. It works with printers from many other brands.
- Bambu Studio: a similar philosophy, but its strong point is the integration with Bambu Lab printers: remote control and monitoring, the AMS multicolor system and calibrations guided by the printer itself.
- OrcaSlicer: the most versatile. It is a project closely tied to the community, it collects profiles from a great many manufacturers and it ships the broadest set of calibration tests of the three.
Point-by-point comparison
| Criterion | PrusaSlicer | Bambu Studio | OrcaSlicer |
|---|---|---|---|
| License | AGPLv3 | AGPLv3 (Bambu Lab’s network plugin is optional and is not free software) | AGPLv3 (it can use the same optional plugin for Bambu Lab printers) |
| Platforms | Windows, macOS and Linux (Flathub) | Windows, macOS and Linux (AppImage and Flathub) | Windows (x64 and ARM64), macOS and Linux (Flathub and AppImage) |
| Integration with its own brand | Prusa printers: Prusa Connect, Printables and system profiles | Bambu Lab printers: remote control and monitoring, AMS and publishing to MakerWorld | It does not belong to any manufacturer |
| Profiles for other brands | More than 30 manufacturers in the profiles of its repository | 11 manufacturers besides Bambu Lab in its repository | More than 60 manufacturers in its stable release |
| Network sending to other printers | OctoPrint, Klipper (Moonraker), PrusaLink, Duet and others | OctoPrint and PrusaLink | Klipper (Moonraker), OctoPrint and PrusaLink |
| Multicolor and multimaterial | Multimaterial painting and ColorMix (virtual extruders) | Color painting, AMS and mixed filaments | Color painting, per-feature filament and prime tower |
| Supports | Grid, snug and organic, plus paintable supports | Normal and tree supports (slim, strong, hybrid and organic), with custom supports | Normal and tree supports (slim, strong, hybrid and organic) |
| Calibration tests | Not built in on 2.x; the 3.x alpha adds flow and temperature towers | Guided calibrations with Bambu Lab printers; with other printers, temperature, flow, pressure advance, retraction, max flow rate and VFA | Temperature, max volumetric flow, pressure advance, flow, retraction, corners, input shaping, VFA, adaptive pressure advance and tolerances |
| Community (GitHub stars, 14 Oct 2026) | About 9,400 | About 5,100 | About 16,000, with a wiki open to contributions and an official Discord |
| Stable releases in 2026 (through 14 Oct) | 2, plus two 3.x alphas | 8, plus betas | 4, plus nightly builds |
The profile counts were made on the profiles included in each project’s repository and may change with each release; PrusaSlicer, in addition, updates its profiles online. Stars and the number of releases indicate activity, not quality.
When to choose each one
- You have a Prusa or you want a stable, well-documented slicer to get started: PrusaSlicer.
- You have a Bambu Lab and you want to make the most of the AMS, remote control and guided calibrations: Bambu Studio.
- You have a printer from another brand (Creality, Elegoo, Anycubic, a Voron…) or you like to fine-tune with calibration tests: OrcaSlicer is the most flexible option, although PrusaSlicer also covers it well if your model has a profile.
Nothing stops you from having all three installed: they all open STL and 3MF, and it is common to use one or another depending on the printer or the job.
Our verdict
After years of use, PrusaSlicer remains one of the slicers we recommend most, both for getting started and for those already squeezing the most out of their printer. It is free, open source, cross-platform, does not force you to create an account and has very complete official documentation. The view modes, with their color coding, let a beginner print without getting lost and an advanced user have full control.
What to keep in mind:
- The sheer number of options is overwhelming if you do not start in Beginner mode.
- The Spanish translation has stumbles that confuse, such as calling brim Balsa.
- The multiple beds in 2.x have a limit of nine and share the same configuration.
- The program is in the middle of a transition: the official help already marks 2.x as Legacy, but 3.x does not yet replace it for daily use.
Today, the version to print with is 2.x. When 3.x is released as a stable version, we will update this guide.


