As many of you know, BigTreeTech (BIQU) is the manufacturer of one of the most widespread electronics on the market, the famous SKR v1.4 / SKR v1.4 Turbo, of which we wrote an extensive article ago some time: Complete guide SKR v1.4 / v1.4 Turbo with TMC2209 drivers and Sensorless.
Now BigTreeTech has launched a new revision of these electronics, whose name is BTT SKR 2, to try to replicate the success of its previous version with powerful hardware and some very interesting news.
And as we usually do in 3DWork, we are going to analyze a little what these new electronics offer and how we can configure them to get the most out of them in our 3D printers.
Let’s finally go to the article, I hope and hope that it will be of use to you:
Brief introduction
Before continuing with the article I would like to remind you as always that we have a large community in our Telegram channel. There we usually share all our doubts and experiences. If you want to be part of it, do not hesitate to join us.
You can also find a lot of help or resources directly in the Telegram group of SKR, as well as other help guides in our Telegram Bot @ThreeDWorkHelpBot
Where can I buy the BigTreeTech SKR 2?
I leave you some links to the electronic ones mentioned in today’s article. It is my duty to tell you that they are links to online stores (affiliates).
If you use them, the price of the product will be the same as if you log in regularly, but 3DWork will have a small commission left to help maintain this website (and I will be eternally grateful).
If you wish, and as an alternative, you can also use our Markets.sx component search engine, where you can compare prices on different sites (Amazon, Aliexpress, Banggood, etc.) with a single search very easily.
What’s new in the BigTreeTech SKR 2?
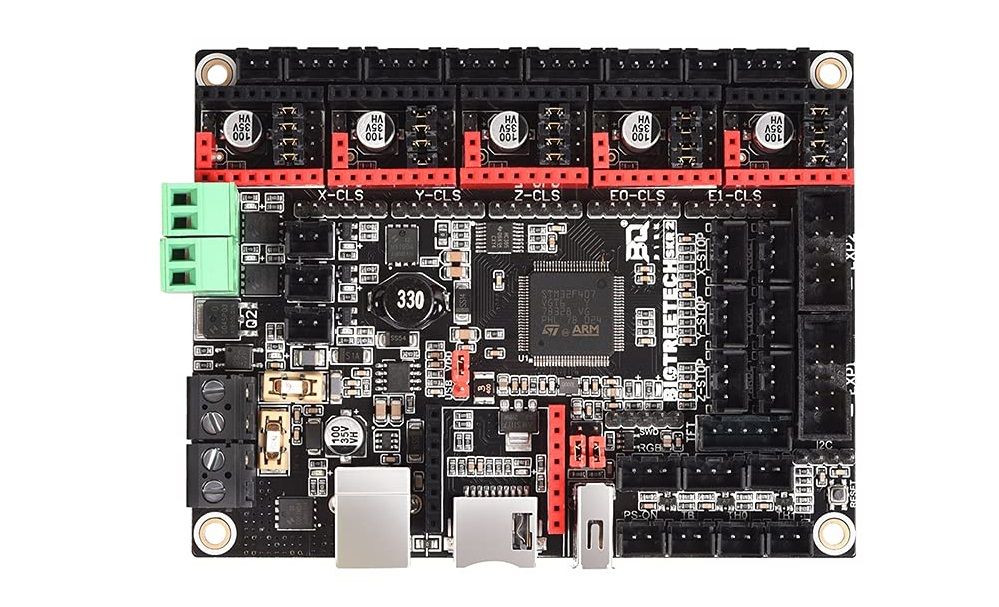
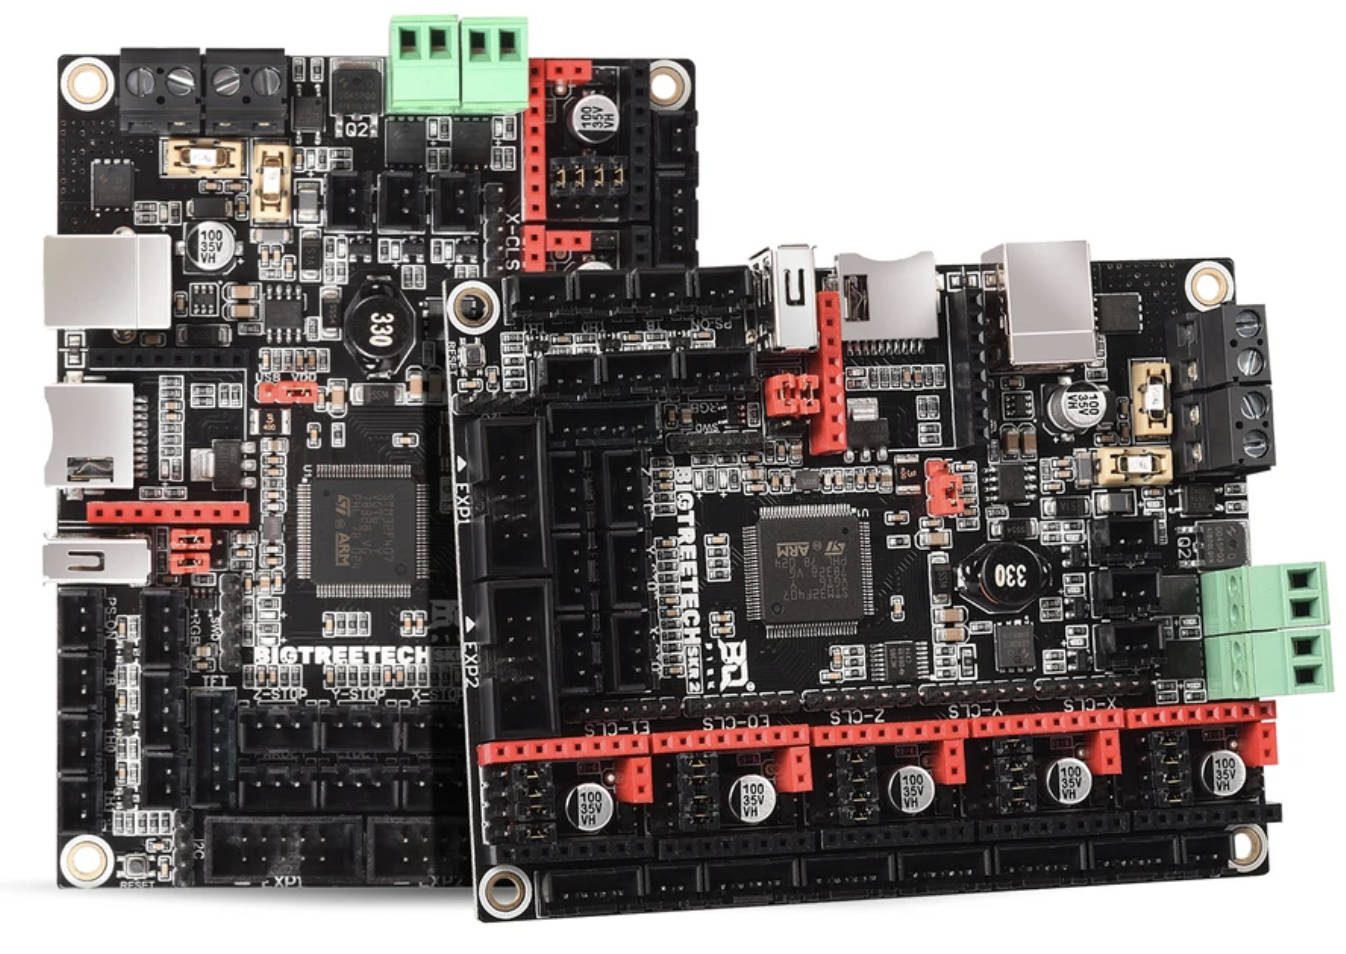
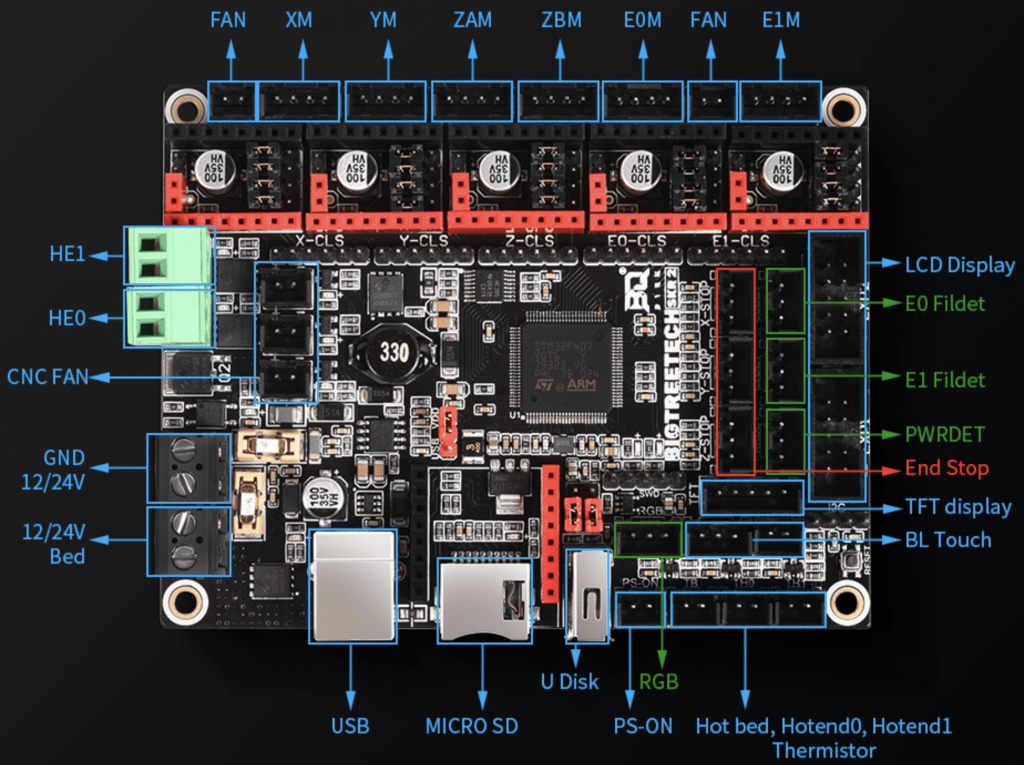
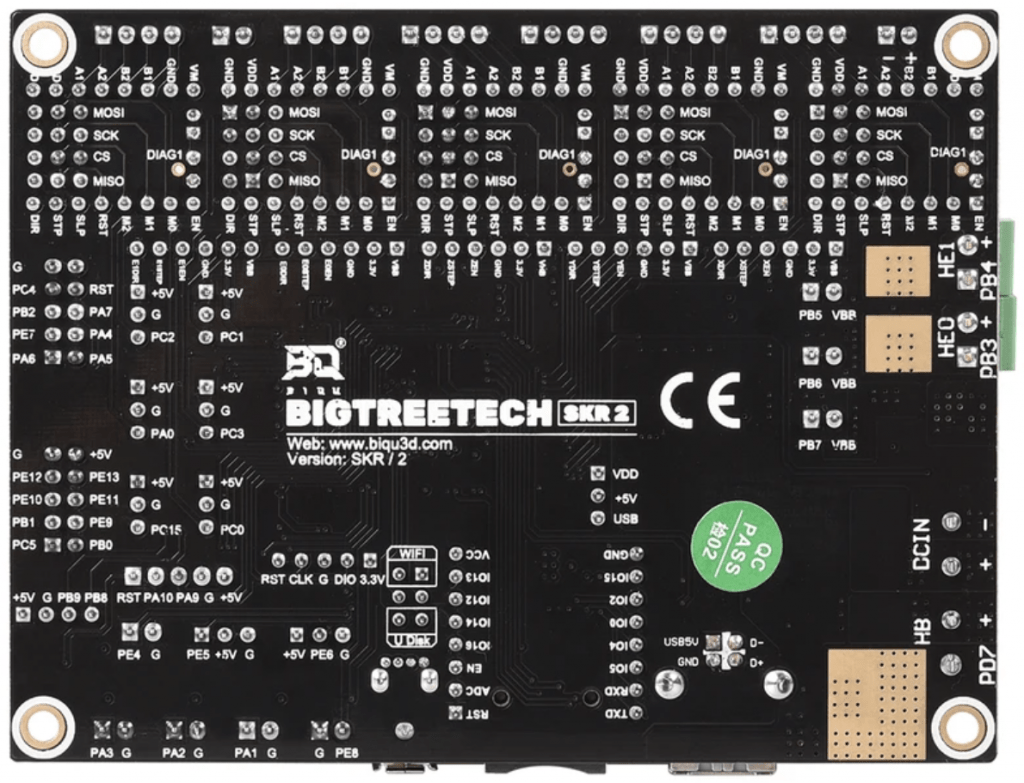
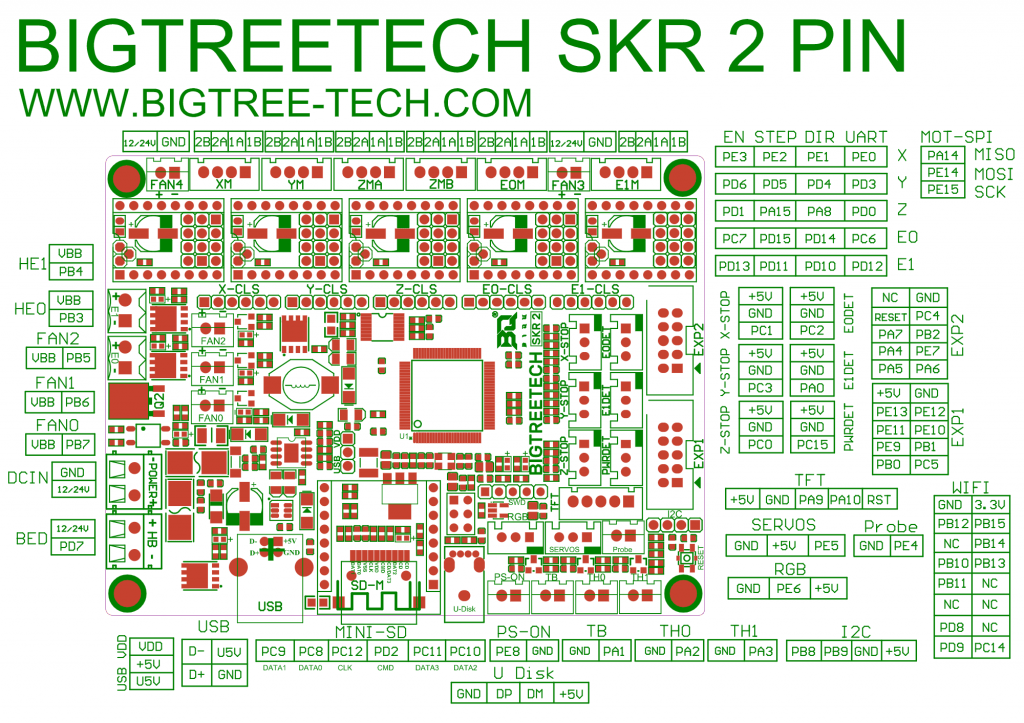
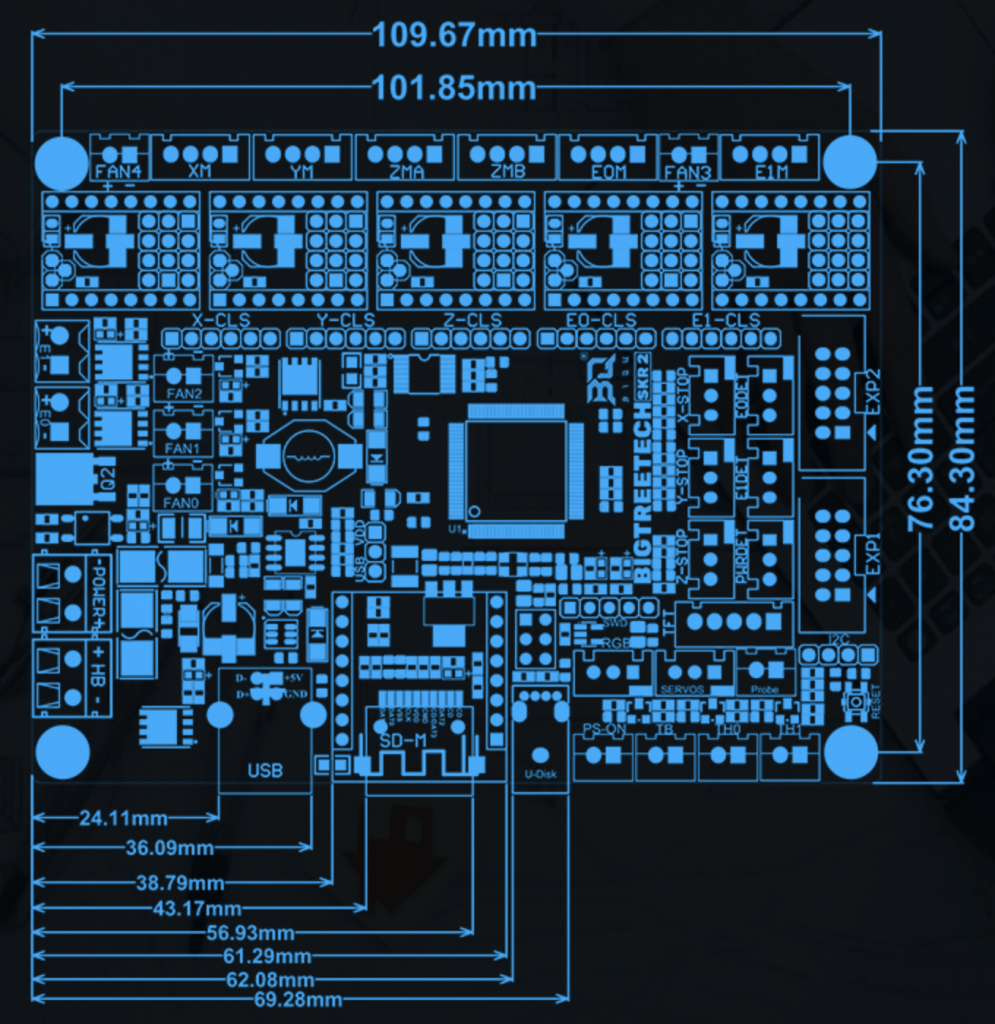
As always, we start with the diagrams of the board, which will help us quickly and visually to see all its innovations and improvements introduced with a format, in terms of size, very similar to that of previous electronics.
Some of the important improvements that we can find in this new SKR 2 electronics from BigTreeTech are the following:
- New and more powerful microprocessor (or MCU)
- Protections on the thermistor connectors
- Thermal protections
- Driver protection (if they are placed in the wrong position)
- Sensorless jumpers and avoid cutting pins in drivers
- Dedicated wifi port
- 3 controllable fans
- SD interface improvements in addition to including a USB connector
Technical specifications
In the following list you can find the technical specifications of the SKR 2 electronics:
- Size 110mmx85mm, in the previous section you have a diagram of the board
- ARM Cortex-M4 STM32F407VGT6 MCU at 168Mhz … a real beast !!!
- Supported input voltages DC12V and DC24V, using 3.3V as working voltage
- Marlin, RepRap Firmware and Klipper firmwares support
- Wifi connector for ESP-12S / ESP-07S especially useful for use with RepRap Firmware
- I2C expansion connectors, Servos, Leveling, Relay, UPS, Filaments, Leds, etc …
- Driver support TMCxxxx, DRV8825, A4988, etc … supporting SPI, UART, STEP / DIR interfaces
- Connectors for drivers X, Y, Z (with double motor output), E0, E1 … five in total each with interface for connection to servo motors
- Support for serial touch screens, SPI touch screens and LCD displays
- Supports kinematics (depending on firmware) XYZ, delta, kossel, Ultimaker, CoreXY, etc …
A deeper look at this electronics
As we have previously mentioned, the SKR 2 is an evolution of the old SKR 1.4 introducing a large number of improvements and updates. Let’s go into detail below.
MCU, while its sisters SKR 1.3/1.4 mounted MCUs LPC176* the SKR 2 has improved this aspect including an ARM Cortex-M4 STM32F407VGT6 MCU at 168 Mhz that will give extra power to our printer.
Thermistors, as we have already mentioned, another of the great improvements is the inclusion of protections in the parts where normally by manipulation or external hardware failure they can affect our board. In this case, the thermistors have protection to avoid shorts that can destroy our board.

Fuses, changing from traditional blade fuses to replaceable SMD fuses that greatly improve the final image of the board, as you can see in the image below.

MOSFETS, a very important part of our boards are the MOSFETS in charge of managing our bed and hotend as well as the fans. In the SKR 2 these have been improved using a HYG090N06LS1C2 in addition to additionally including a G045P03 that serves to protect the plate against possible thermal leaks.

Fans (or fans), adding 3 controllable fans perfect to use as a layer fan, controlled cooling of the hotend and electronics. You have more information on how to use these in our fan guide at 3DWorkLabs.

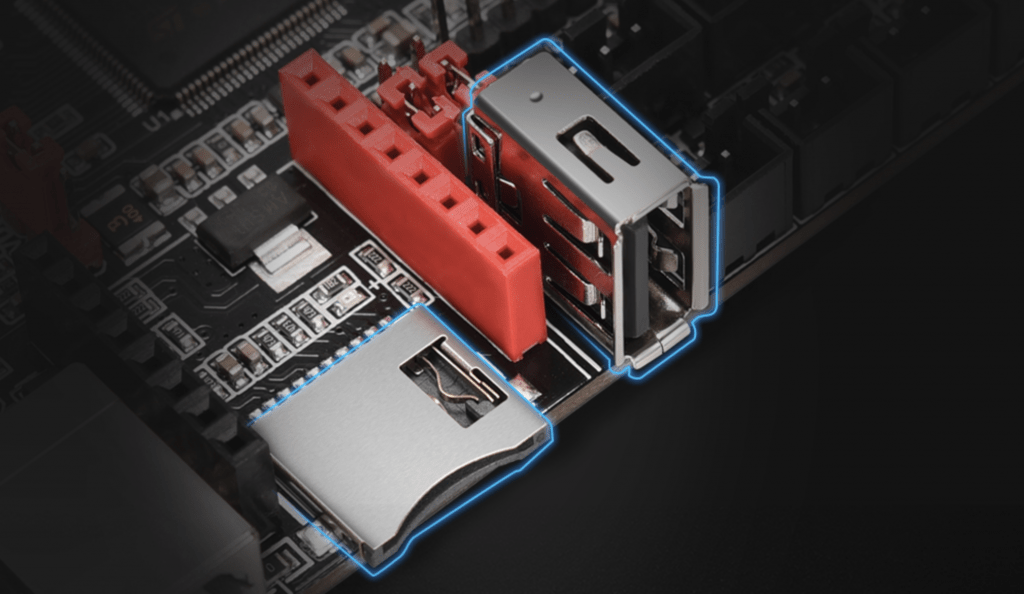
USB and SD Card, the SD Card part has been improved by using SDIO mode and adding a vertical USB interface.
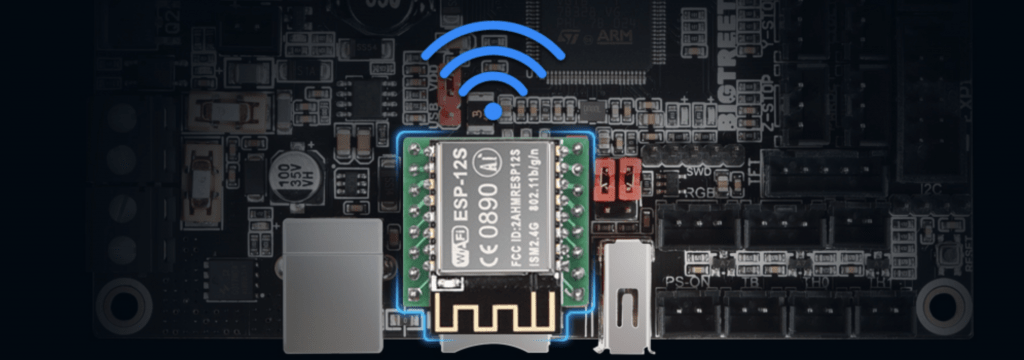
WiFi, although its sisters already had a connector for the WiFi connection, in the new SKR 2 electronics it has been improved and made compatible with ESP12S or ESP07 modules. Especially for later use with RepRap Firmware.
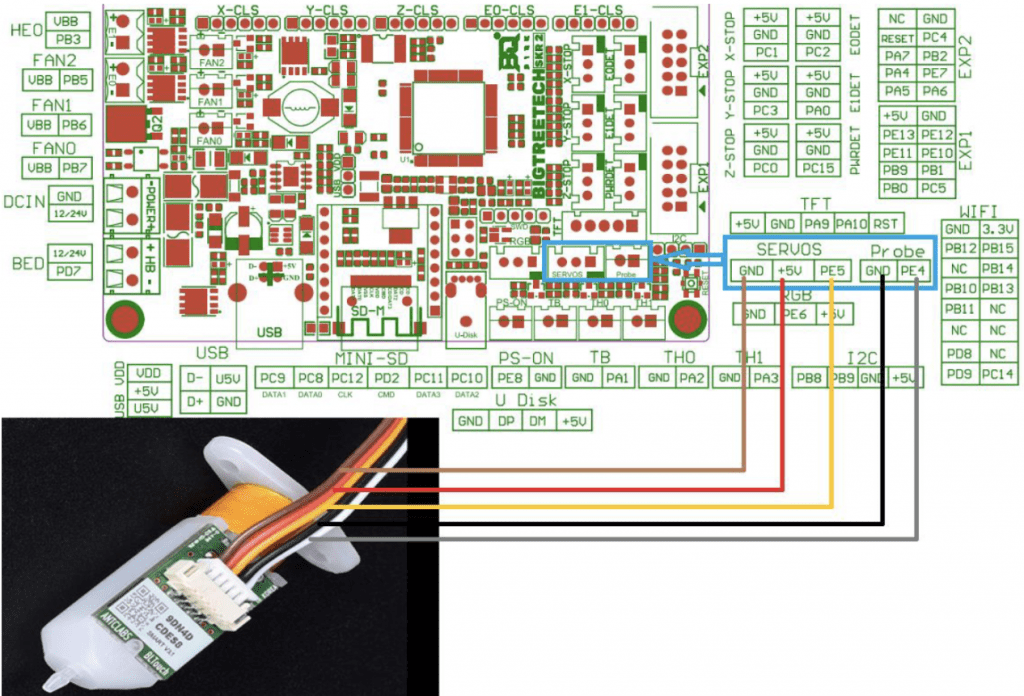
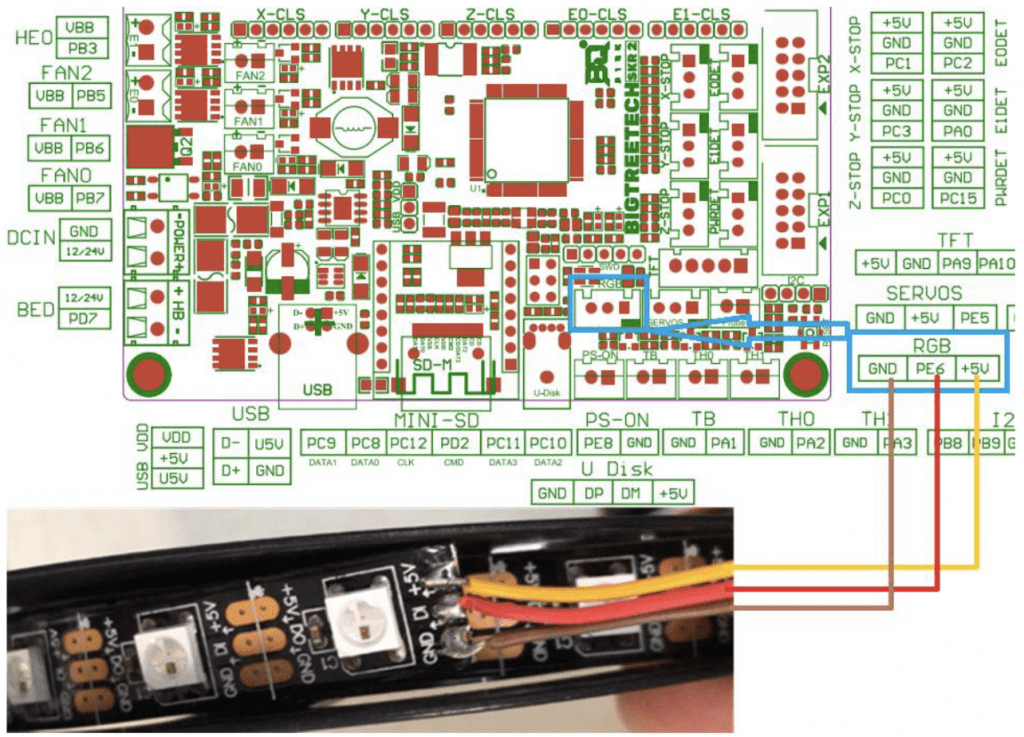
Expansion, although they are not improvements with respect to previous versions, we remind you of the possibilities of improving our printer by adding leveling sensors, relay modules, UPS modules, Neopixel, etc …
A great improvement for our printers that can make it easier for us to have a first layer as perfect as possible is the installation of a leveling sensor such as the BLTouch, as it is one of the most versatile.
You have much more detailed information in our BLTouch Guide or if you prefer an inductive sensor in this other Inductive Sensor Guide.
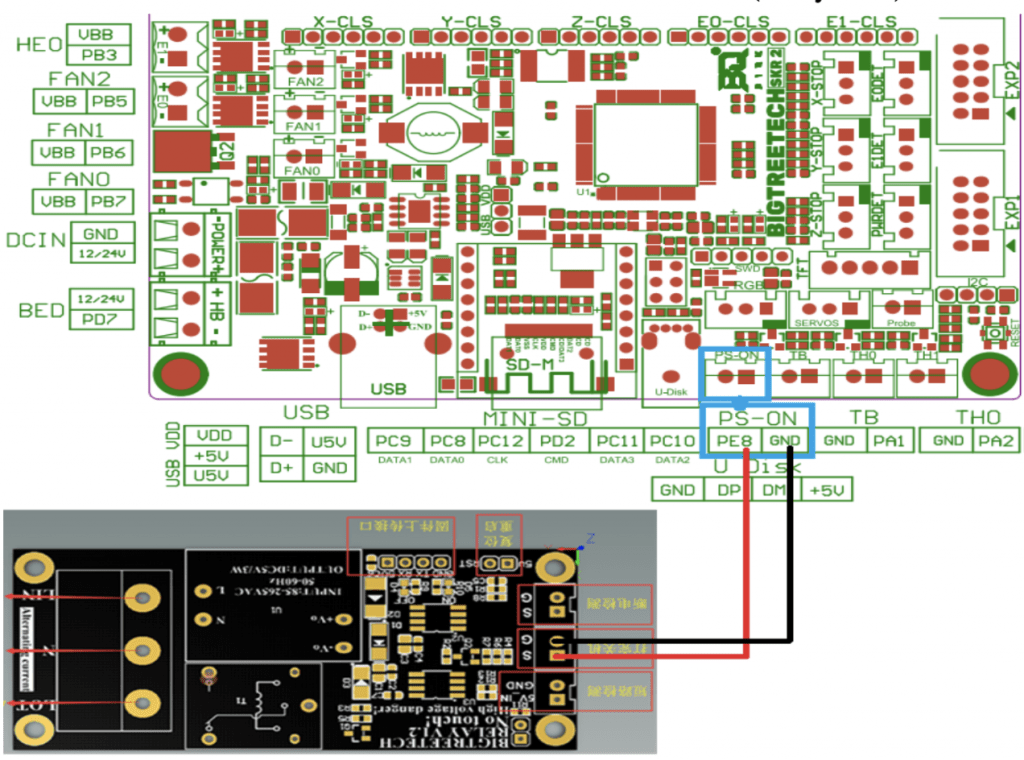
It gives us a control of the on or off of our machine in a controlled way, such as turning it off once the printing is finished.
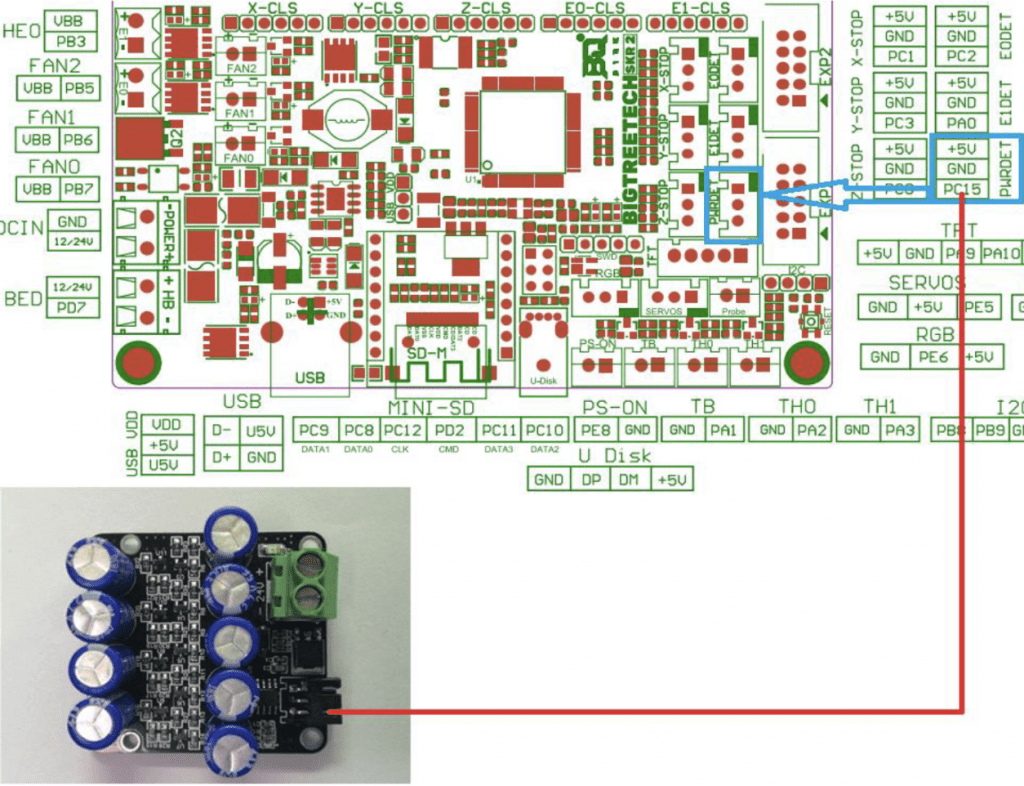
Like the relay module, the UPS allows us to carry out a correct emergency shutdown, especially if we use PLR (Power Loss Recovery) / print restoration in the event of power failure. You can find more detailed information in the following guide.
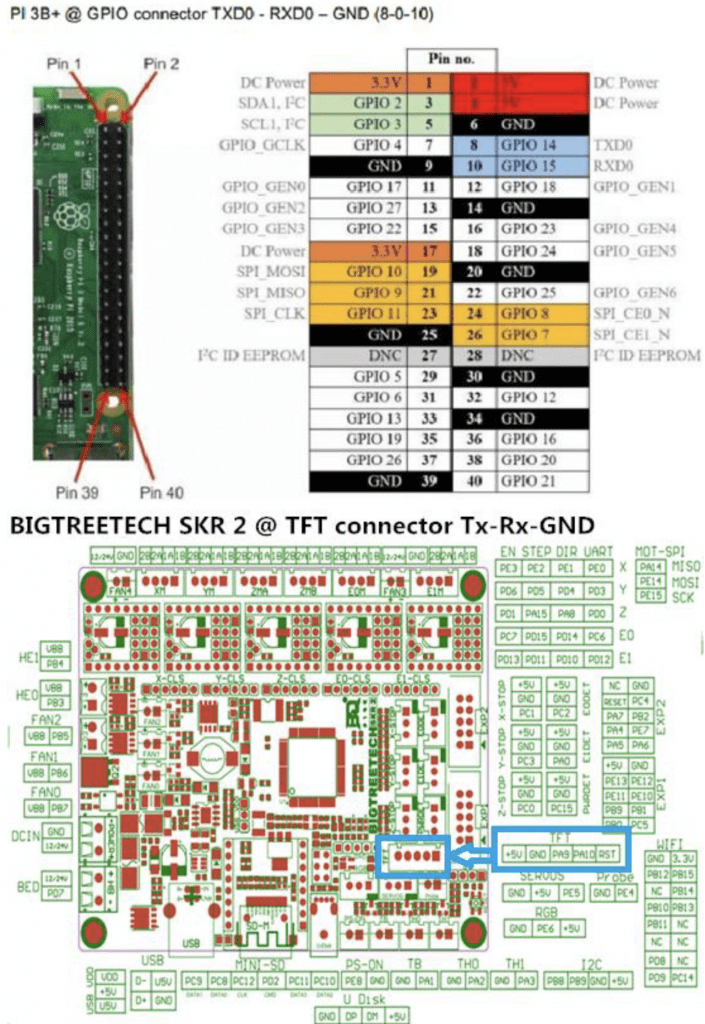
If we want to manage our printer remotely, something very interesting and powerful, we can use Octoprint for example that is installed on a Raspberry normally.
We can connect this by the USB cable or directly using the GPIO of our Raspberry the TFT connector (or any other serial on the board like the one found in the Wifi port).
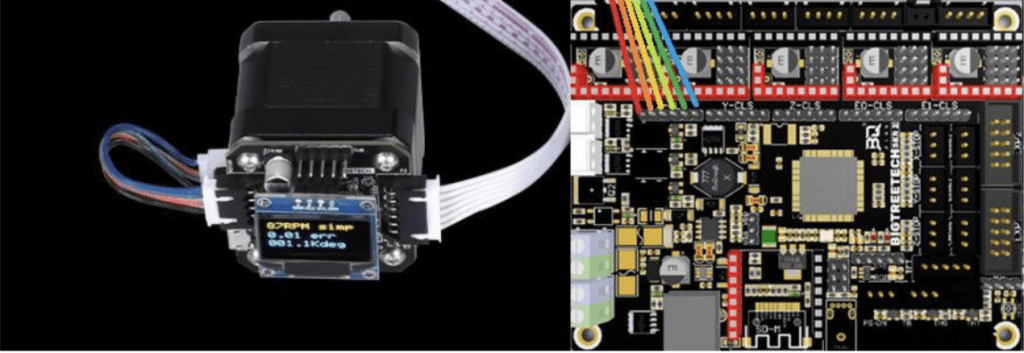
The SKR 2 has interfaces to connect servo motors following the following scheme:
Drivers, without a doubt one of the big changes in this revision on the old SKR 1.3/1.4 electronics is how the drivers interact with the rest of the electronics by including protections.
These protections will prevent the incorrect connection of our drivers as well as the inclusion of the much requested jumper to enable sensorless.
This unfortunately was eliminated in SKR 1.4 and forced us to “mutilate” our drivers in the case of axes other than X, Y or in the case of not using Sensorless, about which you can find more information in our Sensorless guide.
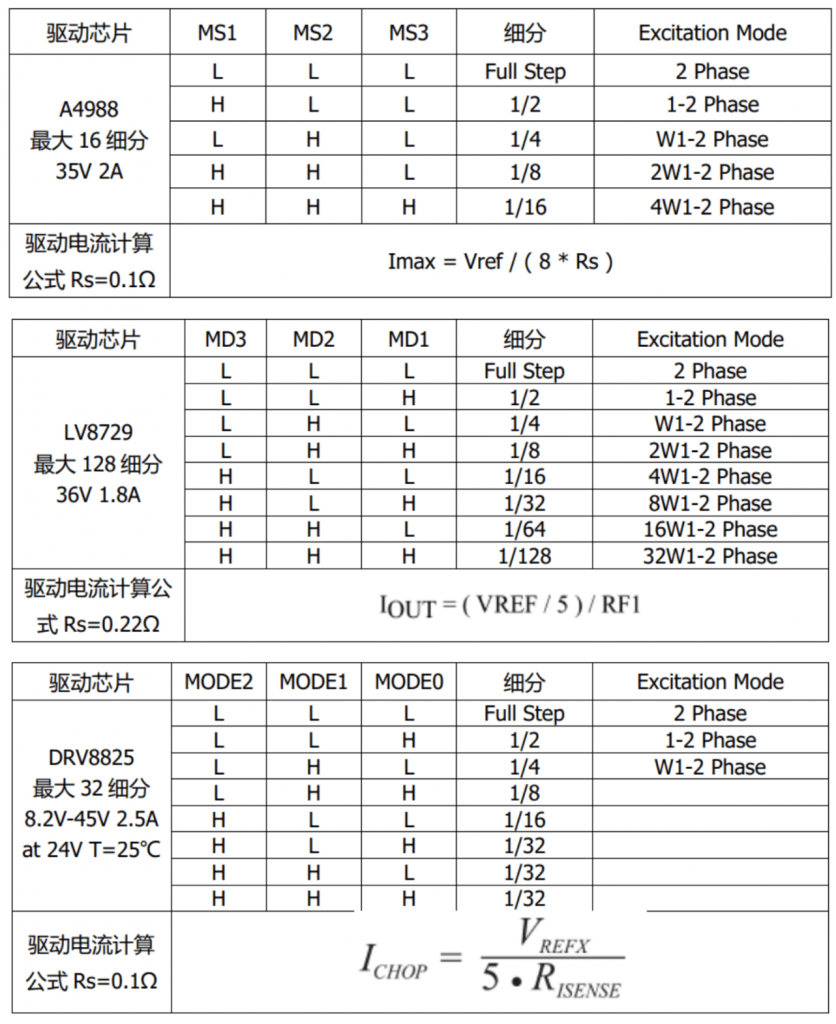
You can review the different options in the available interfaces in the SKR 2 drivers in the following images:
Firmware configuration
As always, all Bigtreetech boards pay special attention to maximum compatibility with the most popular firmwares on the market.
In this case, the SKR 2 ensures optimal support for Marlin, RRF or Klipper firmwares, which means practically any 3D printing environment.
Firmwares Marlin
We advise you to follow our Guide to “cook” your own Marlin that we have in the /Marlin section of our Telegram help bot @ThreeDWorkHelpBot
You can find the sources of the official firmware here.
Modifying “Platformio.ini”

In this file we must indicate the chipset that our board has, so we must look at the beginning of the file for the value “env_default” and change it to the following:
default_envs = BIGTREE_SKR_2
Modifying “Marlin/configuration.h”

We advise you to add a comment to any line that we modify, since later it will be much easier for us to find our changes for future consultations. For this we can add:
In the case that you do not already have a comment, the line
... // 3DWORK
In case you already have a comment
... // 3DWORK ...
We will start by correctly configuring the SERIAL and BAUDRATE for this machine, something key for the correct operation of our TFT, USB or WIFI connection.
#define SERIAL_PORT 1 // 3DWORK SKR 2
...
#define BAUDRATE 115200 // 3DWORK SKR 2
...
#define SERIAL_PORT_2 -1 // 3DWORK SKR 2
...
#define SERIAL_PORT_3 3 // 3DWORK SKR 2
Now we will define our MOTHERBOARD, which, as in the “Platformio.ini” file, indicates the type of chipset that our board carries and that allows Marlin to use one pin configuration or another.
#ifndef MOTHERBOARD
  #define MOTHERBOARD BOARD_BTT_SKR_V2_0_REV_B // 3DWORK SKR 2
#endif
We will define the number of extruders and the diameter of the filament that our printer uses, which basically indicates its diameter. Typically printers use 1.75 millimeter filament, although another less common (but also standard) measurement is 3 millimeters.
// This defines the number of extruders
// :[0, 1, 2, 3, 4, 5, 6, 7, 8]
#define EXTRUDERS 1

// Generally expected filament diameter (1.75, 2.85, 3.0, ...). Used for Volumetric, Filament Width Sensor, etc.
#define DEFAULT_NOMINAL_FILAMENT_DIA 1.75
Thermistors, in these variables we will indicate which thermistors we have. I advise you to identify which is yours or, failing that, use a value of 1, which is usually the most normal. It is very important to indicate the correct type of thermistor so that the measurements that Marlin receives are correct to avoid extrusion problems and/or reading errors.
In the case that we want to deactivate or activate the heated bed, we will comment or activate the thermistor of the bed, in this way Marlin knows whether or not it has a heated bed. In our example and for this board we will use a Hotend and a Heated bed with a standard temperature sensor.
#define TEMP_SENSOR_0 1 // 3DWORK SKR 2 TE0
#define TEMP_SENSOR_1 0
#define TEMP_SENSOR_2 0
#define TEMP_SENSOR_3 0
#define TEMP_SENSOR_4 0
#define TEMP_SENSOR_5 0
#define TEMP_SENSOR_6 0
#define TEMP_SENSOR_7 0
#define TEMP_SENSOR_BED 1 // 3DWORK SKR 2 TB
#define TEMP_SENSOR_PROBE 0
#define TEMP_SENSOR_CHAMBER 0
#define TEMP_SENSOR_COOLER 0
PID, another very important part is the PID of which you can obtain more detailed information in the section /Calibration/Initial Calibration of our help bot on Telegram @ThreeDWorkHelpBot or in our Calibration guide.
Basically the PID helps Marlin to properly control the temperature without having large fluctuations.
#define PIDTEMP // 3DWORK PID
#define PIDTEMPBED // 3DWORK PID
ENDSTOPS or limit switches, it is important to verify when we change the electronics and turn on for the first time that the logic of the limit switches is correct using the M119 command from a terminal such as Pronterface. This is OPEN in normal state and TRIGGERED when pressed. We can reverse this logic by changing:
#define X_MIN_ENDSTOP_INVERTING false // Set to true to invert the logic of the endstop.
#define Y_MIN_ENDSTOP_INVERTING false // Set to true to invert the logic of the endstop.
#define Z_MIN_ENDSTOP_INVERTING false // Set to true to invert the logic of the endstop.
#define X_MAX_ENDSTOP_INVERTING false // Set to true to invert the logic of the endstop.
#define Y_MAX_ENDSTOP_INVERTING false // Set to true to invert the logic of the endstop.
#define Z_MAX_ENDSTOP_INVERTING false // Set to true to invert the logic of the endstop.
#define Z_MIN_PROBE_ENDSTOP_INVERTING false // Set to true to invert the logic of the probe.
On the other hand and although the normal thing is that the machines make the home in MIN (lower left corner) instead of MAX (upper right corner), using HOME_DIR for this change -1 (MIN) 1 (MAX), we must remember that in In the case of changing the logic, enable the corresponding limit switches:
#define USE_XMIN_PLUG
#define USE_YMIN_PLUG
#define USE_ZMIN_PLUG
//#define USE_XMAX_PLUG
//#define USE_YMAX_PLUG
//#define USE_ZMAX_PLUG
Remember that if you have TMC drivers in UART mode you can use, if the driver supports it, the use of SensorLess that will allow you to dispense with the physical limit switches, freeing up components and cables.
You can find information on how to activate SensorLess in our Guide for Marlin.
Drivers, as we have already mentioned, this board has 5 sockets for drivers supporting different types of drivers and their configurations.
In our example we will use a TMC2209 in UART mode (intelligent), with independent double Z and a single extruder:
#define X_DRIVER_TYPE  TMC2209 // 3DWORK DRIVERS
#define Y_DRIVER_TYPE  TMC2209 // 3DWORK DRIVERS
#define Z_DRIVER_TYPE  TMC2209 // 3DWORK DRIVERS
//#define X2_DRIVER_TYPE A4988
//#define Y2_DRIVER_TYPE A4988
#define Z2_DRIVER_TYPE TMC2209 // 3DWORK DRIVERS
//#define Z3_DRIVER_TYPE A4988
//#define Z4_DRIVER_TYPE A4988
#define E0_DRIVER_TYPE TMC2209 // 3DWORK DRIVERS
STEPS or motor steps, we will indicate to Marlin the motor steps to perform movements. In this example we will use the ones that an Ender printer carries by default.
In any case, again we refer you to the /Calibration/Initial calibration section of our help bot in Telegram @ThreeDWorkHelpBot or here for the process to calibrate these steps for our extruder and movement axes.
#define DEFAULT_AXIS_STEPS_PER_UNIT { 80.00, 80.00, 400.00, 93 } // 3DWORK steps for Ender3 axis X, Y, Z, Extruder
S_CURVE_ACCELERATION, this functionality offers a great improvement in print quality by smoothing acceleration or deceleration when the print head is in motion.
#define S_CURVE_ACCELERATION // 3DWORK IMPROVEMENTS
PROBE or leveling sensor, as we have commented on numerous occasions, we have a detailed guide to install a BLTouch sensor. Something very advisable to take into account to ensure that our prints always have a first layer that is as perfect as possible.
We will start by indicating where our leveling sensor is connected. In this case we will connect it to the Z- limit switch connector.
#define Z_MIN_PROBE_USES_Z_MIN_ENDSTOP_PIN // 3DWORK PROBE we indicate to Marlin that our sensor is connected in Z-STOP
Sensor type BLTouch or Inductive, there are different types of sensors. Depending on the one used, we will have to uncomment one or the other in the case that you use an inductive/PINDA check our guide.
In the case of an Inductive sensor:
#define FIX_MOUNTED_PROBE // 3DWORK PROBE
In the case of a BLTouch type sensor:
#define BLTOUCH // 3DWORK PROBE
Sensor offsets, it is very important to tell Marlin where exactly our leveling sensor is installed. We will do this by defining the PROBE OFFSETs.
The Offset is the distance between the tip of the nozzle and the tip of the leveling sensor, which depending on where it is must be positive or negative values, you can use the following graph as an example of what value to put in each case.
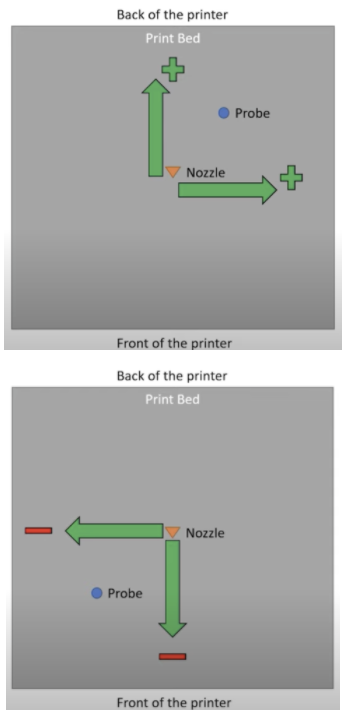
In our case and as an example, our sensor is displaced to the left of the nozzle in X 30mm and 10mm in Y since that distance is towards the bottom of the printer.
#define NOZZLE_TO_PROBE_OFFSET { -30, 10, 0 } // 3DWORK PROBE
PROBING_MARGIN (in previous versions MIN_PROBE_EDGE), it is very normal that our printers have a glass as a printing base although personally we like magnetic PEI sheets more.
They tend to be a little more susceptible to being marked with blows, they have excellent adhesion, they do not limit the size of the bed and removing the pieces is extremely simple and fast.
In any case we already have glass or another surface, it is advisable that the sensor is away from any object that may bother it during the leveling process, whether they are staples to fix the glass or the mismatch of the beginning and end of the bed that makes the sensor cannot measure.
For this, we will use this PROBING_MARGIN, to which we will indicate how many millimeters to move away from the edges of the bed.
In our case using a BLTouch and a PEI platform we leave it by default.
#define PROBING_MARGIN 10 // 3DWORK PROBE
Direction of motors, another very common problem when starting a printer is that the wiring of the coils of our motors do not coincide and there can be two cases:
- That the connectors of our coils are mixed, it is very easy to identify since the motor will not rotate correctly and will stumble. To solve it, it is advisable to check the pinout of the old board and/or the motor and compare it with that of our new board to make sure that they coincide.
- That the motor rotates in the wrong direction. In this case again we have two options. The first and advisable is to modify the motor rotation in Marlin and the second is to reverse the wiring of one of the motor coils.
In our case we opt for the first one by modifying the following lines in Marlin changing the current value to the contrary. In this case we invert the Z axis.
#define INVERT_X_DIR true
#define INVERT_Y_DIR true
#define INVERT_Z_DIR false // 3DWORK We reverse the rotation of the Z axis
Print size, if we have used a generic Marlin it is important to verify that the print dimensions are correct for our machine.
For the bed size in the example we use an Ender 3 at its maximum size, it is advisable to verify that you can physically reach these measurements and adjust it if necessary:
#define X_BED_SIZE 235 // 3DWORK BED
#define Y_BED_SIZE 235 // 3DWORK BED
We will also define the size of our Z axis:
#define Z_MAX_POS 250 // 3DWORK BED
Filament sensor, we advise you to review the section /Improvements/Filament sensor of our help bot in Telegram @ThreeDWorkHelpBot, or in our guide you can find more detailed information about how to install and configure a filament sensor.
#define FILAMENT_RUNOUT_SENSOR // 3DWORK Filament Sensor
As with the limit switches, it is advisable to check the status of the filament sensor with an M119, which should appear TRIGGERED with filament and OPEN without filament. In the case that it seems inverted, we must play with the value of (LOW/HIGH):
#define FIL_RUNOUT_STATE LOW // 3DWORK Filament Sensor
We can also indicate the filament distance that we want since the sensor detects the sensor failure in:
#define FILAMENT_RUNOUT_DISTANCE_MM 25 // 3DWORK Filament Sensor
In the case that our filament sensor works by detection of filament flow (such as the BigTreeTech Smart Filament Sensor) we must enable the following:
#define FILAMENT_MOTION_SENSOR // 3DWORK Filament Sensor
Auto Leveling, as we mentioned earlier in the / Leveling section of our bot @ThreeDWorkHelpBot you have more detailed information on how to activate UBL self-leveling (the most advanced and recommended for beds of a certain size or with problems) and MESH which allows you to have a mesh without sensor by doing the process manually.
In any case, for this example we will enable BILINEAR .
#define AUTO_BED_LEVELING_BILINEAR // 3DWORK PROBE
It is important to tell Marlin to enable self-leveling (G29) after a homing (G28), although in current versions it is no longer necessary we advise enabling it.
#define RESTORE_LEVELING_AFTER_G28 // 3DWORK PROBE
In the case of BILINEAR, we will specify the number of points to be made per mesh in the next part of Marlin (by default it has 3 points per axis, 3×3 = 9 check points).
if EITHER(AUTO_BED_LEVELING_LINEAR, AUTO_BED_LEVELING_BILINEAR)
// Set the number of grid points per dimension.
#define GRID_MAX_POINTS_X 3 // 3DWORK PROBE
Another function that we must enable for safety is to perform a homing in the center of the bed, this helps us to two things. The first to ensure that the sensor has a surface to detect the end of the stroke and the second visually verify that our offsets are in the correct way since the leveling sensor has to be perfectly positioned in the center of our bed.
#define Z_SAFE_HOMING // 3DWORK PROBE
EEPROM, in the EEPROM Marlin saves the configuration values of different functions so that they can be used by the system and changed by the user without having to modify Marlin source files, compile and upload the firmware at each change.
It is highly recommended to activate it and with our SKR 2 we will not have memory problems.
#define EEPROM_SETTINGS // 3DWORK EEPROM
#define EEPROM_CHITCHAT // 3DWORK EEPROM
Nozzle Park, in the example we are explaining we have added a filament sensor. For this, to work we must activate NOZZLE_PARK_FEATURE which basically allows us to “park” the print head in a safe area to carry out this filament change.
Although if we do not have a filament sensor, it is highly advisable to have it active since it allows us to improve the pause functions.
#define NOZZLE_PARK_FEATURE // 3DWORK Filament Change
SD Card, if we want our beloved Marlin to be able to read from our SD, either on the board or on a compatible screen (note that the Touch is not), we must activate the SD Card support.
#define SDSUPPORT // 3DWORK SD
Advanced Homing Menu, it is not necessary but it is highly advisable in the case of tests to enable this function that allows us to perform a separate homing of each axis.
#define INDIVIDUAL_AXIS_HOMING_MENU // 3DWORK Improvements
Modifying “Marlin/configuration_adv.h”

We have already finished the first part and now we will have to go to the configuration of the advanced options.
Scroll and long file names, it is interesting to activate this function to be able to show the full name of the files to be printed.
Like the previous one and for it to work correctly we have to activate the following option.
#define LONG_FILENAME_HOST_SUPPORT // 3DWORK Improvements
#define SCROLL_LONG_FILENAMES // 3DWORK Improvements
SD connection, in “configuration.h” we enable SD support and in “configuration_adv.h” we will define where Marlin will try to use that SD from. As we mentioned previously, not all screens that have SD will work correctly.
We have three options:
- LCD where we will use the one from the Marlin screen.
- ONBOARD where we will use the one from the board.
- CUSTOM_CABLE where we will indicate that we use an external reader connected to the board.
#define SDCARD_CONNECTION LCD // 3DWORK SD
Fans, a great success by BigTreeTech is the inclusion of 3 manageable fans.
The definition of the pin of each FAN can be found in:
- REV A /Marlin/src/pins/stm32f4/pins_BTT_SKR_V2_0_REV_A.h
- REV B / Marlin / src / pins / stm32f4 / pins_BTT_SKR_V2_0_REV_B.h
- For both /Marlin/src/pins/stm32f4/pins_BTT_SKR_V2_0_common.h
FAN0, in this case we are not going to make any changes to its role since it is the layer fan and this is managed by the slicer itself to cool the filament.
FAN1, in our example we are going to assign it to the hotend so that it is dynamically only activated when the hotend is running, avoiding fan wear and unnecessary noise:
#define E0_AUTO_FAN_PIN FAN1_PIN // 3DWORK FAN1 Assigned to the Hotend
...
#define EXTRUDER_AUTO_FAN_TEMPERATURE 50 // 3DWORK FAN1 Activation at temperature
#define EXTRUDER_AUTO_FAN_SPEED 255   // 255 == Full speed
FAN2, to take advantage of this arsenal of manageable fans (we can have more by reusing pins from other functions such as RGB for example) to assign FAN2 as a dynamic electronics fan so that it is activated when the drivers are in use, minimizing wear and noise again by the fan:
#define USE_CONTROLLER_FAN // 3DWORK FAN2 Electronic managed ventilation enabled
...
#define CONTROLLER_FAN_PIN FAN2_PIN // 3DWORK FAN2 Assigned to electronics
...
#define CONTROLLER_FAN_EDITABLE // 3DWORK FAN2 Manageable GCode M710
...
#define CONTROLLER_FAN_MENU  // 3DWORK FAN2 Enable screen management menu
Babystepping, an almost essential function to have is baby stepping. Babystepping allows us to adjust the height of Z during a print to manually “tune” this height to our liking.
In our example, we will enable that it can be activated with a double click on the button/encoder, which is always available and shows us graphic improvements in the adjustment to understand the direction of the adjustment from the screen.
#define BABYSTEPPING // 3DWORK Improvements
#define DOUBLECLICK_FOR_Z_BABYSTEPPING // 3DWORK Improvements
#define BABYSTEP_ALWAYS_AVAILABLE // 3DWORK Improvements
#define BABYSTEP_ZPROBE_GFX_OVERLAY // 3DWORK Improvements
Retries in case of failure in leveling, another very useful function is to be able to retry the homing process in case of failure. Sometimes our leveling sensor may have a specific failure and through this function it will allow us to try again a finite number of times.
#define G29_RETRY_AND_RECOVER // 3DWORK Improvements
#define G29_MAX_RETRIES 4 // 3DWORK Improvements
ARC support, a substantial improvement in the quality of our prints and also when we print through serial devices such as TFT, Octoprint, etc … It allows simplifying the gcodes commands by minimizing the number of movements and making them more fluid while also avoiding a large number of retractions.
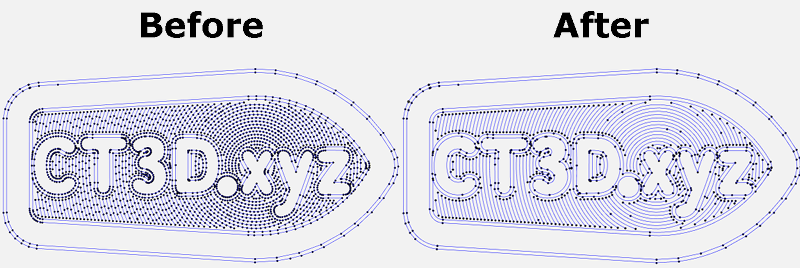
To use it we must configure our Slicer to apply these changes or in the case of Octoprint we can use a plugin. Regarding the changes in Marlin:
#define ARC_SUPPORT // 3DWORK Improvements
It is important to emphasize that in the case of enabling ARC for its use it is advisable, in the case that we also have it enabled, compatibility with S_CURVE. You have more information in the calibration guide.
Advanced pause, as we discussed earlier in this example we use a filament sensor. For it to work correctly we have to enable ADVANCED_PAUSE_FEATURE which enables the gcode M600 command to change the filaments.
This can be done with or without a leveling sensor and requires NOZZLE PARK for its correct operation.
We will not go into the detailed configuration since you have it within /Improvements/Sensor Filaments within our bot or directly in this guide.
#define ADVANCED_PAUSE_FEATURE // 3DWORK Filament Change
UART/SPI driver configuration, with our UART/SPI drivers we have to correctly configure the advanced parameters that we will find in the HAS_TRINAMIC_CONFIG.
Microsteps, although we can configure from 16 to 256 microsteps we do not advise you at all to use a value other than 16.
With these microsteps, the definition that we could achieve mechanically is practically impossible to achieve with normal printers, in addition to the fact that the TMC drivers already perform the interpolation of these themselves to always offer maximum reliability and precision.
Reliability is another important aspect when it comes to microstepping. The stepper motors that our printers carry lose torque (and steps) at high revolutions so increasing this definition of steps will exponentially increase the percentage of reliability and therefore that our parts do not come out correctly.
In the following example, we can see how we have 16 microsteps for our X axis.
#if AXIS_IS_TMC(X)
#define X_CURRENT 650 // (mA) RMS current
#define X_CURRENT_HOME X_CURRENT
#define X_MICROSTEPS 16 // 0..256
#define X_RSENSE 0.11
#define X_CHAIN_POS -1
#endif
Another important value of the previous values is that of CURRENT where we will adjust the current of our motors. You can also adjust them from the LCD from Settings/Advanced/TMC along with other options that we will explain below.
STEALTHCHOP, it is important to enabling it if we want our motors to be “silent” since it will not be working in SpreadCycle mode, which is the power mode.
#define STEALTHCHOP_XY // 3DWORK Drivers
#define STEALTHCHOP_Z // 3DWORK Drivers
#define STEALTHCHOP_E // 3DWORK Drivers
Although rare, some extruders may work better with StealthChop mode disabled. If this is our case, we will comment on the following line.
//#define STEALTHCHOP_E // 3DWORK Drivers
CHOPPER TIMING, is used by StealthChop for the synchronization of signals to the motors. This has to match the voltage used in our printer, in the case of Ender 3, and normally in all 24v printers.
#define CHOPPER_TIMING CHOPPER_DEFAULT_24V // 3DWORK Drivers
Monitor Status, this function allows Marlin to control in detail all the parameters of the drives to be able to adjust, for example, their temperature to avoid more serious problems.
#define MONITOR_DRIVER_STATUS // 3DWORK Drivers
Hybrid Threshold, another interesting function is Hybrid Threshold which allows Marlin to switch between StealthChop (silence) or SpreadCycle (power) dynamically based on the speed of movements.
#define HYBRID_THRESHOLD // 3DWORK Drivers
#define X_HYBRID_THRESHOLD 100 // [mm/s]
#define Y_HYBRID_THRESHOLD 100
#define Z_HYBRID_THRESHOLD 15
In our case, we use the values indicated for an Ender which are 100mm/s for X Y and 15 mm/s for Z although we can adjust it to our needs.
TMC Debug, in this case, is a MONITOR_DRIVER_STATUS requirement that we must enable and it will allow us to have the M122 command accessible, very useful to obtain advanced information on the status and configuration of our drivers.
#define TMC_DEBUG // 3DWORK Drivers
Pin files of our SKR 2
Here are the paths of the pins files that contain the references for this board, and that you can locate within the sources of the Marlin firmware:
- REV A: /Marlin/src/pins/stm32f4/pins_BTT_SKR_V2_0_REV_A.h
- REV B: /Marlin/src/pins/stm32f4/pins_BTT_SKR_V2_0_REV_B.h
- For both: /Marlin/src/pins/stm32f4/pins_BTT_SKR_V2_0_common.h
Update Marlin firmware on SKR 2
In this case, it is very simple and we just have to copy our “firmware.bin” to the root of the SD formatted in FAT32, insert the SD in the module slot and wait about 30 seconds to finish the process.
Once the “firmware.bin” file is finished, it must be renamed firmware.CUR which we can save as a backup (remember that a compiled firmware cannot be modified, this process can only be can be done with the source files of your firmware and recompiled).
RepRap Firmware
As we have mentioned, the SKR 2 supports RepRap Firmware which you can find here.
Final notes
Now we only have to compile and adjust any error that the compiled report reports to us, and put it on our board. As always, we advise you to initially verify the printer as follows:
- First check for our SKR 2 should be to review the power selection jumper, if you have incorrectly could create some functional issues
- We will use position 1 (VDD) on normal printer usage powered by printer PSU (12/24v)
- We will use position 2 (USB) when connected to the computer for testing purposes

- Check limit switches using a terminal (Pronterface for example) with the M119 command.
- Check individually Homing of each of the movement axes in order (XYZE) and reverse motor rotation if necessary.
- Check that our thermistors report the temperature correctly.
- Check that our bed and hotend heaters work correctly.
- Make the guide from Initial Calibration that you can find in our bot in the /Calibration section.
As always, we hope that the article has been useful for the configuration of these new electronic BigTreeTech SKR 2. You can leave your comments or doubts at the end of it.
Feel free to visit other interesting articles from our blog:
- Complete guide Fysetc Spider: A real “beast” for our 3D printers
- New Marlin Builder v2.0 update (+220 firmwares available v2.0.9.1)
- BIGTREETECH E3 RRF V1.1: New electronic boards for the Creality Ender 3 printers
- To buy a 3D printer: Essential guide to buy your first 3D printer in 2021
- BIQU H2 Extruder (Review): One of the lightest and most compact extrusion system on the market
- Expiration date in filaments. Utopia or something that we should demand from all manufacturers?
- QIDI TECH X-Plus: Industrial-grade, high-performance 3D printing for your desktop











I need for ender 5 plus firmware and UART 2209. diag index vref and other pins configuratin on board from steppers.