Anycubic has renewed its successful Kobra series with the new Kobra 2. The new Kobra 2 improves in an exceptional way in terms of software and hardware to take advantage of the full potential of these new models.
In case you don’t know, Anycubic, which is already a veteran in the 3D world, has a wide range of FDM and SLA models that we invite you to discover on its website.
As always before continuing with the article, remind you that you can join 3DWork on our Telegram channel full of 3D printing derangers, or on our social networks Instagram, YouTube, TikTok, TwitterandFacebook,.
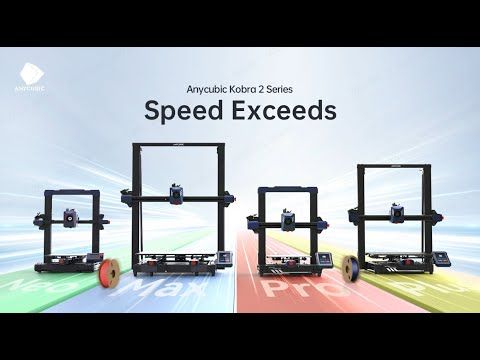
Anycubic Kobra 2 Series Printers
As we’ve already discussed, Anycubic’s new Kobra 2 series has improved on the original Kobra in many ways. Focusing on those improvements that promise to make them faster, more reliable, and easier to use.
Below you can see an introductory video to Anycubic’s Kobra 2 series:
The Anycubic Kobra 2 series has the following models to suit any user/requirement:
- Anycubic Kobra 2 Neo, is an entry-level model but with good features perfect for getting started in 3D printing.
Despite being an entry-level model with a low cost, we have a print speed of 220*220*250 mm and a print speed of between 150 mm/s to 250 mm/s, which is not bad at all.
We also have a simple and friendly interface, automatic leveling system and improvements in the extrusion system compared to the Kobra series. - .
- Anycubic Kobra 2 Pro, although very similar to the Kobra 2 Neo, this Pro version improves in many aspects both software and hardware for users who are looking for a powerful, really fast, and versatile machine.
Taking into account its characteristics, its print speed is 300 mm/s in standard speed and 500 mm/s in sport mode, thanks to its incredible up to 20000 mm/s2 acceleration, which allows you to print the typical benchy test in just 15 m.
- Anycubic Kobra 2 Plus and Kobra 2 Max, if we need a larger print size, these models will be the most suitable.
In the Kobra 2 Plus model, we have a print volume of 320*320*400 mm while in the Kobra 2 Max we have an incredible 420 *4220*500 mm .
On the other hand, without sacrificing high-speed printing from 300 mm/s to 500 mm/s with accelerations of up to 10000 mm/s2 thanks to the improvements introduced such as double z motor, kinematics system based on metal wheels on guides integrated into the profiles.
In short, we have the Neo version as the entry option and reduced cost… the Pro includes performance enhancements and remote management features… and the Plus/Max add larger print volumes to the Pro for large projects.
To be able to compare all the models in more detail, we have the following table:
| Kobra 2 Neo | Kobra 2 Pro | Kobra 2 Plus | Kobra 2 Max | |
|---|---|---|---|---|
 |  |  |  | |
| Printer Type | FDM/FFF | FDM/FFF | FDM/FFF | FDM/FFF |
| Build Volume | 220*220*250mm | 220*220*250mm | 320*320*400mm | 420*420*500mm |
| Print Speed | 250mm/s(Max.) 150mm/s(Avg.) | 500mm/s(Max.) 300mm/s(Avg.) | 500mm/s(Max.) 300mm/s(Avg.) | 500mm/s(Max.) 300mm/s(Avg.) |
| Accelerated Speed | 2500mm/s² | 20000mm/s² | 10000mm/s² | 10000mm/s² |
| Bed leveling | LeviQ 2.0 auto-leveling (25-point) | LeviQ 2.0 auto-leveling (49-point) | LeviQ 2.0 auto-leveling (49-point) | LeviQ 2.0 auto-leveling (49-point) |
| Anycubic APP | No | Yes | Yes | Yes |
| Built-in storage | No | Yes | Yes | Yes |
| X/Y-axis | D-Shaped Wheels Profile Slides | Dual-shaft Core with SG15 Bearings | Dual-shaft Core with SG15 Bearings | Dual-shaft Core with SG15 Bearings |
| Z-aixs | Threaded rod x1 | Double threaded rod | Double motor Double Z-axis | Double motor Double Z-axis |
| Extruder | Direct Extruder | Direct Extruder Double Gears | Direct Extruder Double Gears | Direct Extruder Double Gears |
| Cooling Fan | 7000 rpm/min | 7000 rpm/min | 7000 rpm/min | 7000 rpm/min |
| Filament Detection | Optional | Default | Default | Default |
| Control Panel | 2.4” LCD knob-control | 4.3” LCD touch-control screen | 4.3” LCD touch-control screen | 4.3” LCD touch-control screen |
| Data Input | MicroSD card | USB ports*3pcs | USB ports*3pcs | USB ports*3pcs |
| Machine Dimensions | 485*440*440mm | 486*435*463mm | 630*605*564mm | 740*735*640mm |
| Machine Weight | 7.3 kg | 8.4 kg | 13 kg | 21 kg |
Anycubic Kobra 2 Pro kit
In our case, the test unit was the Kobra 2 Pro. The printer comes partially pre-assembled from the factory and the process, which we detail later with a video, is very simple, in less than 20 minutes we can have our printer assembled and ready to start printing.

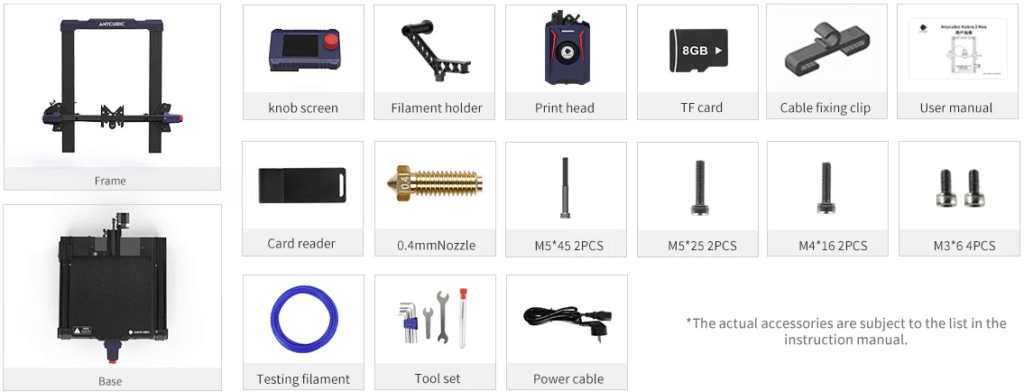
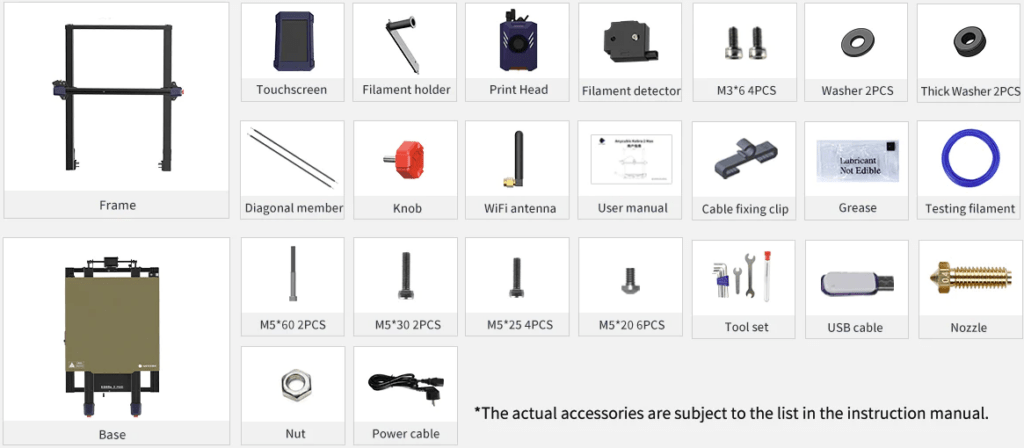
As an example, we show you the contents of the kit for the rest of the Kobra 2 series:
As you can see, the kit comes with everything you need for assembly, first tests and basic maintenance of the machine.
Unboxing and Initial Installation Anycubic Kobra 2 Pro
As we told you, the assembly is very simple since we will basically have to:
- We will assemble the Z bridge that holds the X axis:

- Next, we will assemble the printhead that comes pre-assembled as well:

- We’ll connect and pin the screen to your location:

- We will continue with the connection of the rest of the cables, which are perfectly labeled:

- We will check that the eccentrics of the print head and bed are correctly adjusted:


- We will check the tension of the X and Y axis belts using the tensioners provided for this purpose:

- We will turn on the machine and follow the simple wizard that shows us the screen for the various settings such as language, network and cloud if our model has it, self-tests, self-leveling, filament loading, Input Shaper test or vibration compensation if our model is compatible and finally make a test print.

In the following video you have the process we follow in our case:
Components & Mechanics
The Anycubic Kobra 2, from now on we will refer to the Pro version mainly, has an aluminum chassis and some parts made of blue and red plastic typical of the brand.

At the base of the printer, as usual in this type of printer, we have the space for the electronics and power supply. In addition, we have the space to place the generous touch screen that it carries.
Kinematics
Using traditional Cartesian kinematics, where it is the bed that moves on the Y-axis, we have a magnetic PEI surface on our printing platform that allows us to lighten the assembly for better performance and speed during our prints.
As for the print volume, it varies between models starting from 220*220*250 mm for the Kobra 2 Neo/Pro, 320*320*400 mm for the Kobra 2 Plus, and an impressive 420*420*500 mm for the Kobra 2 Max model.

Related to kinematics, it is interesting to include a system of central rails in the aluminum profile itself, based on metal wheels with SG15 bearings for the movement of the axes, which will allow smooth and precise movements at high speeds that will have an impact on the quality of our parts, as well as greater durability.

We also have a four-wheel drive system on the Z axis, in the case of the Kobra 2 Neo/Pro on a single motor with a synchronizer between the two and a curious spindle that has worked really well for us. While in the Kobra 2 Plus/Max models we have dual Z-motors.


Also interesting is the inclusion of belt tensioners for the X and Y axes.
Electronics
We have to say and take our hats off to Anycubic for the deployment of technology made in these machines.
In the case of the Pro/Plus/Max models we have Trigorilla Spe electronics, with a powerful 64b Cortex-A7 1.2GHz processor with 8Gb of storage, of our own design and that is undoubtedly one of the keys to the speeds and functions that we can obtain from these machines.

The electronics have 4 silent drivers, supposedly TMC2209 or similar, we also have 3 USB-A connectors to be able to connect our pen drives for our gcodes, and probably in the future one of them is intended for the use of a camera for the supervision or timelapse of our prints.

In the case of the Kobra 2 Neo, its characteristics differ a little, mounting a Trigorilla Pro B electronics with a 32b HC32F460 processor and GC6609 drivers, without UART mode, we also have in this case the traditional Micro SD connector and a USB-C for connection to an external host.
Also on the electronic side we have a 4.3″ full-color LCD touch screen. Ithas a user-friendly interface and access to a large number of settings.

In the case of the Kobra 2 Neo we have a 2.4″ color screen that we will manage with the typical button, in this case we have a renewed interface with respect to the Kobra.
In our case, the interface was only available in English and Chinese.
Extrusion System & Printing Platform
The extrusion system has been revamped and significantly improved over the Kobra series.

We have a powerful extrusion system with a double thrust system with a 4:1 ratio. In addition, in the Kobra 2 Pro/Plus/Max models, we have a powerful relatively quiet layer fan that will generate good airflow to be able to work with high-speed prints.


Continuing with the extrusion system, we have a Volcano-style nozzle with a heater system that can reach about 260ºC. With these features, it promises to be compatible with a wide variety of films such as PLA, ABS, ASA, HIPS, TPU, among others.

We also have an inductive sensor that will allow the Anycubic LeviQ 2.0 leveling system to probe our printing platform to ensure perfect first coats. One of the novelties of this LeviQ 2.0 is the inclusion of an automatic Z-Offset self-leveling system.

To finish with the extrusion system we have a filament sensor that is always useful to prevent our prints from failing. In addition to a screw for adjusting the tension of the filament clamp that will allow us to adjust it for use with certain filaments such as TPU.


As for the printing platform, it is on a steel base with a heating system of up to 110ºC maximum, in the case of the Kobra 2 Neo/Pro, while the Kobra 2 Plus/Max models reach 95ºC.
In addition, we have a rough and magnetic PEI surface that, in addition to reducing the weight of the platform, will allow us great adhesion and ease when removing our prints once finished.
Printing and usage tests
To check the default settings, which is what 90% of people normally do when using a new printer, especially if you are just starting out in 3D printing, the first thing we did was to launch the example benchy that comes with the SD.
The speed and quality obtained in the benchy without any adjustment for our filament was considerable, with a great finish and showing a constant extrusion throughout it… and in less than 20 minutes of printing, which is half of what it normally takes on other machines.

Once the previous test was done, we decided to carry out our own test, in this case, we used our favorite laminator, OrcaSlicer, and using the profile of the Anycubic Kobra 2 we customized the speeds and accelerations following the specifications of the machine. For this first test, we did a benchy again, but in this case diagonally and with organic supports:

Again, and taking into account that we have not carried out any fit tests, the final finish of the object was very good.
One aspect that can lead to confusion can be, in our case for the Kobra 2 Pro and probably in the Plus and Max versions, is that we have different storage options accessible. We have a local storage of 8GB (effective in our case of just over 6.5GB) which is where we have the test examples of Anycubic, another USB, another Anycubic Cloud and an icon where we have a list of the most recent impressions. When we launch a print from USB or Anycubic Cloud, it is copied to local storage.

We continued, again without making any adjustments to the profile, launching some more tests with other figures which came out very well.

During our tests, we carried out tests of filament change programmed from the laminator and by activation of the filament sensor. In the first case, it seems that our Anycubic Kobra 2 Pro does not support the M600 filament change gcode, unfortunately. In the second, changing the filament due to the lack of it detected by the sensor, paused the printing but the screen process does not help in the loading or unloading of the filament so it becomes cumbersome and complicated.

We also carry out recovery tests in the event of a power failure, which supposedly in the manual indicates that it is supported, but it did not work on our Anycubic Kobra 2 Pro either… using Klipper we were supposedly already surprised that this functionality was available.
We still have to do some tests with TPU or ASA/ABS to see how it behaves, although due to the temperature limitations in the hotend (260ºC) and bed system (110ºC or 95ºC depending on the model), materials such as ASA/ABS may not be the most suitable or more complicated to print on these machines.
In any case, the machine has behaved sensationally printing PETG:

The truth is that we have enjoyed a lot with this machine and as it has behaved in all our tests, it has some aspects to improve but practically all the ones we have seen seem to befrom the software part which Anycubic can correct in a relatively simple way in future updates:

Where to buy the Anycubic Kobra 2?
Anycubic has its own online store where you can buy directly the Kobra 2 as well as its accessories and spare parts.
In any case, we provide you with some links to other reference stores:
Anycubic Kobra 2 Neo |  |  | |
Anycubic Kobra 2 |  |  | |
Anycubic Kobra 2 Pro |  |  | |
Anycubic Kobra 2 Plus |  |  | |
Anycubic Kobra 2 Max |  |  |
Final Assessment
The Anycubic Kobra 2 series has taken a substantial leap over Anycubic’s previous generation Kobra and Vyper. In addition, the diversification of models allows users who are new to 3D printing (Anycubic Kobra 2 Neo), those who are looking for a machine with extra options (Anycubic Kobra 2 Pro) and those who are looking to cover projects of a certain printing volume (Anycubic Kobra 2 Plus/Max).
On the kinematics side, the improvements with the inclusion of the SG15 mechanical rail and wheel system, the LeviQ v2.0 leveling system that greatly simplifies the leveling process and the use of a printing platform with magnetic and rough PEI.
In the extrusion section, it is worth highlighting the new printhead that practically doubles the filament flow compared to the previous one, and the improvement (for Pro/Plus/Max models) of the layer ventilation system.
Adding to all this a really competitive price!!
As negative aspects that we have found in the Anycubic Kobra 2 Pro:
- Changing filaments:
- An M600 has not worked for us, it is usually the standard in laminators when programming a filament change from this
- The filament change during a print when the sensor is activated did not work properly for us… When detecting a lack of filament, there are no on-screen options for the extraction or loading of the filament, so the process is a bit cumbersome.
- The power failure recovery system on our Anycubic Kobra 2 Pro unit also did not work.
- Some advanced features are noticeably missing on the screen both during printing and in the settings menus.
- The lack of access to the used firmwares and ease of use for the use of official versions, whether Marlin or Klipper, can be negative aspects for some users to have the latest functionalities on their machine.
- Although some models have a WiFi connection for use with their “Cloud”, when we conducted our tests, the Anycubic App did not currently support these printers








Déjanos un comentario