We have to say that we were really looking forward to receiving the ELEGOO Jupiter SE, which includes several very interesting improvements over the legendary ELEGOO Jupiter.

ELEGOO with its excellent Jupiter thanks to its great ratio between quality, reliability and size has always been a benchmark in this machine segment. A printer, Jupiter, that allowed you to do jobs of almost any size, although notably focused on advanced users or with very specific requirements given its size and cost.
ELEGOO has decided to release a new version called Jupiter SE with some interesting improvements but with a very competitive price, maintaining and improving in some aspects the original Jupiter.
As always before continuing with the article, remind you that you can join 3DWork on our Telegram channel full of 3D printing derangers, or our social networks Facebook, Twitter, Instagramand YouTube.
Impresora ELEGOO Jupiter SE
ELEGOO has surprised us again by improving its fantastic previous Jupiter model by improving several of its aspects by creating a machine with a smaller machine size that does not have a print volume, lighter, with several improvements and cheaper!

The original Jupiter had an “industrial/professional” approach while the Jupiter SE seems more focused on home use… while the Jupiter had a metal chassis, the Jupiter SE has the typical red anti-UV plastic dome characteristic of Elegoo, which by the way, has two side handles that are extremely comfortable to handle. Also the Z-axis and its guides or the printing platform are slightly different and lighter.

On the optical side, the Elegoo Jupiter SE has the same print volume and resolution as its big brother, to be exact we have an impressive print volume of 277*156*300 mm and an XY resolution of 51 microns… which gives us a 12.8″ 6K monochrome LCD screen.

Doing a bit of quick math, I’m sure we’ve noticed that the diagonal of the screen together with the resolution of the screen does not give high XY definition values compared to other current machines. Yes, the Jupiter SE has an XY definition of 51 microns… And it’s not a bad thing for a machine with this print volume, quite the opposite, since we’re going to have robust parts with more than enough definition in most cases.
Continuing with the optical part, we find a renewed COB UV light source mounted on one of the sides, which will allow us a better uniformity in the transfer of UV light. Along with this COB UV light source, and for optimal performance, we have a large ventilation system.

Its printing platform has the typical laser engraved patterns to improve the adhesion of our parts, which is key for printers of these print volumes, in addition to a screw leveling system and a fixing method that we have found very comfortable.

Also something that we really liked is the use of PFA as a film in the VAT, something that will allow a larger printing surface reducing the stresses in the retractions of the machine thanks to the characteristics of this type of films.
Another interesting aspect, more so for a printer with these sizes focused on projects with high resin demand, is the inclusion of a resin fill/pour pump with an improved design.

Like the Jupiter, it incorporates the Elegoo Air Purifier system, an air filtration system, to reduce the odor produced by the resins.
For the management of the printer we have the typical 3.5″ TFT screen, in the Jupiter it was 5″, which does its function superbly thanks to the simple and functional interface of Elegoo.
Finally, we have the typical power and USB connectors on the right side of the machine.

Below you can see a table of the characteristics of the Jupiter SE, along with those of its big brother Jupiter:
| Elegoo Jupiter SE | Elegoo Jupiter | |
|---|---|---|
 |  | |
| LCD Resolution | 6K (5448×3064) | 6K (5448×3064) |
| LCD Size | 12.8″ | 12.8″ |
| Pixel Size (xy) | 51 μm | 51 μm |
| Print Size | 278 x 156 x 300 mm | 278 x 156 x 300 mm |
| Velocity | hasta 70 mm/h | hasta 70 mm/h |
| Dimensions/Weight | 480x378x658 mm / 26.6 Kg | 498x358x750 mm / 40 Kg |
| VAT Film | PFA | FEP |
| Light Source | COB 2.0 + Refractive Light Source | COB + Refractive Light Source |
| Kinematics Z | Dual linear guides | Double linear guides with ball rod |
| Touch screen | 3.5″ color resistive | 5″ Color Resistive |
| System | Single-chip System | Single-chip System |
| Slicer Software | ChiTuBox, Lychee Slicer, Voxeldance Tango | ChiTuBox, Lychee Slicer, Voxeldance Tango |
| Other | Air Filter / Resin Pump (Upgraded) | Air Filter / Resin Pump |
Start-up
As usual in this type of machine, the start-up is extremely simple by following a few simple steps that we can find in the manual that is included both on paper and on the included USB.
IMPORTANT NOTE:
If you’re not familiar with resin printers, it’s a technology that allows you to get incredible detail compared to other technologies such as filament extrusion.
On the other hand, remember that the resins used by this type of printer are or can be potentially dangerous due to their toxicity, either to contact with the skin or eyes or the inhalation of the gases, so it is essential to take all the appropriate safety measures such as the use of masks for quality air filtration, gloves, goggles, and working in well-ventilated rooms.
Finally, we would also like to remind you that this type of technology requires post-processing of our pieces, such as cleaning and curing them, and that we have to manage the waste generated by its use appropriately.
Below we will briefly explain the steps to be carried out, which you can also find in the printer’s manual:
- We will start by taking the printer out of its box, which is very well protected, and we will remove all the protections and accessory boxes. Although it is not as heavy as the Jupiter, we do advise you to handle it between two people:

- As for the accessories and tools included, we have the purifier, gloves and masks, tools and screws, as well as the resin pump.


- Before continuing, we would like to review the parts of our Jupiter SE, which can be useful in the following steps:
- (1) Printing Platform Anchor Screw
- (2) Z-axis
- (3) Printing platform
- (4) Air Purifier
- (5) LCD Display
- (6) VAT (Resin Deposit)
- (7) Touch screen
- (8) Power button
- (9) USB port
- (10) Power connector
- (11) VAT Anchors
- (12) Resin Pump

- We will carefully remove the resin tank/VAT, use the leveling blade to protect the screen and install the build platform by securing it well and loosen the two set screws with the included Allen tool.
We remind you that both the screen and the PFA pre-installed in the resin tank have protectors that we will have to remove.


- We’ll go to the leveling menu, Tools/Manual, and click on the Home icon.
Once the printing platform is positioned in its location we will use the included Allen key to tighten the screws during the process, we will keep the platform correctly oriented with the hand and pressing lightly for a good alignment with the screen.

- Once the leveling process is done, we will go back to the Tools menu and click on Set Z=0.

- Finally, in order to reinstall the resin tank or VAT, we will move it manually from the corresponding option on the screen, pressing as many times until we can install our resin tank in its location.

- It is advisable as a next step to carry out a test of the screen and UV. To do this, we will go to Tools/Exposure where we will press the Next button and we will see the ELEGOO logo on the display, if everything is correct.


The next step we will install the resin management system, it is quite simple:
- Removing the VAT, if we have it in place, we will connect the resin pump to the USB port on the right side and fix it with the two screws included.

- Along with the accessories two pumping plugs are included, we will take one that we will connect to the pump, due to the diameter of the connection tubes it is easy to identify where to connect each one.

We leave the installation of the air purifier for last, it is very simple, we will connect the purifier to the USB on the left side of the Jupiter SE:

These improved air purification systems do their job quite well, at least eliminating the smell of some resins.
In any case, it is always more than advisable to properly ventilate the work area and, if possible, have an air purification system suitable for the instance where we have our machines that also allow the filtering of VOC particles.
We already have our printer ready to print, inside the USB we have a typical test to verify that everything is correct.
Once we have our screen test done, we advise you to start performing the exposure tests to adjust the times of our resin for our ELEGOO Jupiter SE.
The Importance of Exposure Testing!!
Correctly calibrating the exposure time is a critical factor in ensuring that our parts are printed smoothly and with the highest quality. There are, mainly, other values that are a little more advanced that we do not advise you to modify initially, very important values to take into account:
- The exposure time of the first layers. These first layers are critical since they will withstand the tension of our piece and its supports when carrying out the printing process. In this regard, it is important to:
- The number of first layers, a low value or a very high value can be counterproductive. Having a small number of first coats can make them not support, in this aspect, it is advisable to have a number between 4 and 8 base coats.
- Exposure of the first layers, also like the previous one, can affect the adhesion of our piece and cause the printing to fail. A short exposure can affect adhesion, while a high exposure, apart from causing similar failures, will reduce the life span of our screen. Normally, as always depending on the printing and resin conditions we use, this exposure time is usually between 25 and 40 seconds.
- The exposure time of normal layers, if the previous layers were critical for the adhesion of our piece to the printing plate, in this case, they are important to provide consistency to the part as it is created and to obtain a good definition of details in our figures.
After all this explanation, it is important that we invest a little of our time to find the exposure time of normal layers. To do this, we can use different types of tests that you can find in our SLA calibration guide. The problem is that it is a tedious method and thanks to UVtools we can improve enormously!!
In our case, we used Uvtools to generate our multi-exposure test to make the correct setting for our machine/resin once or twice. We are not going to explain the whole process, just refer you to the explanation in our review of the Elegoo Saturn 3 where you have explained the process in detail.
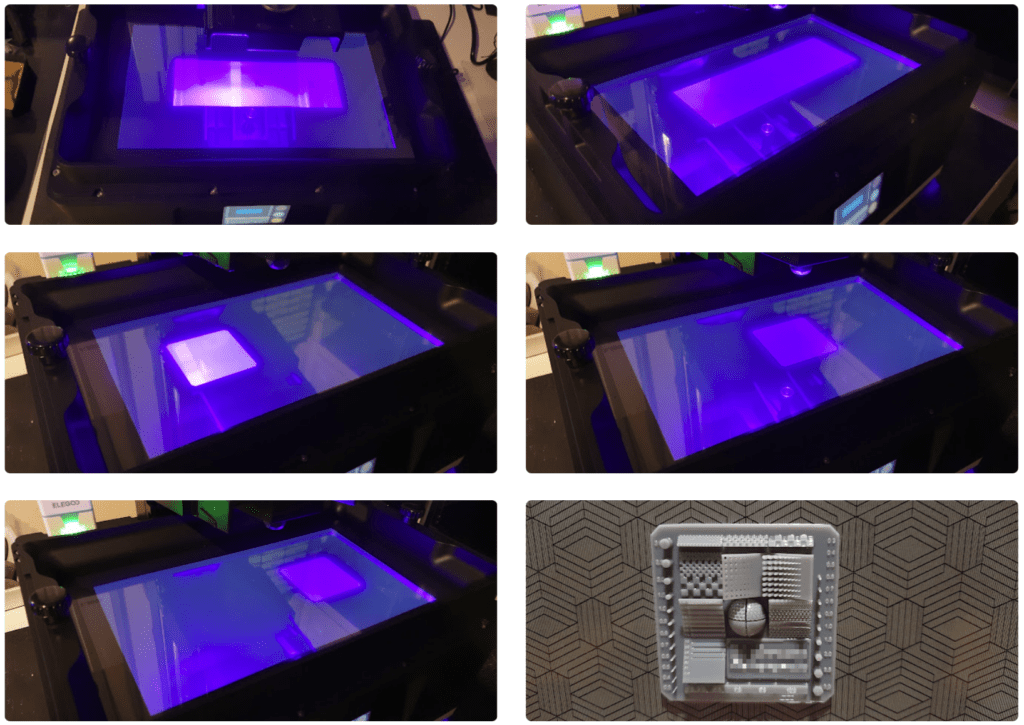
Initially, we do not advise you to make further adjustments to your laminator profile, in the case of being an advanced user and knowing resin printers moderately, you can try to adjust the speeds. Basically, these print speed adjustments will result in a reduction in printing time, between 5 and 20% depending on the settings.
In case you want to make these advanced adjustments, always try to make small changes to your settings and check that they do not affect anything. Usually with very fast speeds it can affect the flow of resin and affect the level of detail of our parts.
Another factor that we can play with is the antialisign to hide that staggered effect between layers. Personally, and considering the resolution/accuracy of the Jupiter SE, it is better to print at standard layer height (0.05) or use the minimum antialisign value to keep the details as high as possible.
In any case, we advise you to check out our SLA calibration guide for more detailed information on parameters, options and tricks with our printers.
Print Quality
Once our Jupiter SE has been adjusted, it’s time to get the most out of this great machine. Although we are already used to the print sizes that our Saturn 3 provides us, we have to tell you that it is a joy to be able to have that extra size that our Jupiter SE offers us… either to be able to do larger projects or simply to be able to print a greater number of parts at once, saving especially in printing time and post-processing.
At the time of review, the Elegoo Jupiter SE was only supported by Chitubox 1.9.6 (beta) included in the USB. In our case, as we like Lychee Slicer better, we chose to create our profile based on a normal Jupiter, making all the adjustments process in parts such as angulation, supports, hollowing, etc… to later export to STL and from Chitubox 1.9.6 (beta) make the lamination with the Jupiter SE profile.
For this occasion and to make the most of the features of the Jupiter SE, a colleague provided us with 4 projects of a certain scale to see the performance of our printer.
Let’s start with two models from Archvillain Games in particular from The Tome of Demons (I) bundle which if you like this type of figures are a real delight of details and care in its design, cuts and pre-supported versions for those who do not control the printer.

The second figure was the imposing Decataurs that although simpler in pieces and details looks imposing once printed, this figure tested the mechanical capabilities of our Jupiter SE since the entire body is printed in a single piece which generates great tensions during printing… of course, our Jupiter SE passed the exam with a :).

The next two figures were from the friends of Avatars Of Wars who have exceptional designs especially if you like Orcs or Dwarves… They have collections that you will fall in love with!!
We started by making a diorama figure called Goblin Git Launcher which, at the scale we chose to print, has a significant size and the final result was impressive… We can’t wait to see how the companion works his magic with the painting to see these figures in all their splendor!!

The second figure is the imposing Orc Warlord mounted on Wyvern where again the body of the Wyvern is in one piece as well as having great details. It is important to indicate the care of the Avatars of Wars team in making their figures fit together perfectly and, as far as possible, that the joints are aligned at strategic points that allow these joints to be hidden.

The truth is that we have really enjoyed these figures where the Jupiter SE has shown us its great characteristics to print large volume with an exceptional quality for its characteristics.
As soon as our colleague finishes the painting process of the pieces, we will share the final result with you. We will continue to run tests that we will share in our communities!!
All these tests were performed:
- modifying the original scales of the figures to take advantage of
- with Elegoo Standard Grey resin, which we mix with Electrobits ABS to provide a bit of flexibility and shock tolerance to our parts
- with the default profile for Jupiter Lychee, 0.050 layer height, adjusting only the exposure times as explained above and then exporting to STL the worked part to finally laminate from Chitubox 1.9.6 Beta as explained above
We try to carry out the tests simulating the conditions in which a normal user would do when receiving the machine, so by dedicating time to specific tests, with configurations by type of parts adjusted, we will probably obtain significantly better results in some cases.
Analytics & User Experience
The ELEGOO Jupiter We have loved its operation and performance given that printing on large format resin can be tricky at times.
In the kinematics section we have differences between the Jupiter SE and the Jupiter. While the Jupiter featured the double linear guide system with a rod with balls, the Jupiter SE uses standard rods that leave a set with theoretically less consistency… although in our tests we haven’t noticed that lack of consistency with respect to its big sister, something probably thanks to the use of PFA as a film.

ELEGOO continues to bet, for the Jupiter SE, on the use of PFA instead of the traditional FEP that basically improves light transfer, has greater thermal stability and will reduce adhesion stress, significantly minimizing possible failures in our prints. And we can assure you that it works perfectly, especially on machines with a large print volume!!
The Jupiter SE has a, like the Jupiter, imposing printing platform in size as well as finish. With engraved laser patterns that improve adhesion and minimize failures during our prints. The leveling and anchoring system is very similar to the two, which is very convenient in the case of the anchoring system.

Another interesting aspect of this Jupiter SE is the resin management system with which we can carry out any project, ensuring that we are not going to run out of it or facilitate the tasks of emptying the VAT.
Its use is very simple through the menu system, we will go to System/Feeding Settings and activate Feeding Status along with the desired filling speed:

Once activated, if the resin management system, during a print, if it detects that there is a lack of resin, it will automatically proceed to refill the VAT.

During printing, we can also manage the process from the screen itself:

Another use/function that we have with the resin management system is to empty our VAT in a comfortable way and considerably reducing the risk of spillage in our machine or work environment. To do this we will go to System/Auto Recycle and activate the option, it is important to recline the VAT slightly to extract the maximum resin content:


Turning to the Jupiter SE’s printing performance, we were pleasantly surprised by the low rate of failed prints, which is usually our fault for preparing parts or the printer incorrectly.

For example, currently the temperatures have dropped, it is important to remove the resin well between prints for a homogeneous mixture and verify that there are no residues… But it is also important that we have an environment at a suitable temperature, in our case while we remove the resin we use our mini-stripper or hair dryer to heat it and the printing platform enough so that the printing begins in suitable conditions since the printing process itself will maintain the temperature once it starts printing.
We also have other solutions such as specific heaters for 3D printers, either by air or using silicone bands, which are usually good solutions if our printing environment has more extreme conditions.
Also noteworthy is the cooling system of the machine, something very important for the optimal functioning of our electronics and optical system, which has two large fans that initially made us think of the worst in terms of noise but we were pleasantly surprised since the noise in operation remained at more than acceptable values.

Final Assessment
An important aspect when evaluating a printer like this are the size needs, the mass production needs and the resolution/detail of our parts, since these factors are decisive in choosing a printer of this format compared to others with slightly smaller diagonals.
We will go through each of the above topics in parts:
- The Jupiter SE is a perfect machine for large projects, whether they are large figures, masks, helmet parts, scenery… Its large print volume and features make it one of the best printers for those use cases.
- Production, again taking into account the large printing volume of the Jupiter SE makes it perfect for mass production of objects which can save us many hours and printer wear.
- Resolution/Detail, this is where a more complex point comes in given that the resolution of the Jupiter SE (51 microns) is a little far from the current so if we are looking for maximum definition this is probably not our machine… But let’s not fool ourselves, the resolutions that we have in other machines are often nothing more than marketing aspects and when it comes down to it, without a part that highlights those resolutions, a resin that allows it, not even fine adjustments are of much use. The Jupiter SE has a correct XY resolution, more thinking about the use of the machine thinking about large printing volume and where all the mechanical, optical and electronic set make the Jupiter SE a very great printer in its range.
We would also like to extol some of its characteristics regarding the Jupiter:
- A great price considering the print volume and features of the machine.
- Improvements to some parts of the printer, especially the resin management system, its more “compact size“, and its lightweight but consistent construction.
The Elegoo Jupiter SE is a printer that, with a Jupiter base, has managed to balance between price and quality allowing it to be accessible and focused on a user more amateur than professional.
Of course we miss things such as a heating system, the possibility of network printing but honestly for features and price little more can we ask for from this Jupiter SE.
Where can I buy the ELEGOO Jupiter SE?
Nowadays if you want to get the ELEGOO Jupiter SE, you will only be able to do it with pre-booking through their website and take advantage because they have an interesting discount for those who opt for pre-booking!!

Finally, you can use our search engine called Markets.sx. This way you will literally crawl different online marketplaces in a single click (Amazon, Aliexpress, Gearbest, etc.) and it will show you the results in a single search.







Déjanos un comentario