Bigtreetech enters fully into Klipper solutions all in one with its Pad 7.
If a few weeks ago we enjoyed a similar solution, the Raspberry Pad 5, which left us an excellent taste in our mouths, which we have controlling two of our laboratory machines. Now Bigtreetech has launched its big sister Pad 7 that make it a perfect all-in-one solution.

As always before continuing with the article, remind you that you can join 3DWork in our Telegram channel full of deranged by 3D printing, or in our social networks Facebook, Twitter, Instagram.
Below you can see more details of its characteristics, as well as how it behaves.
Bigtreetech Pad 7
The Bigtreetech Pad 7 has an imposing 7″ screen in addition to mounting its CM4 module, in our case a CB1 module based on an Allwinner H616 chip, which is a perfect solution for running Klipper.

To complete the device we have excellent relatively compact housing in which we have easy access to the multitude of available connections that we will detail later.
In the software part and depending on the CM4 module that we use we will have access to different distributions of Linux / Raspberry Pi OS that will allow us to enjoy a perfect experience with Klipper. Something that in other similar devices of other brands has ended up being a big headache … Again Bigtreetech thinks about the maker community that is always appreciated!!
Specs
As usual in Bigtreetech the Pad 7 comes with excellent hardware features:
- 7″ touchscreen
- 1024*600 and 60 Hz refresh
- 5-point touch with touch vibration function
- 178º viewing angle
- 500 Cd/m2 brightness
- Illumination sensor for automatic brightness adjustment

- CM4 socket for SBC module compatible with
- Bigtreetech CB1 v2.2 (normally included in the kit), Allwinner H616 quad-core Cortex-A53 processor, Mali-G31 MP2 GPU, 1GB RAM, 802.11 b/g/n WiFi support
- Raspberry Pi CM4, Broadcom BCM2711 quad-core Cortex-A72 processor, VideoCore IV GPU, 1 to 8 GB RAM, 0 to 32GB eMMC memory, Wifi 5 and Bluetooth 5 depending on version

- MicroSD socket, the kit includes a SanDisk microSD with Bigtreetech’s CB1 OS based on Debian OS and with Klipper and its components installed
- Expansion ports
- 10/100M ethernet port (if we use CB1) or Gigabit (if we use CM4)
- as for USB ports, we have 3 USB 2.0 ports and 1 Type-C to install the system in the case of using a Raspberry Pi CM4 module
- we have a CANbus port (MCP2515) for the expansion of MCUs with Klipper
- SPI connector for use of the ADXL345 accelerometer included in the kit
- Built-in speaker with buttons for volume control, we also have a 3.5 mm jack output which will allow us to connect external speakers
- RGB LED for notifications
- Power
- power supply 12V/2A DC
- Approximate consumption of 7.3W
Here are some diagrams of Pad 7:

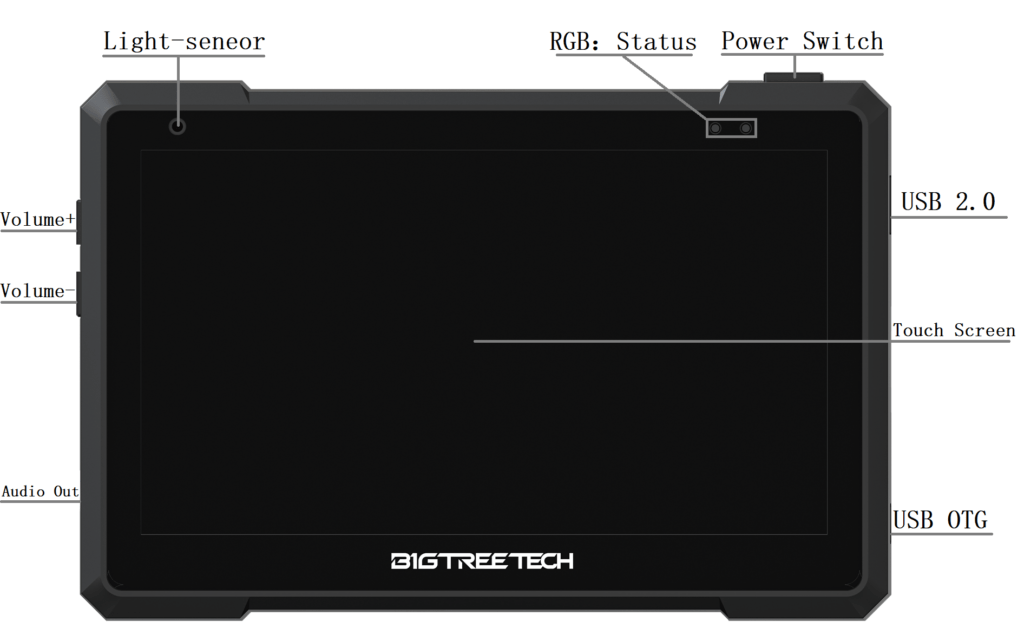
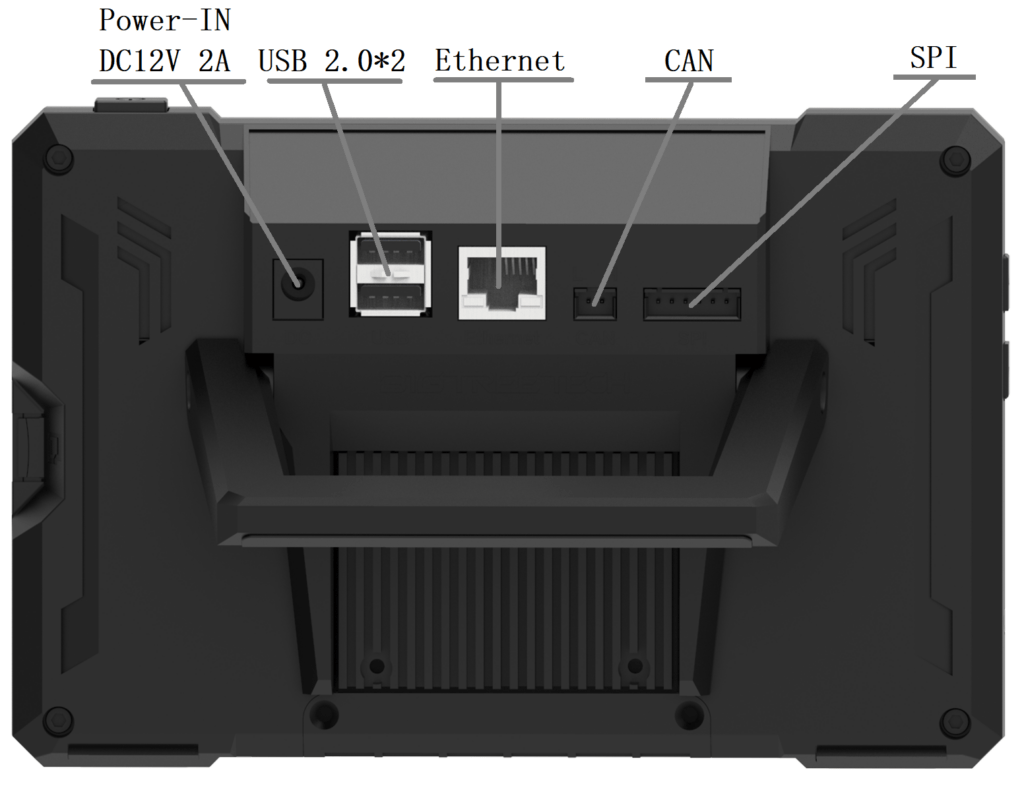
Expansion/Improvements
As we anticipated in the specifications, the Pad 7 comes prepared with several expansion/improvement connections that we can use to expand its functionalities such as the use of accelerometers, CANbus, etc …
The installation of ADXL345 accelerometer, included in our kit, can not be simpler and once adjusted the configuration of our system will simply connect it to the SPI port of our Pad 7
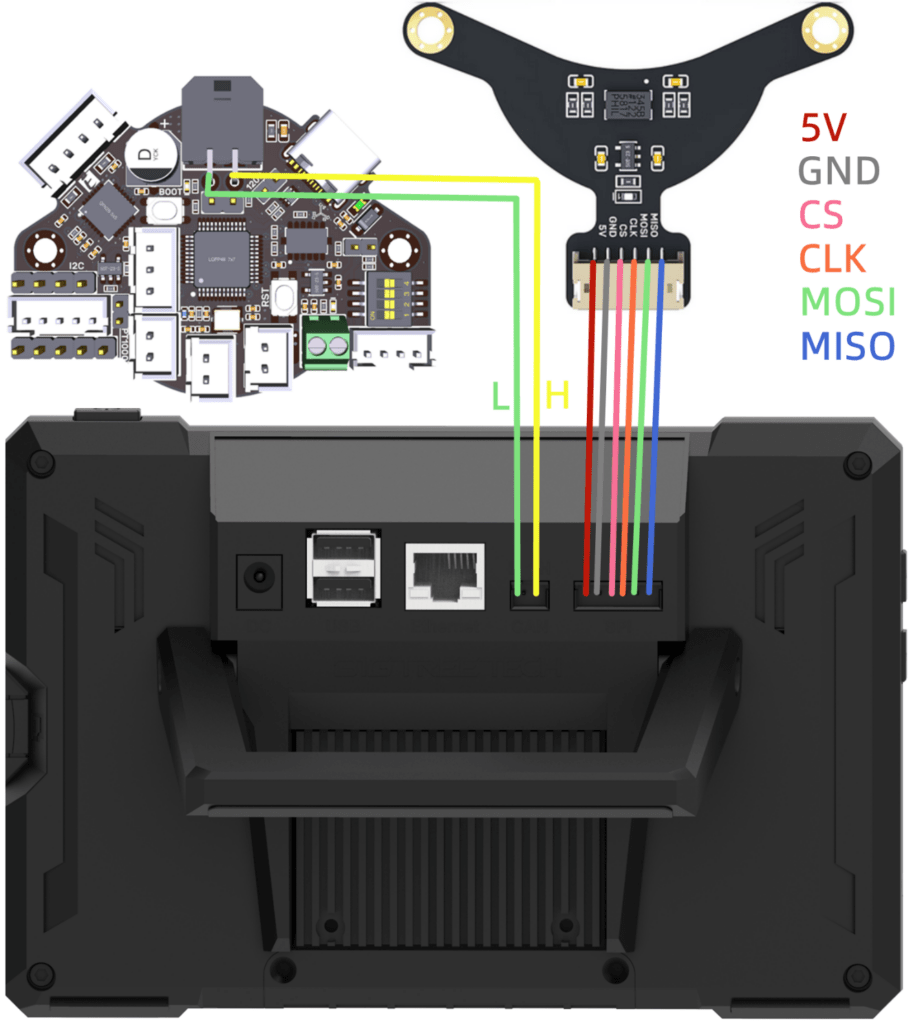
In the previous diagram we can find the order of pins of the connector in case we want to use another accelerometer.
Our Pad 7 has a CANbus connection that can be very interesting for many machines greatly simplifying the wiring to our print head.

In the above diagram you can find the order of pins of the connector.
Bigtreetech CB1 modules are, in terms of quality/price, probably the best choice today for use with Klipper.
In any case we have the option to use Raspberry CM4 modules in our Pad 7.
- We will disconnect the power of our Pad 7
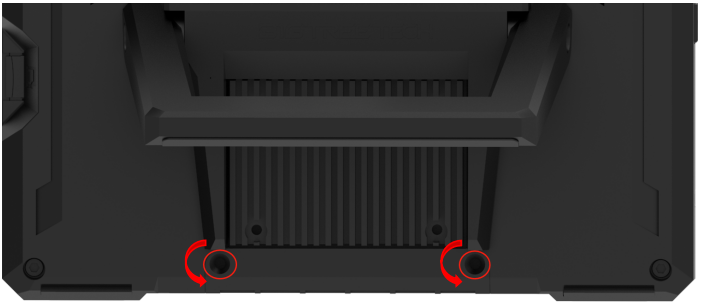
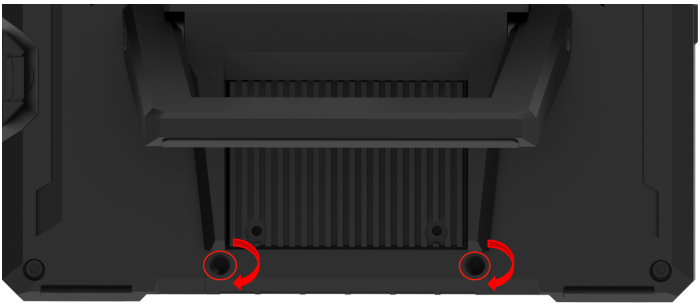
- In the back we will remove the two screws that you can see in the following image to remove the bottom cover
- Then we will remove the screws from the heatsink of the CB1/CM4 module to be able to remove it as you can see below
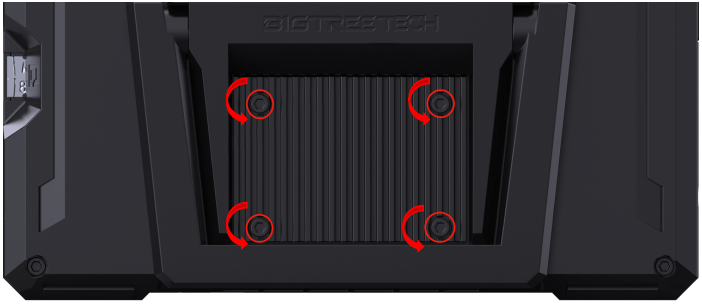
- We will take out, with great care, the antenna of our CB1 module and remove the CB1 module from our Pad 7
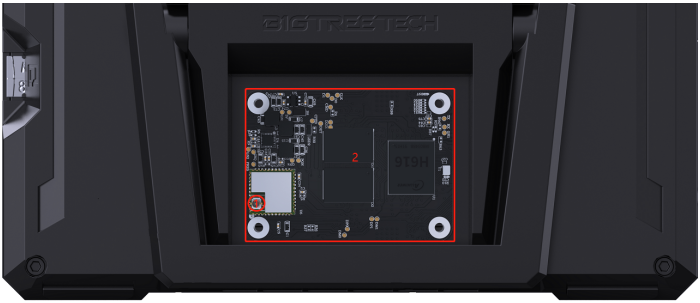
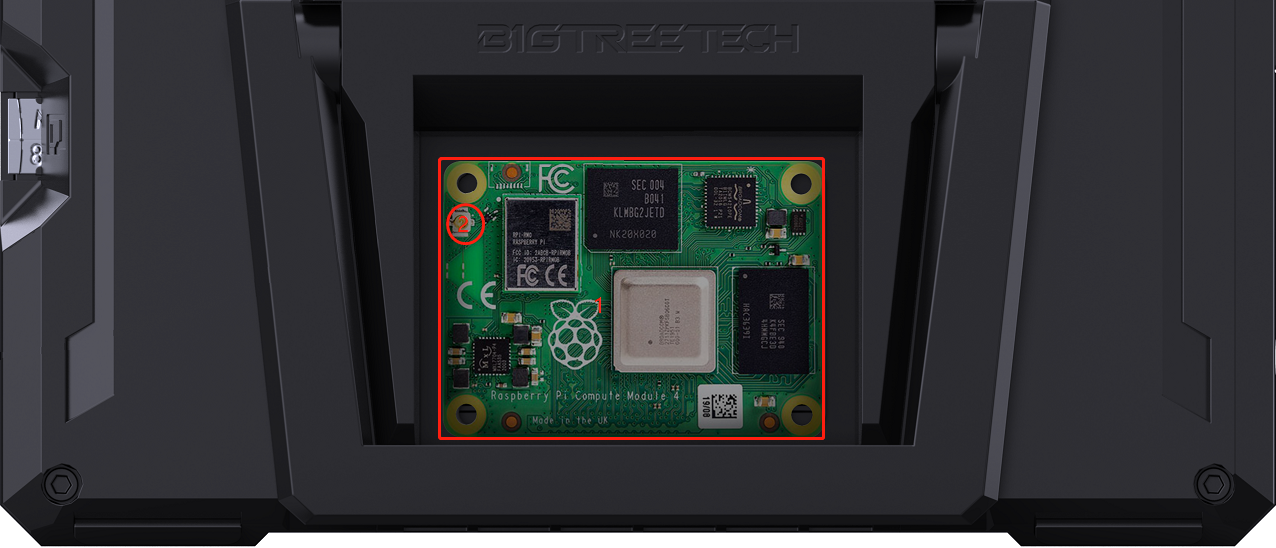
- Now we can place our new CM4 module, it is important that you place the CM4 module as you see in the following image. Once the module is installed, we will connect the antenna.
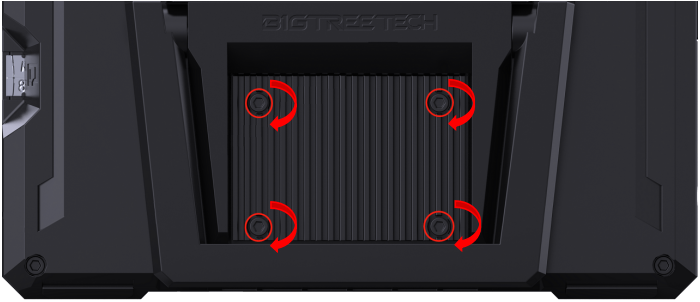
- We will replace the heatsink with its screws
- We will have to adjust the microswitches as you can see in the following image… selecting USB-Choose to CM4-OTG and CS-Choose to CM4.

- We will reinstall the bottom cover
- We can now proceed to install the system for our CM4 module that you will find below!!
Klipper System Installation
Bigtreetech has always been very aware of users, so it is one of the few brands that support projects related to Klipper which ensures a better experience in its use.
That is why, and depending on the CM4 module we use, we will have different options of Klipper distributions to install:
Next we will proceed to install the Klipper system in our CB1 module, we have two options:
- Using the generic distribution of Bigtreetech
- Using RatOS you have some advantages, and disadvantages depending on your level of knowledge in Klipper, such as pre-installation of various components, and compatibility with various electronics and printers with pre-configured and default macros.
- Once we have downloaded the Klipper distribution that we like the most, we will use Raspberry Pi Imager or balenaEtcher to transfer the Klipper image to our SD card. A card of at least 16-32Gb is advisable. For this guide, we will use RatOS which is the Klipper distribution that we usually use.


- After the process and from the explorer of our computer we will access our SD where we will have a partition called BOOT.
- In this we will find a system file.cfg where we will adjust the network name for our Klipper host:
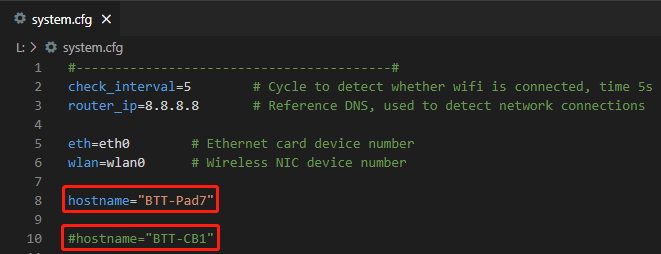
#hostname="BTT-CB1"
hostname="BTT-Pad7"
- Regarding the WiFi configuration, in case you do not use your Pad 7 with a network cable, we will return to our system file.cfg where we will adjust our WIFI_SSID and WIFI_PASSWD:

- Following in the system file.cfg where in this case we will adjust the specific options for our Pad 7

- Next, we will configure the specific options for our Pad 7 in this case we will do this on our BoardEnv file.txt where we will adjust the following:

overlays=ws2812 light mcp2515 spidev1_1
- Enable CANbus, as we discussed in the previous point, enabling mcp2515 in our BoardEnv file.txt will enable CANbus in our system in case we use it
- Adjustment of the CAN interface, if in the previous step, we enable CAN in this step we will configure its interface. Using sudo nano /etc/network/interfaces.d/can0 we will add or adjust this file as you have below:

allow-hotplug can0
iface can0 can static
  bitrate 1000000
  up ifconfig $IFACE txqueuelen 1024
- Enabling an ADXL345 accelerometer, as with CANbus with enabling the option spidev1_1 our system will enable access to the SPI port of our Pad 7.
Learn more about accelerometers in our Input Shaper guide. In this case, we will need to adjust the following settings in our printer.cfg or any of its includes:
# Enable our CB1 as a secondary MCU
[mcu CB1]
serial: /tmp/klipper_host_mcu
[adxl345]
cs_pin: CB1:None
spi_bus: spidev1.1
axes_map: z,y,-x  # Modify according to the actual orientation of the ADXL345 installed on the printer.
To install the Klipper system in our CM4 module, we recommend two options:
- Using the generic MainsailOS distribution
- Using RatOS you have some advantages, and disadvantages depending on your level of knowledge in Klipper, such as pre-installation of various components, compatibility with various electronics and printers with pre-configured and default macros.
Once downloaded the Klipper distribution that we like the most, we will perform the same steps that we described with the CM1 module to apply the OS to our CM4, we advise you to go through the installation guide of the Bigtreetech Pad 5 where you will have more detail of the process.
As is done with a CB1 module we must make some adjustments in the configuration:
- Settings in serial communications, for this we will modify:
- /boot/cmdline.txt where we will delete
console=serial0,115200if it exists - /boot/config.txt where we will delete
enable_uart=1if it exists
- /boot/cmdline.txt where we will delete
- Backlight, we will edit again our file /boot/config.txt where we will add the following lines:
dtoverlay=gpio-led
dtparam=gpio=14,label=Pad7-lcd,active_low=1- Adjusting the resolution and touch, we will add the following lines to our /boot/config.txt :
hdmi_group=2
hdmi_mode=87
hdmi_cvt 1024 600 60 6 0 0 0
hdmi_drive=1- USB, some systems can disable USB ports for energy saving to avoid this we will modify the file /boot/config.txt adding the following lines to ensure that the USB HID used by our Pad 7 does not affect this energy saving:
dtoverlay=dwc2,dr_mode=host- SPI and CAN, again in our /boot/config.txt we will add the following configuration lines:
dtparam=spi=on
dtoverlay=mcp2515-can0,oscillator=12000000,interrupt=24,spimaxfrequency=10000000- Adjustment of the CAN interface, if in the previous step we enable CAN in this step we will configure its interface. Using sudo nano /etc/network/interfaces.d/can0 we will add or adjust this file as you have below:

allow-hotplug can0
iface can0 can static
bitrate 1000000
up ifconfig $IFACE txqueuelen 1024- Enabling an ADXL345 accelerometer, as with CANbus with enabling the mcp2515-can0 option our system will enable access to the SPI port of our Pad 7. Learn more about accelerometers in our Input Shaper guide. In this case we will need to adjust the following settings in our printer.cfg or any of its includes:
# Enable our CM4 as a secondary MCU
[mcu CM4]
serial: /tmp/klipper_host_mcu
[adxl345]
cs_pin: CM4:None
spi_bus: spidev0.1
axes_map: z,y,-x # Modify according to the actual orientation of the ADXL345 installed on the printer.
Commissioning
Once we have installed our operating system on Pad 7 we will start this. If all goes well, the screen will show the KlipperScreen interface which will inform us of an error for not finding our printer.cfg with the configuration of our printer.

Do not panic, we simply do not have any configuration enabled and therefore tells us that our Klipper found an error.
To start with the configuration we will connect to the web interface (Mainsail) from our web browser using http://btt-pad7.local or if we customize this name during the configuration we will use the custom one.
In order to find the IP of our Pad 7 we can use Fing which is a cross-platform application that will scan us and list all the devices in our network. It should appear with the hostname btt-pad7 or the one defined in our system.cfg above.

Once our IP is identified, we will go to our browser and use it to access the Klipper web interface… We advise you that the first thing to do is an update of all Klipper components:

Already with access to the interface we only have to create and apply the Klipper firmware to our MCU (electronics) and find our serialID, you have information about these steps here.
Once we have applied the firmware to our MCU and with the communication serialID we only have to create and adjust our Klipper machine configuration, connection, and macros that we want to use.
If everything has gone well, our Pad 7 can already connect to our MCU and our screen will show a control interface of this!!
We advise you to follow the steps described in our Klipper configuration guides. Some of them you can launch from the screen options themselves, we advise you to follow the configuration guides in order to make sure we leave everything perfect.
Input Shaper
You have more detailed information about this process in our Input Shaper guide, in any case, we will guide you through the process using our Pad 7.
We will start by connecting our ADXL345 included in the kit to the SPI port.

We will update our printer.cfg adding as a second MCU our CB1 and we will define the accelerometer (in our case for a CB1, remember that in CM4 this configuration is slightly different)
[mcu CB1]
serial: /tmp/klipper_host_mcu

[adxl345]
cs_pin: CB1:None
spi_bus: spidev1.1
axes_map: z,y,-x # Modify according to the actual orientation of the ADXL345 installed on the printer.
In our case we are going to launch the process in one of our Cartesian printers, so we must place the sensor on the X axis (print head) and after making the measurements anchor it to our Y axis (bed). In the event that we have a CoreXY printer anchoring it in the print head is enough.


For more information about the process, we advise you to follow our Input Shaper guide.
You can also perform the process from the Printer/Configuration/Input Shaper/Auto-calibrate screen.

Slicer settings
Klipper is an incredibly flexible and powerful 3D printer firmware as we have seen, an important aspect is its integration and configuration of our slicer.
An important aspect is to make sure that our slicer generates the laminate or g-code (G-code flavor) valid for it to be interpreted by Klipper.
Today slicers such as PrusaSlicer/SuperSlicer and Bambu Studio/OrcaSlicer support the generation of the g-code for Klipper for which they are usually the most advisable.
Other slicers can be used without problem, since Klipper can process g-codes generated for Marlin or Smoothiware, but may need certain adjustments to avoid including g-codes that are not supported by Klipper.
Similarly, generating g-code for other systems can cause similar issues, for example, selecting Marlin2.
In this case, it is advisable to review the configuration of our laminator and select to generate the slice in Klipper, Marlin or Smoothiware format… In this order, ideally.

Another important aspect is to adjust our start and end of print g-codes, at least, for the use of Klipper macros instead of the traditional and limited g-codes. You can find more information and details in the Klipper configuration guide in laminators. By way of example:

The use of macros in Klipper will allow us to raise the control and customization of our machines to incredible levels.
Another great improvement is that we can upload our g-codes directly from the laminator, something that is very comfortable. Moonraker emulates the Octoprint API, something very useful to make it compatible with any tool that uses Octoprint:

Control multiple printers
As we have already mentioned on many occasions, Klipper is an extremely versatile system that together to a host like our Pad 7 can allow us to control several printers simultaneously.
Next, we are going to guide you through the process to have multiple instances of Klipper on our Pad 7 which will allow us to control our machines centrally.
We will start by connecting to our Pad 7 using an SSH client, launching an ls -l command we will see what we have installed on our Pad 7:

It is possible to install our Klipper instances manually, but we prefer to use Kiauh.
Kiauh is a sensational module for Klipper which allows us to easily launch different actions from a simple menu system. Let’s proceed to install it by launching the command:
cd ~ && git clone https://github.com/th33xitus/kiauh.git
Once we have Kiauh installed we will launch it with the following command that will show us the Kiauh menu system :
./kiauh/kiauh.sh
As we see in the previous screenshot, in our case we have 1 instance of Klipper, Moonraker as well as KlipperScreen or Crowsnest.
Then we will proceed to uninstall Moonraker, clicking on option 3 (Remove) and then 2 (Moonraker) … During the process, we will be asked for the password of our user:

Once the process is finished, press 1 (Klipper) to delete our Klipper instance:

If everything has gone correctly Kiauh will show us that we do not have instances of Klipper and Moonraker:

Now we will proceed to install Klipper using option 1 (Install), 1 (Klipper) and 1 (Python 3.x)… it will ask us for the number of instances we want to install, in our case we will use our Pad 7 to control 2 printers.
Before installing the instances it will ask us if we want to assign each instance a custom name, our advice is that we do NOT customize the instances since later we can do it on the other hand that will prevent our Klipper instances from using a non-standardized name structure:

Once the process is finished, and if everything worked as expected, we will go to the main menu of Kiauh (B) that we have our 2 installed instances:

Next we are going to install our Moonraker instances by pressing 1 (Install) and 2 (Moonraker)… Kiauh itself will detect our Moonraker instances and suggest the number of these to install:

Once the process is finished, and in the main menu of Kiauh, we will be able to see our Moonraker instances… It is very important that we write down the port of each of our instances since later it will be necessary:

We already have all our instances installed, we only have to leave Kiauh and restart our Pad 7 with the sudo reboot command. We will reconnect by SSH to our Pad 7 and we will launch the ls -l command again to verify that we have our configuration directories for each of our instances:

We will continue with the following steps to perform from our web interface, in our case Mainsail, where we will open our favorite web browser on our computer / tablet using its IP or hostname where it will ask us to add a printer:

Adding our instances of Moonraker, and remember the information of the instances that Kiauh previously provided us:


We will enter our instances and change the name, and also from UI_SETTINGS we can customize the color of the logo, to be able to identify each instance clearly. We can also use the drop-down to choose between one instance or another:


Now you will have to configure each of our instances with its own printer.cfg and includes that we have for our printers.
The next step will be to configure our KlipperScreen so that we can connect to our instances to be able to manage them comfortably from the screen of our Pad 7. To do this, we will have to return to our SSH client to edit the KlipperScreen configuration file:
sudo nano KlipperScreen.confAnd we will copy the following settings, adjust the names of printers and ports of Moonraker to your own installation:
[main]
job_complete_timeout: 0
job_error_timeout: 0
#default_printer: ElegooN3Max
use_default_menu: True

[printer ElegooN3Max]
moonraker_host: localhost
moonraker_port: 7125
moonraker_api_key: False

[printer Voron01]
moonraker_host: localhost
moonraker_port: 7126
moonraker_api_key: False
To finish, we will press CTRL + X and Y to exit and save the changes and restart KlipperScreen with the following command sudo service KlipperScreen restart . If all has gone correctly, our screen will show access to our two printers, being able to change from one to the other by clicking on the icon of the two crossed arrows.
Final assessment
During the last months we have tested all kinds of solutions for Klipper and without a doubt if you plan to switch to Klipper, if you do not use it already, Bigtreetech electronics are the best option we have tried.

In the case of the Bigtreetech Pad7, and after being delighted with the Pad 5, it is an ideal team to get started in Klipper, since we have everything in the same device, with a very competitive price, and also being able to freely use Klipper.

In addition, the inclusion of tools, screws, and accessories such as the accelerometer help to make the start-up and use of Klipper relatively simple.

With a great screen, perhaps sometimes too big although our tired eyes appreciate it, a good handful of connections and a very correct finish, the colleagues of Bigtreetech have made a great product.
In addition, as always with Bigtreetech we will find abundant documentation and good support from both the manufacturer and the community, which often helps… Especially if you are new to Klipper because it is a new world totally different from other firmwares for 3D printer.

Troubleshooting
Below we help you solve some problems that we can find with our Pad 7.
Although Klipper increasingly improves the processes sometimes we may find that our accelerometer does not work correctly, in these cases we advise you to review the following points:
- On the back of our Pad 7 we have micro-switches that allow us to adjust the hardware configuration. Make sure you have them in the correct positions:


- Make sure you connected the cable correctly between your Pad 7 and the accelerometer as indicated at the beginning of this guide, especially check the wiring if you do not use a Bigtreetech accelerometer.
- From SSH we will check that our SPI channel is working correctly by launching the command
ls /dev/spi… in the case that we have a CB1 module we will see aspidev1.1device and if we use a CM4 modulespidev0.1


The use of CANbus, in certain machines and circumstances, can be a great-added value that allows us to simplify the wiring of our machine a lot.
On the other hand, it will add more complexity to our configuration and more points of failure. We give you some tips to keep in mind for our Pad 7:
- On the back of our Pad 7 we have micro-switches that allow us to adjust the hardware configuration. Make sure you have them in the correct positions:


- Make sure you connected the cable correctly between your Pad 7 and your CANbus device as indicated at the beginning of this guide.
- From the SSH terminal we will launch the command
dmesg | grepcan where it should indicateMCP2515 successfully initialized.

- Again from the SSH terminal we will execute the command
sudo nano /etc/network/interfaces.d/can0to verify that our CAN interface configuration is correct.

allow-hotplug can0
iface can0 can static
bitrate 1000000
up ifconfig $IFACE txqueuelen 1024- Also from the terminal we can launch the ifconfig command to see if our can0 interface exists.

- For more information on troubleshooting CANbus check out our guide.












Sorry, I’ll leave my comment in English.
I’m struggling with my Pad 7.
Have any of you made a backup of the original image of your BTT Pad 7? If so can you upload it to Dropbox or another service? I’ll be glad to receive a PM with the link.
Normally I understand that it is an update in the OS that broke something. here is my problem: I wish I had made a backup of my BTT Pad 7. It worked a charm. Now I getting many inconsistencies. My printer is an Ender 3 S! F4 and used to work very well. Some of the updates have made my Klipper unusable. I read all the manuals (RTFM) and I know I need to start mine with a CB1, not the last. Can someone point me to the original version?
Better yet if anyone has uploaded the original card!
Mine apparently works but I have the dreadful ls/dev/by-id/* issue.
When I try to do ‘ls /dev/serial/by-id/’, Pad 7 says “ls: cannot access ‘/dev/serial/by-id/’: No such file or directory”
So, get to the basics. Can someone help me?
Yes, I know E3S1 F4 implies flashing FW under a directory.
And yes, it works with Sonic Pad. So it’s not on the printer’s side.
Hi Jacques, no worries about English we will try to provide solutions for your problem.
You can install different CB1 images on your Bigtreetech Pad 7 the most important are:
– Official Bigtreetech CB1 – https://github.com/bigtreetech/CB1/releases
– RatOS – https://github.com/Rat-OS/RatOS/releases
From Assets artifacts from those releases you can install old versions, and adapt the settings to enable the special Pad 7 parts as display, SPI, touch, etc…
In any case if your main problem it´s related with the by-id this is a Linux issue started at May 2023 affecting distributions based on Debian due an incorrect Udev package. This issue will probably happens on all versions with the incorrect package as soon you update OS and should solved, without any action, on newer versions.
You have different options to check and solve this issue:
– How to identify? basically if after update you do ls /dev/serial/by-id/ and nothing appears listed or launching apt show udev and your udev version is versión 247.3-7+deb11u2… you have a third one checking the udev rules but previous are much more easy
– How to resolve? the best it´s to try to use an update released firmwrare without the udev package issue, a second option is to update udev package launching cd ~;wget http://ftp.us.debian.org/debian/pool/main/s/systemd/libudev1_252.5-2~bpo11+1_`dpkg –print-architecture`.deb http://ftp.us.debian.org/debian/pool/main/s/systemd/udev_252.5-2~bpo11+1_`dpkg –print-architecture`.deb;APT_LISTCHANGES_FRONTEND=none sudo apt install –fix-broken ./libudev1_252.5-2~bpo11+1_`dpkg –print-architecture`.deb ./udev_252.5-2~bpo11+1_`dpkg –print-architecture`.deb; rm libudev1_252.5-2~bpo11+1_`dpkg –print-architecture`.deb udev_252.5-2~bpo11+1_`dpkg –print-architecture`.deb … your have another options like use by-path instead by-id but if you change your USB port the serialID will change… another solution will be to adapt udev rules
If you visit our LABS documentation https://3dwork.gitbook.io/labs/klipper/troubleshooting (english link at the beginnig to translate) you will have all the information about the Udev patch.