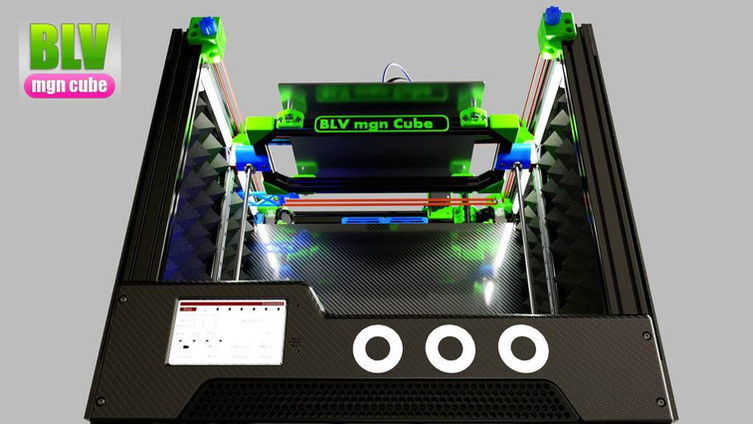
We present one of the best DIY printer models on the market… the BLV mgn Cube.
As its name gives us clues, it is a printer with a chassis in “cube” format with CoreXY cinematics using linear guides.
In our case, we have used the complete Fysetc kit that includes everything to assemble the printer: chassis, kinematics, screws, electronics, sensors, enclosure, etc …

BLV mgn Cube… A community-initiated project
The BLV mgn Cube was born as part of a project by Ben Levi to assemble a printer of this format with a rigid structure with the front open to have easy access to the printing area, which was simple to build on the other hand and completely open source to allow it to adapt to our needs and that had a contained cost.
You can find all the information on the website of the project itself with everything you need to build yours, in any case, and given the complexity and number of components, it is usually more interesting to get one of the DIY kits like Fysetc.
https://www.blvprojects.com/blv-mgn-cube-3d-printer
You can also access the 3D design of the machine which is great to get an idea of the sensational design of this printer.
https://myhub.autodesk360.com/ue2bf7842/g/shares/SHabee1QT1a327cf2b7a13d3988f9c72527c
Where can I buy the BLV mgn Cube kit Fysetc?
As we always do, we leave you some links where you can buy the FYSETC kit of this printer, as well as some components.
If you use them, the price of the product will be the same as if you access them regularly, but 3DWork will have a small commission. Something that will help us support the project and be able to offer you this type of article.
You can also use our product search engine for 3D printing developed by 3DWork, where with a single search you will be shown prices from different marketplaces (Amazon, Aliexpress, Banggood, etc.)
Fysetc Kit Contents
Fysetc has done an exceptional job in this kit which includes everything you need except for the few printed parts depending on whether we choose the metal parts kit option.
The components came perfectly packaged and labeled in detail such as screws, engines, etc.
Perhaps we would have liked for future revisions of the kit the aluminum profiles had some kind of label that facilitates identification in a simpler way.
Below we will go into detail about some of the components of the kit and a link to the 3D design.

Chasis
The kit includes all the necessary profiles to mount our BLV which are protected in an adequate way and as we discussed at the beginning we would have liked these to be labeled to identify them more quickly.
One of the peculiarities of the Fysetc kit is the use of profiles with “blind joints” allowing a good anchoring of all the pieces and saving us probably 80% of the time to assemble the chassis.
In addition to the profiles, all the necessary screws are included and completely labeled, interesting that some that are not in the official BOM are included.
Electronics
In our case, the kit includes an excellent clone Duet 2 Wifi 1.04 of the brand Fysetc everything and there are more current versions this is still one of the most advisable and reliable machines that use Reprap firmware.
The kit includes accessories such as USB cable, cables, connectors, SD with a basic FW, jumpers, etc …
It also includes a great screen of 5 “PanelDue v3 which is not the standard of the BOM and that we can find in the link of STLs or Thingiverse the stl to adapt this screen.

In the event that we select a kit without electronics, we advise you to use the Fysetc Spider specially designed for this type of printer and compatible with Klipper and Marlin.
HotEnd
Included in the kit we can find a BMG clone of great quality as it could not be otherwise of the Fysetc brand which includes everything necessary to be assembled.
It also includes a pre-assembled V6 clone as well as a spare bar and nozzle and an HT-NTC100K thermistor and a 24v and 40W heater plus PTFE for installation.
Engines
The 5 motors included in the kit are perfectly protected in FOAM… Another important thing to mention is again the labeling of both the motors and the connection cables, something that especially in machines type CoreXY or of this complexity is very appreciated if it is our first machine of this type.
Indicate that the engines included do not seem the same as those indicated in the official BOM but their characteristics and how they have behaved in the different kits that we have tested their behavior was correct and without problems.
Rods and spindles
Another great success, which we have fallen in love with, of this kit is the inclusion of rods with black Teflon that look especially good in this machine along with POM TR8 spindles that do not need lubrication, withstand heat well and work in a smooth and noise-free way.
Power
One of the points that pleasantly surprised us is the “beast” of a source included about 2Kg of weight, a MeanWell SE-600-24 that with a working voltage of 24V, and a supported current of 25A gives us 600W of power!!!
In addition to having this great source, you include all the necessary wiring, buttons, and an SSR.

Bltouch
Fysetc has thought of everything with this kit including a leveling system compatible with any printing surface. This Bltouch-style clone sensor includes all the necessary wiring for installation.

Hot Bed
The kit includes a 310×310 aluminum heated bed with an integrated NTC 100K thermistor and its crimped silicone cables for easy installation.
Along with the bed, we can find a Buildtak glass with a layer of nylon on top to ensure a surface as linear as possible. In our case, we chose to use PEI since it is a surface that we like more for our printers.
In addition, aluminum foam is included to protect our bed from thermal leaks, something that is greatly appreciated since it allows an even distribution of heat in addition to protecting from leaks and thus avoiding greater wear due to temperature adjustments.
Also, and as something we had not seen in other kits, leveling wheels of the Creality brand are included as well as rigid springs that are perfect for manual adjustment of any deviation.
Lineal Rails
Although the guides included in the kit do not seem to be of a renowned brand such as HIWIN, the guides have excellent quality in their machining producing smooth movements in addition to coming perfectly protected in FOAM.
It is advisable in this type of linear rail to clean and grease the skid before installing it.
Enclosure
To give an exclusive touch to your kit Fysetc has included cut and perforated ACP panels for the printer enclosure.
They have also included foams for sound insulation along with double-sided tapes for installation.
On the other hand, they have also included a roll of vinyl emulating carbon fiber along with a spatula for installation on the panels and give it a pro finish.
Neopixel
Included in the kit we find another extra that gives a touch of distinction to our machine with three Neopixel that will help us see the status of our printer. In this case, Fysetc has included the control electronics and wiring so that the installation is child’s play.
- 3 x Neopixel rings
- 1 x STM Control Board
- 3 x Neopixel cables with connectors
- 1 x Cable connection to Duet 2 Wifi
- 1 x Power cable

LED strips
In addition to the inclusion of Neopixel rings, the kit includes 4 strips of white 24v LEDs for use as the lighting of the printing area.
Within the STL of Fysetc as BLV you can include the diffusers for installation as well as the connection scheme of these with one of the switches included.
Fans
The kit includes all the fans necessary for the commissioning of the printer with the wiring adapted for the Duet 2 Wifi electronics with 3 4010 fans and a 5015.
A comment that although we did not know the brand of these fans we have found them very correct.
Endstops
In the case of not wanting to mount Sensorless, we can choose to use the endstops included in the kit, a note, it is advisable to use the STL of Fysetc since they improved this part.
Other included accessories
We have commented again and again this Fysetc BLV kit includes everything you need to assemble this great machine:
- GT2 6mm belts with fiberglass reinforcement and bearings of very good quality
- HEPA filters
- Metal brush for automatic cleaning of the Nozzle, something very useful but sometimes it can cause damage or wear of the Nozzle
Tools
Now that we made a complete review of all the contents of the kit could not miss the tools to assemble it including hexagonal keys of different sizes and cutting pliers of excellent quality.
Assembly
Before proceeding to assemble the kit it is advisable to have some useful links at hand:
- BLV Cube website where we can find a lot of information about the materials, parts, and assembly process.
- Fysetc Github repository for the BLV kit, we will find FW, documentation, printed parts adjusted for the kit,…
- Parts of help in the assembly of the kit that we can find here, these pieces will allow us for example to correctly align the linear guides or adjust components in the exact measure.
Fysetc could not make it easier with the inclusion of some videos with the detail of the assembly of the kit:
Chassis assembly
Z-axis installation
Assembly hot bed platform
X- and Y-axis installation
Kinematics I
Kinematics II
Hot bed installation
Electronics installation
Firmware
Duet3D
Once our printer is assembled, we will begin the start-up by performing the initial ignition. As we have already mentioned, this kit comes with everything ready and we have the firmware versions both in our Duet 2 Wifi and in our PanelDue 5i screen.
Connecting to our Wifi and accessing Duet WiFi Web
The first step after verifying that our screen turns on and has a connection with our printer will be the connection to our wifi by performing the following steps from the PanelDue itself although we can do it by connecting our Duet 2 Wifi by cable and using a terminal client such as Pronterface / Printrun:
- To verify that we have a connection with our Duet we will launch the command gcode M503 which will return the configuration parameters of our printer (config.g)

- We will enable the WiFi module using the command gcode M552 S1

- After a few seconds (approximately 30s) we will see that the WiFi module was activated correctly and we will see a WiFi access point called DuetWiFi.

- We will connect to the DuetWifi access point, if you have your computer connected by cable or otherwise to another network we advise you to disconnect from them.
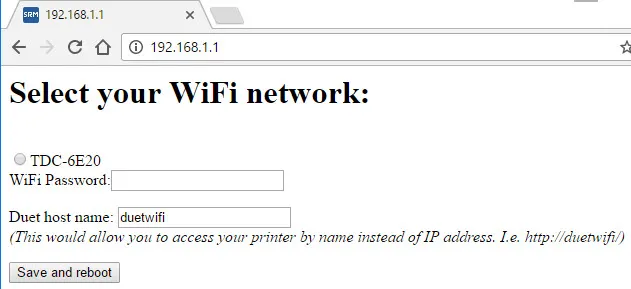
- We will open a browser and put 192.168.1.1 in the address of the browser which will open a simple web page where we must:
- Select our home/work WiFi and we will put in the password
- In hostname we can put the name we want our BLV to have in our network
- We will press the Save and reboot button and it will indicate that everything was saved correctly
- Without disconnecting the USB cable or Pronterface we will send the command M552 S0 to turn off the WiFi module and then M552 S1 to enable it again. After a few seconds we will see how our terminal will indicate, if all went well, that it has connected to our WiFi and the access IP

- We will open the browser again, remember to reconnect to your normal WiFi or cable, and we will use the IP assigned to our printer in the previous step where we will see the web interface to manage our printer!!!

- We will configure that our WiFi module is activated automatically at startup, for this and from the web interface we will modify the config.g configuration file and look for the line; M552 S1 and remove the ; from startup and save the changes to the Save Changes button and apply them to the Apply Settings button.


- If we are interested in configuring a fixed IP to avoid changes we have two options, either we force it in the DHCP of our home router or we can define it in the configuration file with the gcode in the config.g M552 Pxxx.xxx.xxx.xxx where the x will be the IP that we want to assign … but remember that if it is within the DHCP range of your router it can create collisions!!!

Updating the firmware
- Firmware update:
- PanelDue Update: https://duet3d.dozuki.com/Wiki/PanelDue_Firmware_update
- Upload firmware
- Clear 4seg y rst
- Run gcode actualizacion1M997 S4Copied!
- Fan adjustment: https://duet3d.dozuki.com/Wiki/Connecting_and_configuring_fans
- FAN2 Auto Fan M106 P2 T45 H1This sets fan 2 to run any time the temperature of heater 1 is above 45 Celsius. See M106 for details. We recommend you use the FAN1 connector for a thermostatically-controlled hot end fan, because on the Duet 2 WiFi / Ethernet in RRF 2.x it defaults to being on at power up , to provide maximum safety if you restart your Duet when the hot end is hot.
- Basic settings
- Bltouch setting:
- Initial calibration: https://duet3d.dozuki.com/Guide/Ender+3+Pro+and+Duet+Maestro+Guide+Part+4:+Calibration/40#s161
Klipper
Although the kit is based on a Duet and RRF board, the latter has never been one of our favorite firmware. Its “industrial” orientation, relative complexity in its configuration, and the slowness in the transfer for example of gcodes made us think about its migration to Klipper which is one of the firmware lately very fashionable and that is a round solution for this machine.
Installing Klipper
You can find more information about what Klipper is and how it works here as well as some interesting resources/guides about it. In order to perform this migration we will need:
- A Raspberry Pi or any other host supported by Klipper, the ideal is to use a 3B onwards although a Pi Zero 2 W works great
- USB
- Micro-SD card, 32-64GB is a perfect size plus it is interesting that it is fast
- If we plan to automate input shaper an accelerometer
Klipper mainly has 2 parts:
- The Klipper firmware installed in the electronics
- The core of Klipper, its UI and other components that are installed in the SD of the Raspberry Pi
We are not going to go into the detail of the installation of Klipper since you can find here an installation guide we will only leave you the “printer.cfg” with a base configuration for a BLV that we can modify to our liking.
Kliperizing our Duet2 Wifi
Once we have installed our Klipper and have access to our brand-new UI the next step will be the installation of the Klipper firmware in our Duet2 Wifi.
- The first step will be to make a factory reset of our board, for this with the plate off we will place a jumper on the erasing pins. Then we will connect the USB cable to power our board. Once the DIAG led is turned on we will remove the jumper and we will have our board without any firmware installed

- For the generation of the Klipper firmware we will connect our Duet2 Wifi via the USB cable to our Raspberry Pi. We will connect via SSH to our Pi and execute the following steps/commands:
cd klipper
make clean
make menuconfig
// - Micro-Controller > SAM3/SAM4 (Due and Duet)
// - Processor > SAM4e8e (Duet WiFi/Eth)
// - Communication Interface > USB

- Now that we have the configuration we will proceed to generate the firmware running from the console
make

Once generated, we will install it on the board following these steps:
- we will stop the service Klipper sudo service klipper stop
- we get the “serial id” of our Duet ls /dev/serial/by-id/*
- We launch the installation command by putting our “serial ID” after = make flash FLASH_DEVICE=

If the installation process fails you can leave the board in bootloader mode so the ideal is to disconnect the board and redetect the “serial id” in case it changed.
[mcu]
serial: /dev/serial/by-id/usb-Klipper_sam4e8e_xxxxxxxxxxxxxxxxxxxxxxxxxx-if00

Optional settings
Here are some interesting Klipper settings for our BLV:
- Configuring Power Off/Power Management

- Use our PanelDue screen, connecting the screen to our Pi by GPIO… More detail here
We will have to update our config.txt using sudo nano /boot/config.txt adding at the end dtoverlay=pi3-miniuart-bt press CTRL+X to save the changes followed by ENTER
On the other hand we will have to update our cmdline.txt launching sudo nano /boot/cmdline.txt deleting or commenting console=serial0,115200 we will press CTRL+X to save the changes followed by ENTER
We will run the Raspi-Config utility using sudo raspi-config and go to option 3 Interface Options > P6 Serial Port > No > Yes and restart our Pi We will make sure that our PanelDue is set to 115200
Finally we will have to make some modifications in the moonraker file.cfg of our Klipper, here you have more details of the changes.

User and printing experience
This BLV mgn Cube kit from Fysetc is very complete, with a very well-thought-out machine design and an excellent alternative to other similar DIY models. The assembly process thanks to the documentation/videos as well as the contents of the kit has been relatively simple considering the type of machine.
On the other hand, in the part of the commissioning of the electronics if you do not have some experience with RRF / Duet systems it can end up being a bit convoluted. The move from RRF to Klipper gives fresh air and will improve the experience in the use and operation of the machine.
Related to the Duet electronics that carry although it is an excellent electronics we believe that it is somewhat outdated and perhaps focused more on other more “industrial” machines, the use of the excellent Fysetc Spider would have been a perfect companion for this machine.
Also related again to electronics and its power supply emphasize that they can generate some noise so if it is an important aspect, and without it being something scandalous in excess, the change of electronics and change of the fan in the power supply help to silence this part enormously.
Otherwise, we have a very robust chassis and kinematics, well designed and that behaves exceptionally in any situation being an excellent idea to use triple Z to improve it even more.









I wrote all the instructions and guides for Ben’s printers. I also maintain all the firmware configs. If you’re going to steal my work and claim it as your own I’d appreciate you at least give me the credit.
Hi David,
We do not steal anything we follow the different guides and instructions from different sources and adding the links to some of them when required no one says was our invention.
We, as other users really appreciate your efforts as the others who contributed to make possible build those machines.
Original guide was create at 2022 March but unfortunately translated to English last 2022 November.
Any problem to add any link or recognition to the guide if you think appropriate.