It seems that the recognized manufacturer of printers and components BigTreeTech doesn’t want to stay behind his competitors in electronics development for 3D printers and raises the bar a little more.
Some time ago, as you will know if you are regular readers of our blog, BigTreeTech launched a great electronic board called BTT Octopus. In fact, you can read the analysis and configuration of it in an extensive article that we recently published here: BTT Octopus: Analysis and Setup Guide with Marlin and Klipper
Well, these weeks ago it has surprised us again with a complete review/update of it called BTT Octopus Pro, and in the next article we will show its new features.
Brief introduction
As can you imagine, the new BTT Octopus Pro is a new evolution of the great electronics BTT Octopus, and that was launched less than a year ago.
This evolution has been thought directly for machines that require high volumes or printing speeds, using more powerful and advanced components than those that we would normally find in another type of low or medium range electronics.
As we advise for the BTT Octopus normal, these electronic boards are especially suitable for “CoreXY” style machines such as Voron 2.4, BLV or VCore3, being today the best machines if you are looking for high performance in a 3D printer.
Before continuing with the article I would like to remind you as always that we have a large community in our Telegram channel. There we usually share all our doubts and experiences. If you want to be part of it, do not hesitate to join us.
You can also find a lot of help or resources directly in the Telegram group of SKR, as well as other helpful guides in our Telegram Bot @ThreeDWorkHelpBot.
Where to buy the BTT Octopus Pro?

You can find the BTT Octopus and BTT Octopus Pro in different internet marketplaces. Here we leave you some available links.
They are affiliate links to Amazon, Aliexpress and Markets, but they do not imply any increase on their price and they serve to support our project 3DWork.io
Or if you wish, you can directly use our Markets.sx component search engine, where you can compare prices with a single search very easily.

BigTreeTech Octopus PRO diagrams
Although the differences with its sister BTT Octopus are minimal, you can find the connection diagrams, pinning and measurements in the following images (click to enlarge)
You can also access the BTT Octopus PRO manual provided by BigTreeTech on its official Github, along with other interesting information about this impressive electronics.
Main features
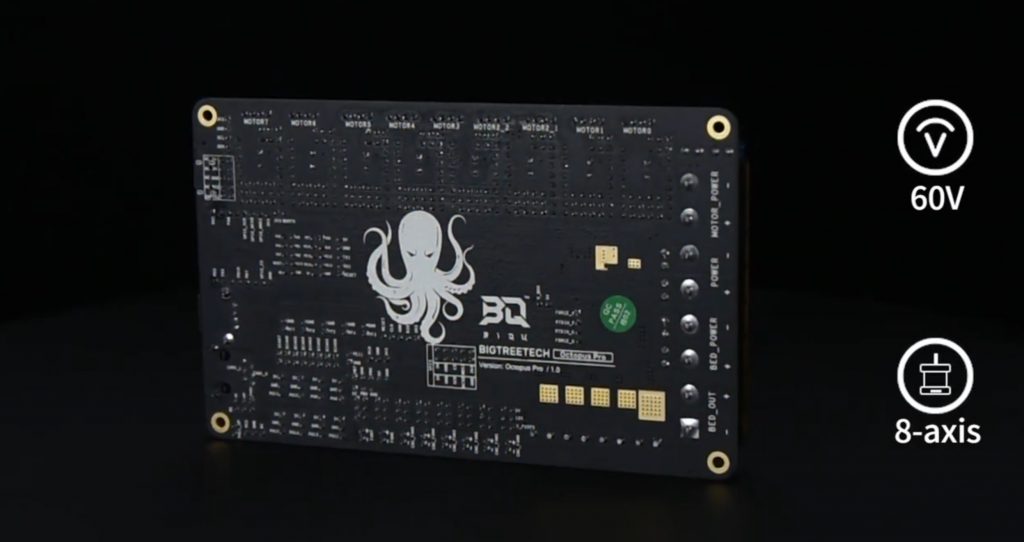
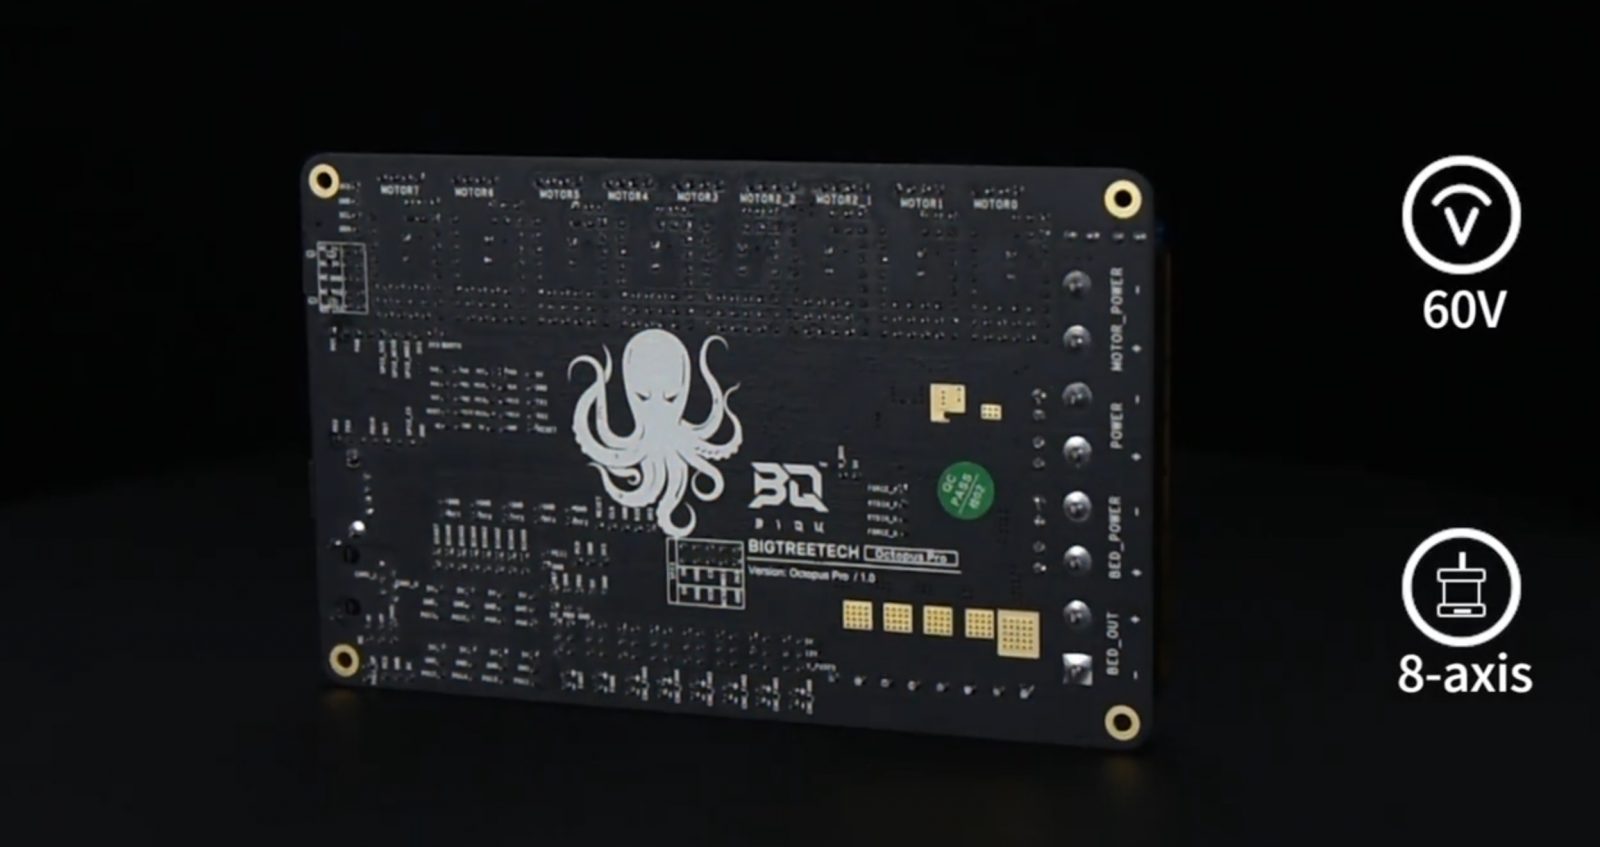
The most important features that we could highlight about the new BTT Octopus Pro are the following:
- Two versions of MCUs available
- 32b ARM Cortex-M4 MCU STM32F446ZET6 with a clock frequency of 180MHz and 512k of flash memory, being this version the most advisable for Klipper or Marlin firmwares
- MCU of 32b ARM Cortex-M4 STM32F429ZGT6 with a clock frequency of 168Mhz and 1MB of flash memory, this version being the most recommended for RRF firmwares
- Direct support for 3 types of available firmwares: Klipper, Marlin and RRF
- Interface for Raspberry Pi both by USB and UART (by GPIO)
- Up to 4 hotends available
- Up to 8 high voltage drivers or normal with new protection electronics
- Independent power supply for motors, hot bed and electronics
- Up to 6 controllable fans and 2 without control, with the possibility of selecting the working voltage between Vin, 12V and 5V.
- Protection against shorts in the fan sockets, important due to poor handling or failure of these components as it is one of the most common problems with the boards of our machines
- USB-C connector that allows serial emulation to be able to print via USB
- Compatibility with almost any screen although always advisable use the great ones SKR dual screens
- MOSFETs high performance that improve the efficiency and heating speed of the heaters
- Protection fuses that can be easily replaced
- Double motor output for the Z axis
- Improvements in bootloader, supporting updating by USB (recommended) and DFU (advanced users)
- 32K EEPROM (AT24C32)
- Connectors for RGB LEDs and Neopixel
- Connector for WiFi interface (ESP8266)
- PT100 interface / amplifier installed supporting 2/3/4 wire sensors
- Short protection in thermistor connectors, another great improvement over well applied to fans. Allows reusing these pins for other tasks with a pin that bypasses these protections
- Support for BLTouch/3DTouch and similar with a connector intended for them and usable by other ABL systems. The PROBE port was added extra protection with an optocoupler so as not to need to use a BAT85 diode
- CAN BUS via 6P6C RJ11 connector for future expansion modules
- SPI BUS expansion port for SPI modules such as MAX31865
- I2C BUS expansion port for I2C modules
- Support for modules solid state relay and UPS
Differences between Octopus and Octopus Pro
Now we are going to discover what differences exist between both electronics BTT Octopus and BTT Octopus Pro. In this way, we will know exactly what improvements the manufacturer has introduced.

- To begin with, support for high voltage (HV) drivers has been added, specifically up to theoretical 60V, although we recommend working with 48V systems. Of course we can use our BTT Octopus Pro board with standard drivers thanks to the fact that BigTreeTech has put at our disposal a jumper to choose one mode or another.

- Improved driver control electronics, with new integrated that promise to improve the quality and management of their use.

- Two versions oriented to different firmwares available (Klipper, Marlin and RRF)

- Standard inclusion of an amplifier for PT100 sensors. Remember that the normal version of the Octopus has the pre-installation
- Inclusion of a small buzzer for alarm notification, certainly interesting
- The polarities have changed in some of the connectors
Octopus Pro connections
Since the BTT Octopus Pro is practically the same as its sister BTT Octopus, we are not going to review the details of all its connections if not those that have simply changed.
You can consult all of them in our previous article on the BTT Octopus in the following link: BTT Octopus: Analysis and Configuration Guide with Marlin and Klipper
Power-selection connector
The BTT Octopus Pro has a jumper for selecting the electronics power supply using the USB-C port. With this pin connected through a jumper, the board will be powered by the USB-C port to perform firmware update tasks or basic tests.
It is very important not to place this jumper in normal use while it is connected to the printer’s power supply.

Drivers
Another great improvement, focused on specific machines, is the support for HV (high voltage) drivers/motors. The 8 sockets of the Octopus PRO stand out from their sister with stronger capacitors as well as higher sockets.
The improvements in the management of the drivers are not only limited to improving the capacitors but to the inclusion of a control electronics for the drivers. In order to use HV drivers, a jumper is included to activate this function, something that we have loved since we can use this function or not if we need it for our machine.
In the case that we use normal drivers we will place the jumper at the top of the socket (under the motor cable connector) on the right side, in that case the drivers would use the MOTHERBOARD power input which is normally 24v.

In the case that we use HV drivers we will place the jumper on the left side making the power supply of our drivers use the MOTOR POWER IN current input that we can reach up to 60V.

PT100/PT1000 Sensors

The BTT Octopus Pro includes the necessary electronics to be able to use the excellent PT100 sensors, supporting 2, 3 and 4-wire sensors using a micro-switch to indicate to the board which type we are using in each moment.
Micro-switch configuration depending on the type of PT100 sensor used:
| 1 | 2 | 3 | 4 | Sensor |
| ON | ON | ON | OFF | PT100 – 2 cables |
| ON | ON | OFF | ON | PT1000 – 2 cables |
| OFF | ON | ON | OFF | PT100 – 3 cables (*) |
| OFF | ON | OFF | ON | PT1000 – 3 cables (*) |
| OFF | OFF | ON | OFF | PT100 – 4 cables |
| OFF | OFF | OFF | ON | PT1000 – 4 cables |
In the case of using three-wire sensors, it is necessary to make an adjustment on the board. Check the image below that shows how the board comes and that it is suitable in the case that we use 2 or 4-wire sensors.
For 3-wire sensors it is necessary to remove both SMDs and place the blue marking instead of the red one, leaving the blue socket points disconnected. Being a 0 ohm SMD we can place a bridge between the points of the sockets and not solder the SMD if it gives us problems.

Firmware configuration
As we have already commented BigtreeTech has endowed this electronics with maximum compatibility with the most current firmwares supporting Marlin, Klipper and RRF.
As in the review of connections and given the similarities with its sister BTT Octopus we will refer only to the most notable differences.
Firmwares Marlin
Modifying “platformio.ini”
In this file we will indicate our chipset / electronics looking at the beginning of the file for the value env_default and change it to:
- If our BTT Octopus Pro has the MCU 446
default_envs = BIGTREE_OCTOPUS_V1
o
default_envs = BIGTREE_OCTOPUS_V1_USB
- In the case that our BTT Octopus Pro has the MCU 429
default_envs = BIGTREE_OCTOPUS_PRO_V1_F429
o
default_envs = BIGTREE_OCTOPUS_PRO_V1_F429_USB
Modifying “configuration.h”
First of all and as we always do, we recommend adding a comment to any configuration line that we modify, since later it will be much easier for us to find our modifications for future changes / queries.
For this we can add:
In the case that you do not already have a comment, the line
... // 3DWORK
In case you already have a comment
... // 3DWORK ...
As we have already commented we are only going to detail the changes with respect to the normal Octopus, of which will basically be the definition of the type of MOTHERBOARD.
For the rest of the options we advise you to review the Marlin section of the Octopus guide at the following link: BTT Octopus: Analysis and Setup Guide with Marlin and Klipper
// Choose the name from boards.h that matches your setup
#ifndef MOTHERBOARD
  #define MOTHERBOARD BOARD_BTT_OCTOPUS_PRO_V1_0
#endif
Firmwares Klipper
Klipper is an open-source firmware for our 3D printers that use the power of a Raspberry Pi (although it can be mounted on many more devices) to control the electronics of your printer.
By doing this we can make our printers work faster and with more precision, always depending on the system and hardware we have (I would like to clarify).
Something that is going to allow us Klipper in any case is to be able to have a lower level control of our machine, which will also require an extra amount of knowledge/efforts, greater speed in applying any changes plus a first-class remote control of the machine.
It is important to emphasize that if we come from other systems Klipper may have some restrictions regarding compatibility with components or with certain functions that we now have in our printer.
On the other hand, we have very interesting control functions of our printer such as Pressure Advance (similar to Marlin’s Linear Advance) and Input Shaper, which will greatly improve speed and quality.
Connecting Raspberry Pi to our BTT Octopus Pro
As we have already mentioned, the heart of Klipper runs in a Raspberry Pi normally, and there are different ways to connect this to our BTT Octopus Pro but for our example we will use the most common/simple one which is using a USB-C cable.
Compiling our firmware
- We can follow the official Klipper documentation to install it, we also advise using Kiauh, Fluidd Pi has an image that greatly facilitates the installation process of all the necessary components.
- Following the previous documentation we will go to the Building the micro-controller option using this configuration for MCU 446:
- [*] Enable extra low-level configuration options
- Micro-controller Architecture = STMicroelectronics STM32
- Processor model = STM32F446
- Bootloader offset = 32KiB bootloader
- Clock Reference = 12 MHz crystal
- If we use USB-C
- Communication interface = USB (on PA11/PA12)
- If we use USART2
- Communication interface = Serial (on USART2 PD6/PD5)

If we have a MCU 429:
- [*] Enable extra low-level configuration options
- Micro-controller Architecture = STMicroelectronics STM32
- Processor model = STM32F429
- Bootloader offset = 32KiB bootloader
- Clock Reference = 8 MHz crystal
- If we use USB-C
- Communication interface = USB (on PA11/PA12)
- If we use USART2
- Communication interface = Serial (on USART2 PD6/PD5)

- The firmware klipper.bin will be generated in the folder home/pi/klipper/out which if Klipper is not able to copy it directly to the SD from our BTT Octopus Pro manually copy to the SD using WinSCP or the command pscp in the CMD.
- Updating our BTT Octopus Pro to Klipper firmware will suffice with rename the firmware created (“firmware-USB.bin”, “firmware-USART2.bin” or “klipper.bin”) to “firmware.bin”, which It is the default name used by the bootloader of our BTT Octopus Pro to carry out the update process.
Klipper basic-configuration
- Using as reference the official documentation to configure Klipper we will use Octopus klipper.cfg as the basis for our printer.cfg which will include the correct pinout level definitions for our BTT Octopus Pro .
- You can use the Klipper reference configuration to enable the functions that interest us the most.
- If we are going to use USB-C to communicate Klipper with our BTT Octopus Pro we will execute the following command from Klipper: ls /dev/serial/by-id/*
From Kiauh we have our own menu in a quick and easy way to execute this action, to identify the correct ID of our Octopus and add it to our printer.cfg
[mcu]
serial: /dev/serial/by-id/usb-Klipper_stm32f446xx_0E002B00135053424E363620-if00

- If we use USART2 to communicate we will need to modify some settings on our Raspberry Pi directly on the SD from the computer or in the most comfortable and advisable way that is through SSH
- Delete or comment out the console = serial0,115200 line in /boot/cmdline.txt
- Add dtoverlay = pi3-miniuart-bt to the end of /boot/config.txt
- Modify the configuration of [mcu] in printer.cfg to serial: /dev/ttyAMA0 and enable restart_method: command
...printer.cfg
[mcu]
serial: /dev/ttyAMA0
restart_method: command

Firmwares RepRap
The versatility of the BTT Octopus Pro and its sister is total, as you can imagine. We have already discussed Marlin and Klipper in detail, so now it is the turn of the Reprap firmwares.
However, and given its complexity, we refer you directly to its repository where you will find the versions prepared for our Octopus.
Update via DFU
Our BTT Octopus PRO allows us to update it through DFU, a process that will allow us to upload the firmware or bootloader in case the normal process does not work using USB-C cables.
Since it is not a recommended process for inexperienced users, we leave you the link to Bigtreetech document where it explains the process in its entirety.
TMC5160 HV Drivers

Together with the new Octopus Pro Bigtreetech has released a review of one of the best drivers that exist today, specifically the TMC5160 driver.
In this case it is a new PRO/HV (High voltage) version, in order to take advantage of all the new functions of this new BTT Octopus Por.
These new drivers support theoretical motors up to 60V, although in the case of using them in our BTT Octopus Pro we recommend working with 48V systems (recommended voltages 12-24-36-48-56V)
It also has a great build quality, as well as components something common in all drivers manufactured by BigTreeTech and considerably improving the MOS of this version for total and optimal control in motor management .
And this is all for the moment, I hope this brief analysis of the new BTT Octopus Pro electronics has been of interest to you, or at least a pleasant reading.
As always, you can find other articles of interest in the following links:
- The best resin 3D printers in 2021
- Longer LK5 Pro: Review of a High-Volume Desktop 3D Printer
- Nozzle: Learn all the basics about this essential component
- Elegoo Mars 2 Pro: Review of a great resin printer for home use
- BTT Octopus: Analysis and Setup Guide with Marlin and Klipper
- FYSETC S6: Complete guide to this excellent electronic board for our 3D printers
- BTT SKR 2: How to detect and repair the failure of the first revisions (REV A)
- Elegoo Jupiter 6K: A new flagship arrives on the Crowdfunding platform Kickstarter
- Monoprice Mini Delta v2: The perfect choice to get started in 3D printing
- 3D printed Simpsons TV that plays the episodes randomly
- BigTreeTech SKR 2: Guide and setup of this new electronics
- Complete guide Fysetc Spider: A real “beast” for our 3D printers
- New Marlin Builder v2.0 update (+220 firmwares available v2.0.9.1)








Déjanos un comentario