BIQU is a brand used by Bigtreetech, well known for its electronics and one of our favourites, focused on 3D printing components.
While BIQU has launched machines in the past with great quality/price, its scope has been limited when competing with other more established or well-known manufacturers. With the BIQU Hurakan has put all the meat on the grill launching a great machine at an exceptional price considering its components.

As always before continuing with the article, remind you that you can join 3DWork on our Telegram channel full of 3D printing upset, or on our social networks Facebook, Twitter, Instagram
We anticipate that we are going to use this BIQU Hurakan in future mods or reviews, and we have created a specific Telegram group to be able to collaborate with other users of this sensational machine. You can access the Telegram group for the BIQU Hurakan here.
BIQU Hurakan
BIQU/Bigtreetech have always been characterized by high quality printers with top components, mainly by incorporating electronics and first level solutions.
Then we leave you a presentation video.
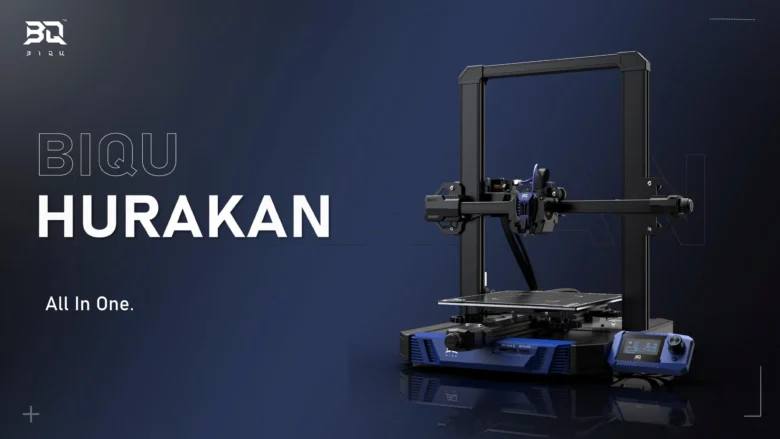
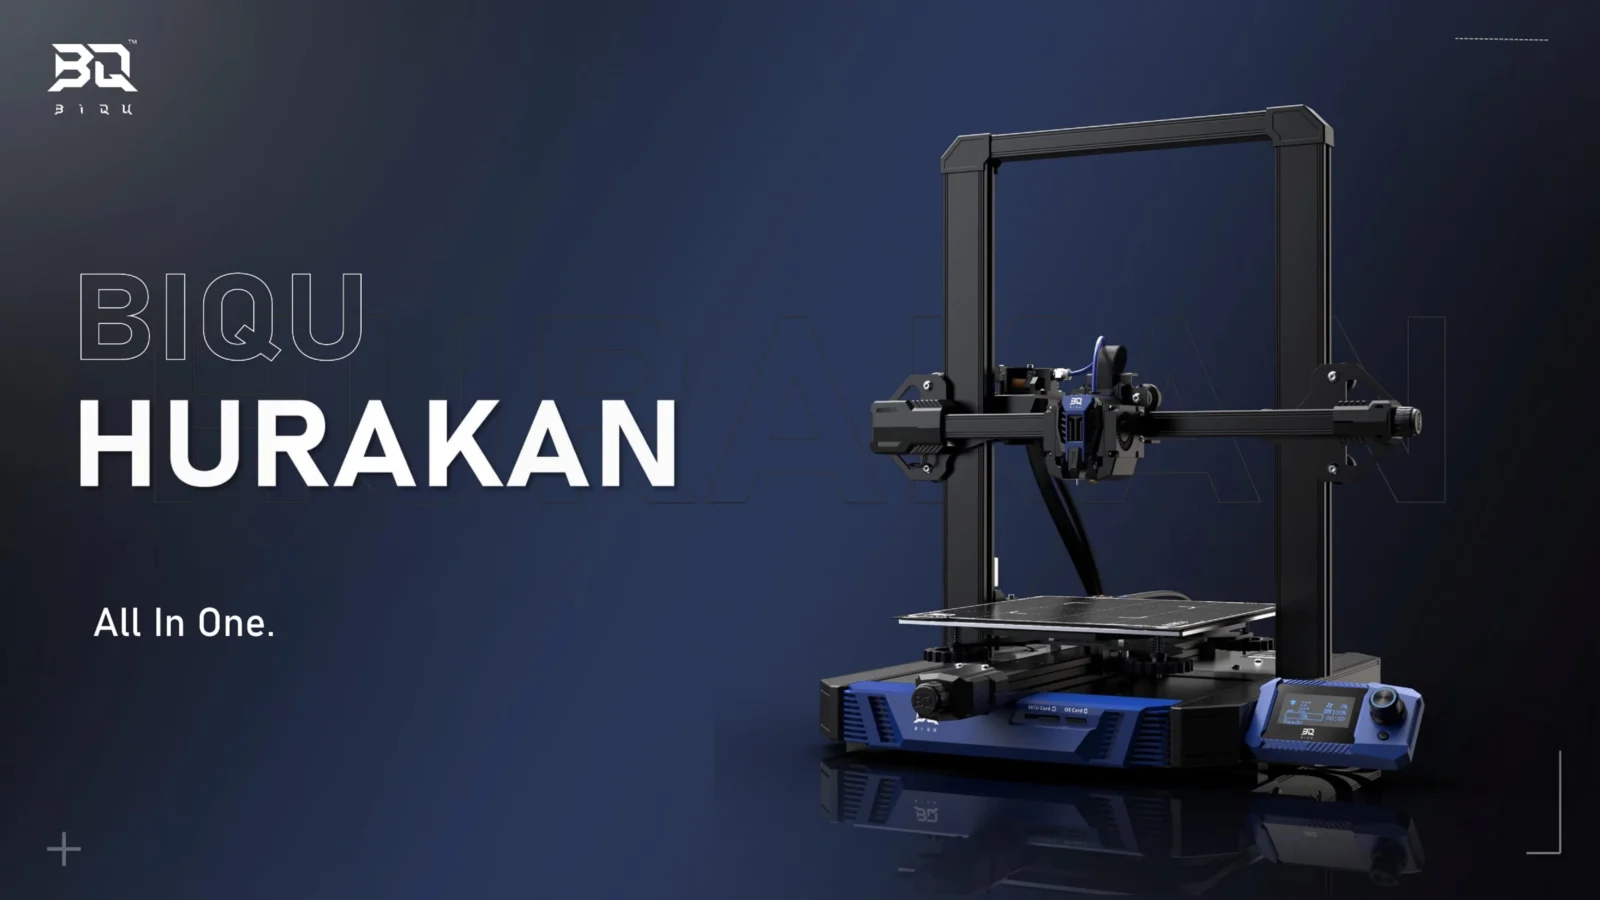
As you can see, the design and details of this BIQU Hurakan are excellent. We have a machine an imposing and distinctive appearance using quality materials at a general level that is then reflected in the quality obtained in our prints.
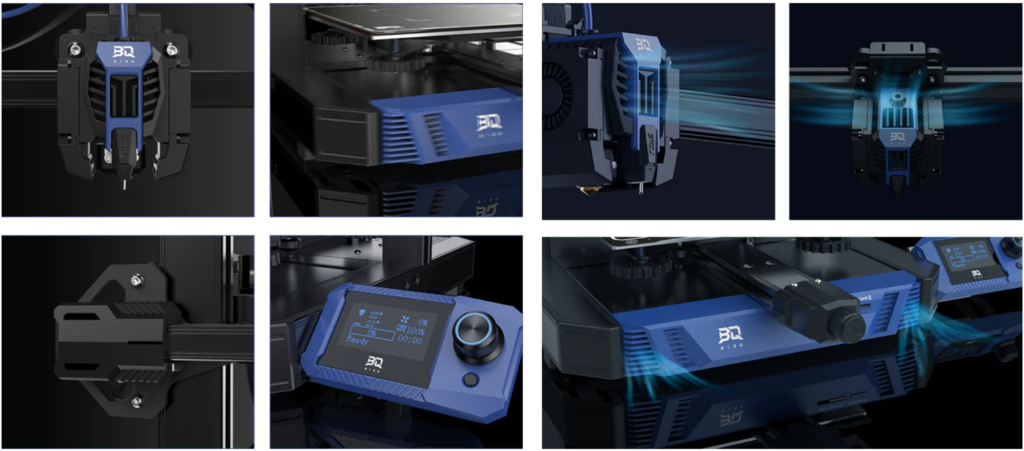
Impressive features on paper for a machine of this range that we will detail later, but… What makes the BIQU Hurakan so special?
- Klipper as control firmware, we have already talked different times about this firmware that is the present and probably the future of 3D printing for a large part of the printers that will provide us with great flexibility and functions that we do not normally find in machines of this range.
- Electronics Bigtreetech Manta M4P + CB1, a sensational electronic of which we will give you more details… In addition to preparing a complete guide of her and her older sister, M8P…
- Automatic levelling, something that every day, has been more essential to improve and simplify the adjustment of the printer. BIQU in this case has done an excellent job with the BIQU MicroProbe levelling sensor included and of which we will give more details later.
- Hot bed with two heat zones, a simple and interesting functionality that allows us to activate or not two heating zones depending on our needs. That will help reduce the electricity consumption of our machine when it is not necessary and which we will talk about in more detail later.
- Filament sensor and intelligent lights in the print head, that are interesting improvements that never hurt.
We detail the technical specifications of the BIQU Hurakan:
| Print volume | 220x220x270mm |
| Printing surface type | PEI magnetic |
| Features hot bed | Up to 100º with two heating zones (consumption 100W or 240W) |
| Extrusion system | Bowden |
| Hotend | Phaetus type, 260º |
| Print speed | 60-180mm/s |
| Electronics | Manta M4P+CB1 |
| Supported firmware | Klipper |
| Leveling sensor | BIQU MicroProbe, sensor with multi-surface servo with a weight of only 6g |
| Z-axis | Single motor |
| Extra functions | Auto LevelingX-belt and Y-TensionersFilament TensionerAccelerometer SensorSD/USBSPIRJ45 |
Where to buy the BIQU Hurakan?
BIQU/Bigtreetech have their own online store where you can buy the BIQU Hurakan directly. In any case, we provide you with some links to other reference stores:
If you use the purchase links, the price of the product will be the same as if you access it regularly, but 3DWork will have a small commission.
Something that will help us support the project and continue generating content.
Contents of the BIQU Hurakan kit
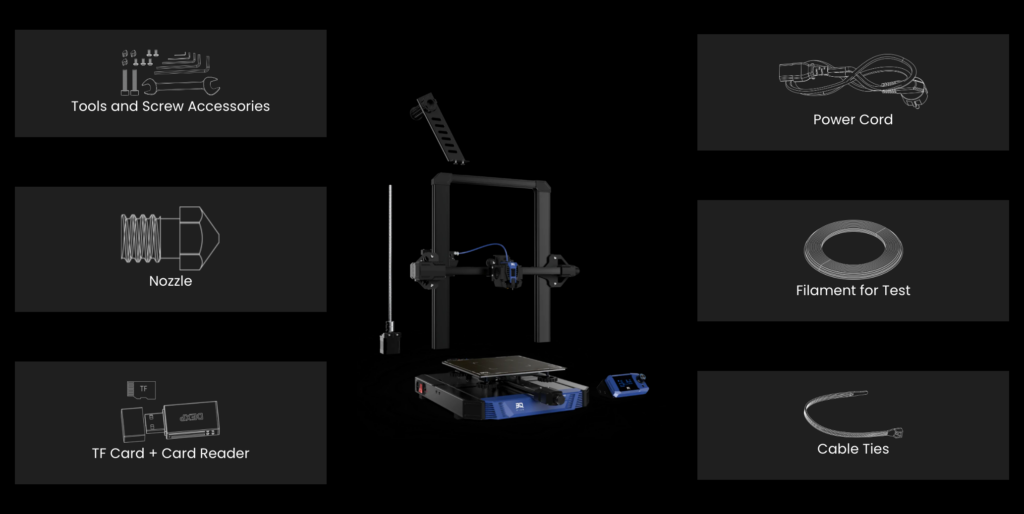
BIQU/Bigtreetech have done an excellent job with their BIQU Hurakan with their kit, including everything necessary for commissioning and using the printer. In addition to perfectly protected in its box.

In the package, we can find:
- Printer, its fully assembled base… The Z-bridge and X-axis will need to be partially assembled.
- Screws and tools
- Nozzle spare parts
- USB/SD for Klipper CB1 System
- Manuals and filament for tests
Components and mechanics
Design
BIQU/Bigtreetech always pays special attention to detail and in this BIQU Hurakan its design is magnificent and, according to the brand, based on the lines of the famous Lamborghini Huracán and using the classic colours of this supercar.
The chassis is made of aluminium profiles that give a fantastic finish, as well as a good robustness to the chassis.

On the front we also have sockets for SD and microSD (for the Klipper system) in addition to the LCD screen that will allow us to perform certain functions directly from the printer.

On the back we have a pair of USB connectors (1), the connector for network cable (2) and the SPI port (4) for accessories such as the accelerometer sensor.
Kinematics
The BIQU Hurakan is a printer with typical Cartesian kinematics, where the Y axis is responsible for sliding the bed. In addition, we have always grateful tensioners for the belts on the X and Y axes that will help us keep the tension correctly adjusted.
Personally, we always think it is a better option to have a double Z motor for this type of machines, something that with this BIQU Hurakan they offer as a kit and that we think it is interesting to add.
An aspect that we have seen that can cause problems is the bed cable that can sometimes get hooked on the gear trim of the motor Y on the back of the printer. In our case, we aligned it correctly so that it took the correct shape, and we plan to place a spring / guide to avoid this issue.
Electronics
As it could not be otherwise for a BIQU / Bigtreetech printer has some first class electronic components, in this case the BIQU Hurakan has a Manta M4P MTB along with a CB1 module for the Klipper part.
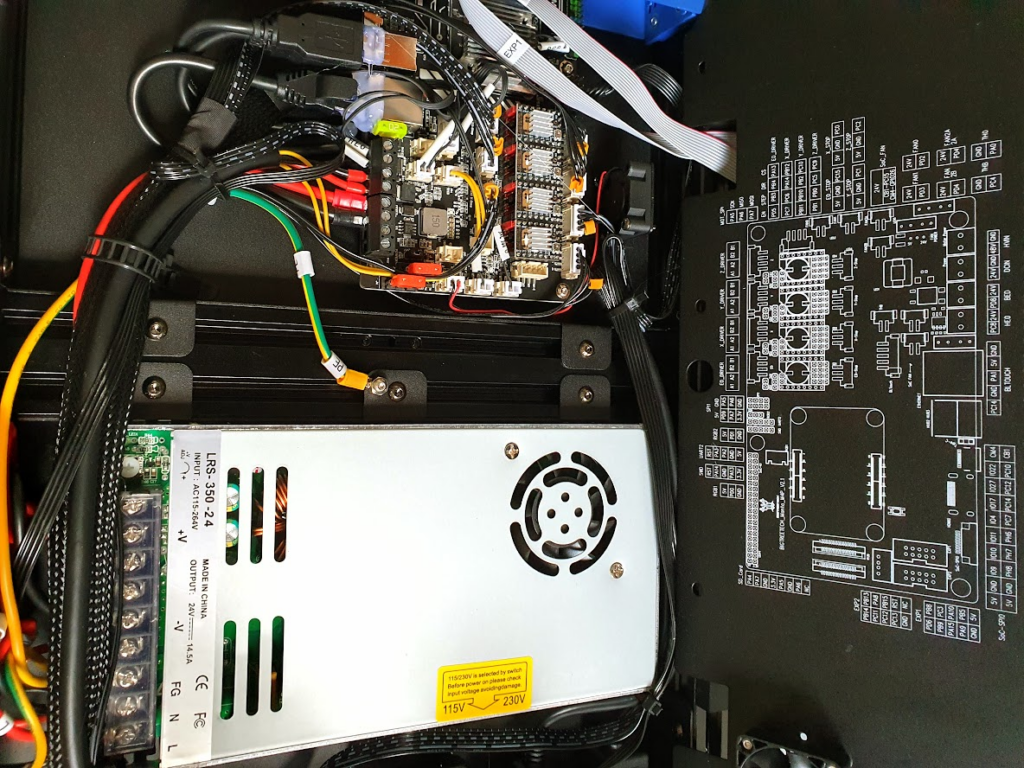
We are not going to go into much detail of this electronics, since soon we will make a complete guide of it. Just confirm that we think it is one of the best solutions we have today for the binomial 3D printer + Klipper

Hotend, extruder and bed
With respect to the Hotend we have a print head with a striking design in which we can highlight. Apart from its design, have a hotend that seems manufactured or at least based on the Phaetus that has given us excellent performance during our tests.
We can also highlight the wiring uses an umbilical that is easily and securely fixed to an intermediate connection plate, which allows us to perform maintenance or repairs in a very simple way
The integration of the BIQU MicroProbe levelling sensor has been a success because its location is close to the nozzle, allowing our meshing to be more precise.
In addition to its size, weight of about 6g, precision and compatibility with any surface, we can say that it is one of the great successes of this machine.
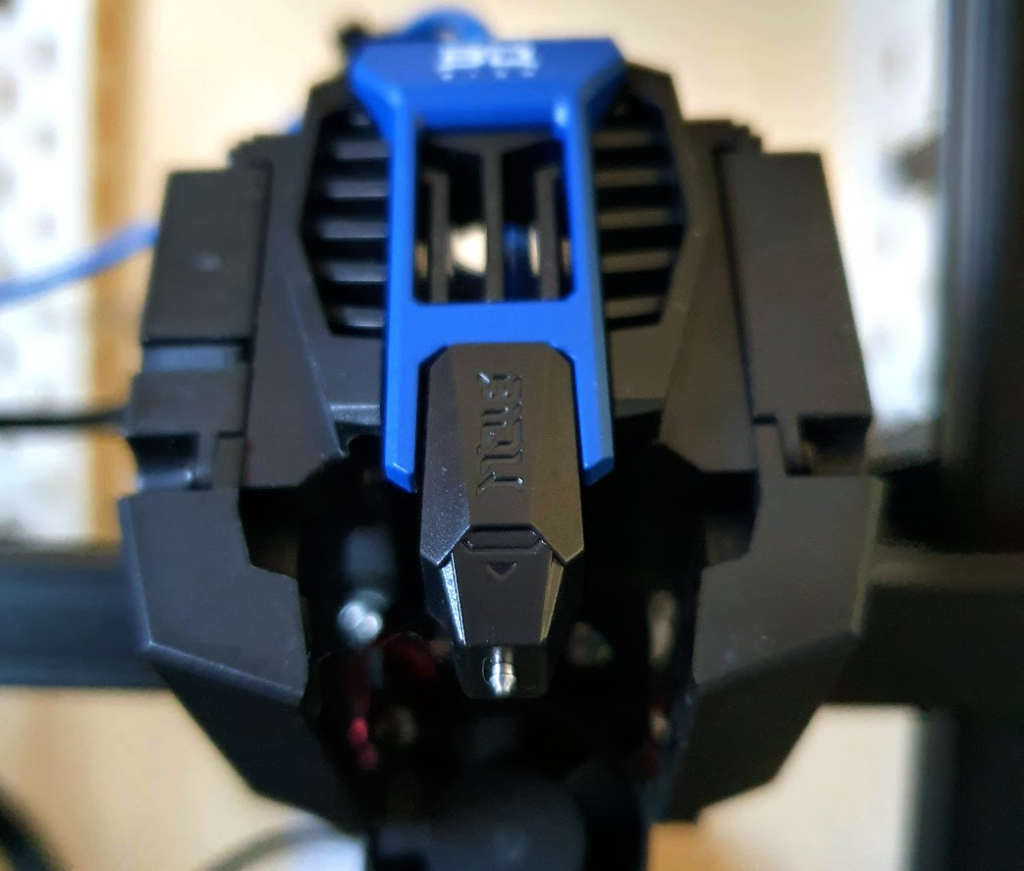
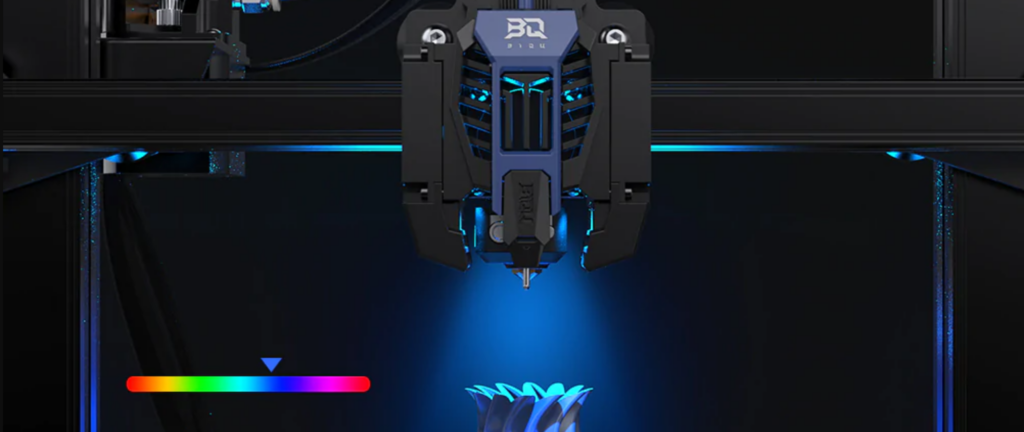
We also have LEDs integrated into the print head that, apart from being sensational, are tremendously useful to illuminate the printing area. They will also serve us to make visual notifications before events, as always with the total freedom and flexibility that Klipper provides in this type of customizations.
Another novelty that we loved about our BIQU Hurakan is that it has a powerful bed that has as a novelty to have two heating areas that we can handle by means of a switch in a simple way. This allows us to save energy by being able to select to heat the centre of the bed only (100W) or totally (240W).
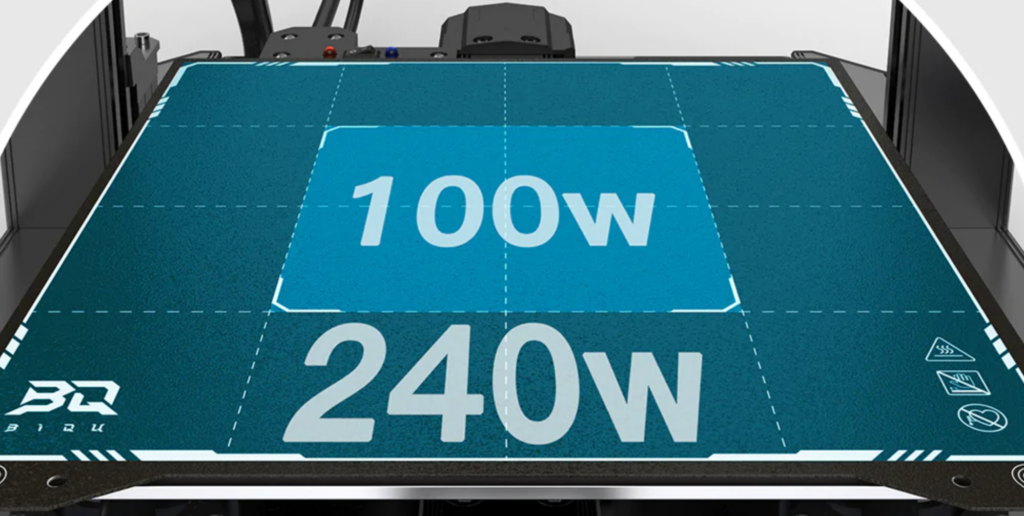
We are already thinking about how to improve this sensational functionality with for example manage through a relay automatically and through macros the automatic ignition of each zone as necessary.
On the other hand BIQU has used as a printing surface a PEI magnetic strip that, although during the first tests gave us some adhesion problems, once cleaned with IPA it has given excellent results.
With reference to the bed, we also liked the detail of including a protection to maintain / avoid thermal leaks in the lower part of the bed
Display and management interface
Klipper is the brain of this printer that manages electronics and printing. If something stands out, Klipper is in its versatility and modularity and in the aspect of management interface with the user we have different and powerful ways to do it.

In the case of the BIQU Hurakan we have an LCD screen with encoder that has the basic menus to manage some functions of the machine. In addition, this has a manageable led lighting, which like the one we have in the print head, can help us give a distinctive touch to our printer and allow us to use it for event notification..
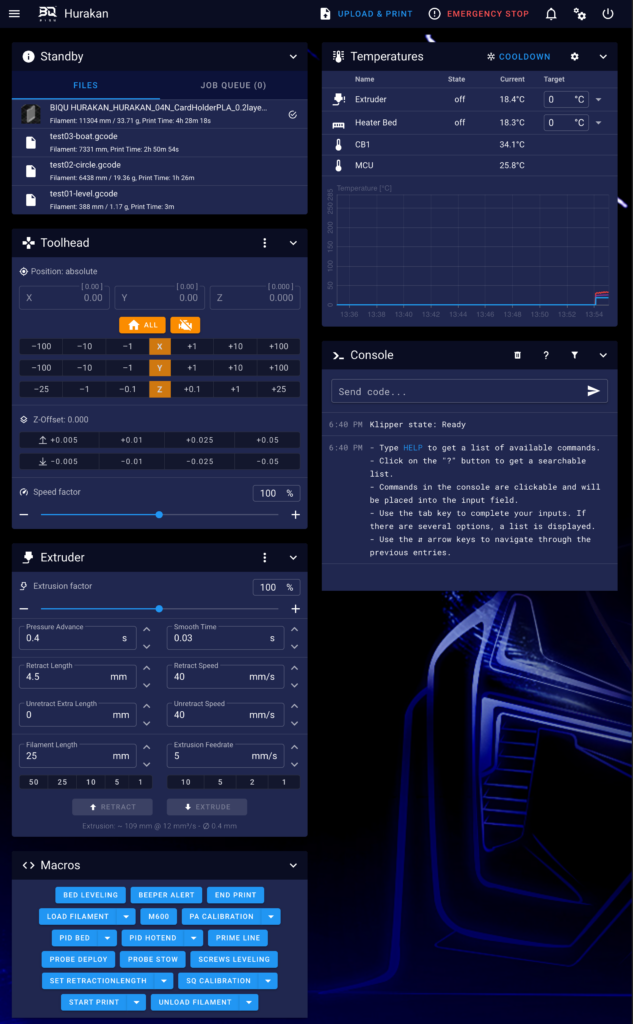
But where Klipper’s management really shines is through the use of its web interface, in this case BIQU / Bigtreetech uses Mainsail as a UI for Klipper with a customization theme that gives it an excellent touch.
We can access this UI from any computer connected to our network, or through VPN or any other compatible remote accesses such as Telegram, using a simple browser.
In addition, since we have several connections for this, we can install an external screen like the fantastic Bigtreetech HDMI5 to the CB1 module and have the KlipperScreen interface.
KlipperScreen very powerful for management from the printer itself and similar to the use from the browser in options.
ADXL345 (acelerometer)
We have already told you that this BIQU Hurakan includes excellent components, and it has been a success given the use of Klipper to include an accelerometer to be able to use one of the star features of Klipper … Input Shaper.

The ADXL345 together with Klipper’s Input Shaper functionality allows us to measure the resonances of our printer so that Klipper can compensate for them, allowing higher quality prints avoiding / significantly reducing the “ghosting” effect, for example. Later, we will explain the process to follow to make this adjustment in our BIQU Hurakan
Assembly and commissioning
The BIQU Hurakan comes pre-assembled, so the assembly is relatively simple, and we will not take more than about 20–30 minutes depending on our expertise. We provide you with a video where you can see the whole process.
Although we are not going to go into detail in the assembly of the machine, we do advise you to do this with patience because it will be the basis for everything to work correctly. So pay attention to all the initial assembly and adjustment steps.
Once we have assembled the machine, the next step is to assemble the Klipper system.
Klipper… Initial setup
We are going to focus on explaining this part because despite being a great advantage of this machine and there is a great work of both the creators of Klipper and BIQU / Bigtreetech.
It is important to clarify that Klipper has a certain degree of complexity. It is essential too to understand how it works and a minimum knowledge so as not to have problems in some aspects.
Klipper is an open-source firmware for our 3D printers that uses the power of an external host to the electronics. In the case of the Manta M4P electronics uses a CB1 module from Bigtreetech as a host, for the control of the electronics of your printer. In this way we can operate faster and more accurately depending on the system and hardware we have.

Something that will allow us Klipper is to have a lower level control of our machine, which will also require extra knowledge / efforts, greater speed when applying any change in addition to a remote control of the machine first class
Klipper basically consists of three basic components, on which others can be integrated to extend the system.
- Klipper is the central component and responsible for interpreting the gcode and control of your printer
- Moonraker, is an API that allows linking external services with Klipper exposing print states or methods to allow other services to talk to Klipper
- UI/Interface, allows easy control of Klipper using Moonraker to interact with it.
To prepare our SD, the first thing will be to download the latest version of Klipper for CB1 from here where we will take the specific version for the BIQU Hurakan. With BalenaEtcher or Raspberry Pi Imager we will write the image to our SD (8 GB or greater in addition to ideally being a high-speed SD).
In our case the version included in the printer was an old version so we advise you, MUCH, to update to the latest version available because it corrects many problems and will save us a lot of time.
Once we have our SD ready the next step, if we plan to use the Wifi, we must modify the system file.cfg to adjust our SSID (name of our Wifi) and password. It is important that we use an advanced text editor such as Notepad++ or VSCode for this.

We will insert the SD in our BIQU Hurakan, in the OS Card slot, and we will be able to turn on the printer and wait for a few seconds for the printer to start.

Once we see that the display shows the menu with information from the printer or that the LEDs of the head are lit, it will mean that everything has started correctly. The next step will be to find the IP assigned to our machine, we can use a network analyser like that has versions for both computers and phones / tablets.
Once our IP is located, we can go to our browser and access the control interface… that we have to say, like the printer, it looks spectacular for the customization of BIQU / Bigtreetech
Although, during the creation of this guide, it comes with the cfg for our printer recently added a more interesting modular configuration and that will probably be applied in the future. You can see it from here.
We advise you to put it, although it is also advisable to install some Klipper / Moonraker. Modules such as crowsnest for camera management, print_area_bed_mesh for an intelligent and more precise bed levelling and sound for improvement in the Wi-Fi.
Backing up our settings
We advise you that once we see that our Klipper system works correctly, you make a backup of your configuration.
Since the system that we suggest here to perform the backup is simple and fast, it is advisable that you do it every time changes are made to your configuration.
Klipper Update
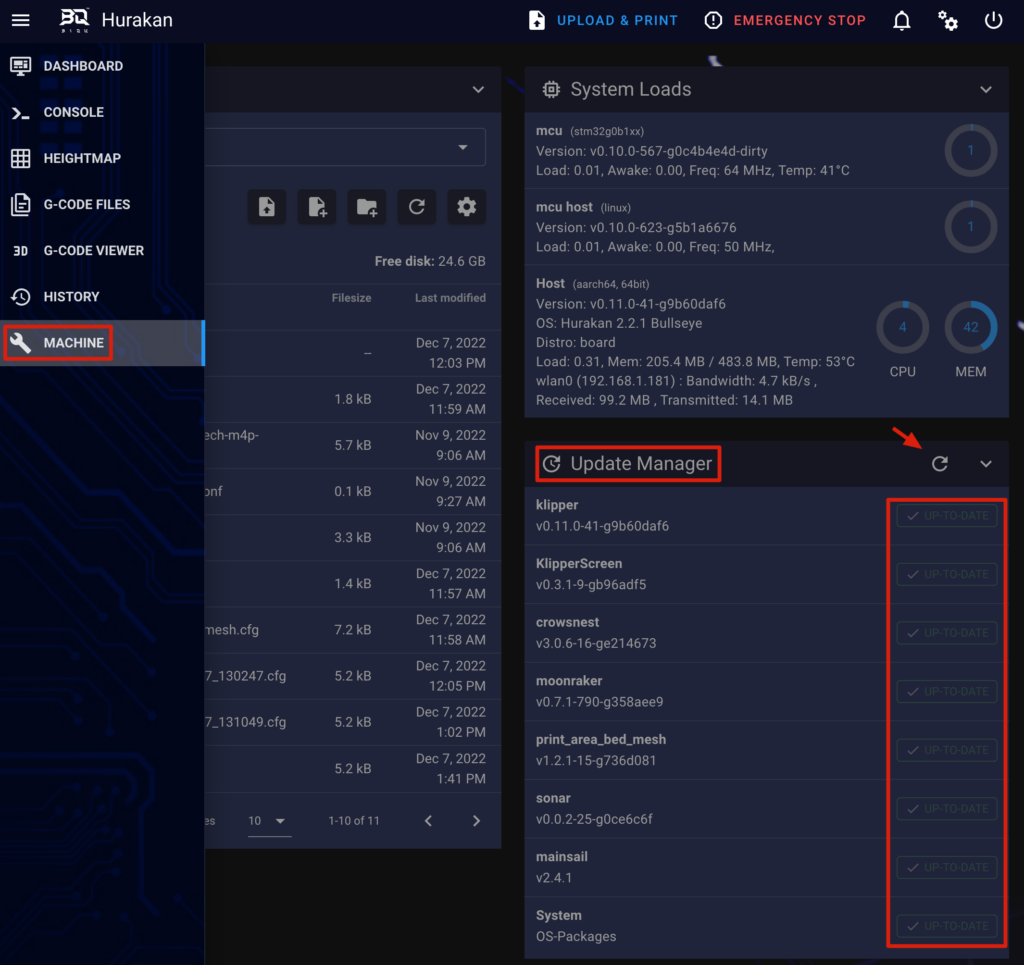
Now that we have our system mounted and a backup, the next step will be to make sure that our system is completely updated. To do this, from our UI we will go to the MACHINE and Update Manager section where we can easily keep our system fully updated.
Initial settings
We already have the machine ready to continue with the important initial adjustments to be made before starting with the calibration
PID
The adjustment of the PID is an important point to be made during the start-up and whenever we modify any part / component related to the heating system of our machine.
The process is very simple and very fast, so we have no excuse to do it whenever we see abnormal temperature fluctuations:
Some tips to perform the PID on your machines:
— launch the PID process with your machine at room temperature, avoid doing so after printing at least until the sensor temperature drops to room temperature
— it is advisable to place your nozzle about 5-10 mm high in Z
— ideally, launch the PID process with the layer fan at 100% speed
- Hotend/Extruder, we will launch from the terminal the command PID_CALIBRATE, for example:
PID_CALIBRATE HEATER=extruder TARGET=200
Once finished we will SAVE_CONFIG to be saved in our printer.cfg our PID configuration. - Bed, in this case, we will launch the command as follows:
PID_CALIBRATE HEATER=heater_bed TARGET=60
Once finished, we will SAVE_CONFIG to be saved in our printer.cfg our
Manual bed levelling assisted by levelling sensor
Having our bed properly levelled will greatly minimize corrections by the machine once we have a mesh of our bed.
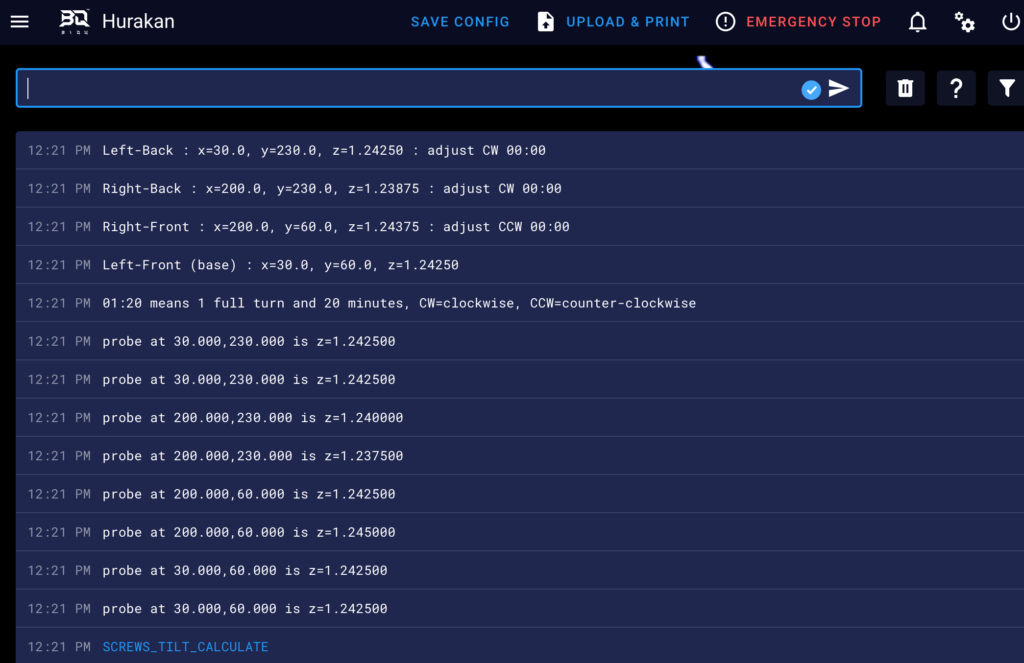
Klipper provides us with two macros that will help us in the assisted levelling of our bed, we advise you to use SCREWS_TILT_CALCULATE.
SCREWS_TILT_CALCULATE checks the reading points defined in section [screws_tilt_adjust] of our printer.cfg for leveling.
For reference, these would be the points in section [screws_tilt_adjust] of our printer.cfg
[screws_tilt_adjust]
screw1: 30,60
screw1_name: Left-Front
screw2: 200,60
screw2_name: Right-Front
screw3: 200,230
screw3_name: Right-Back
screw4: 30,230
screw4_name: Left-Back
speed: 100
horizontal_move_z: 5
screw_thread: CW-M3
Once the readings have been made at those points, it will suggest the manual adjustment in the screws of our bed being CW clockwise and CCW in reverse.
Z-Offset and bed meshing
For the Z endstop we have the new BIQU MicroProbe sensor. One of the previous steps to print is to find the Z-Offset, this value is the distance between the activation of our sensor and the tip of the nozzle.
We can find our Z-Offset in different ways:
- Simple method
- We will make a home of all axes
- We will put a sheet under the nozzle
- using the babystep controls in Z we will move the Z axis until we notice that the nozzle makes resistance with the folio when trying to move it
- We will launch the command GET_POSITION in the console that will return the coordinates // kinematic: X:0.000000 Y:0.000000 Z:-0.400000 (example)
- We will go to the PRINTER CONFIGURATION section of our printer.cfg and add the integer value of Z (0.4 in the example) to our z_offset:
- Precise method, if we want to use the precise way to adjust our z-offset we will use the wizard from our UI in the console / terminal section with PROBE_CALIBRATE following this procedure.
In this case we can also launch the process from the screen itself if it is more comfortable, we will go to Setup / Calibration / Start Probing / Move Z / Test Z to move our head and adjust it to our liking … Once finished, we make Accept & Save.
Once we have our bed and our Z-Offset adjusted, we can make a mesh
We can launch the calibration process from the options of your Mainsail UI or by console launching BED_MESH_CALIBRATE. We can run BED_MESH_CLEAR to clean the values, once the meshing is done we can save it with SAVE_CONFIG
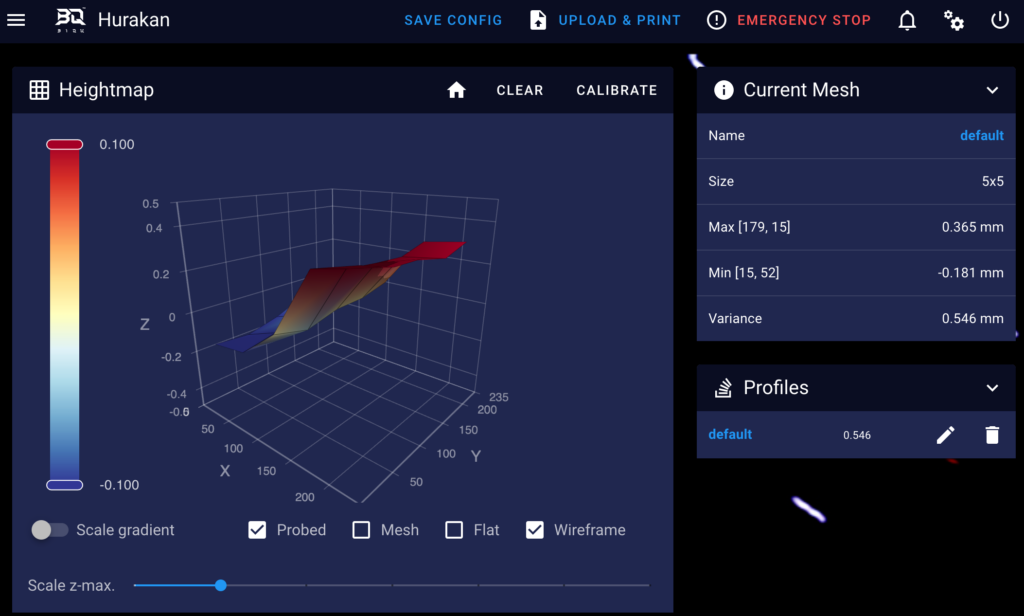
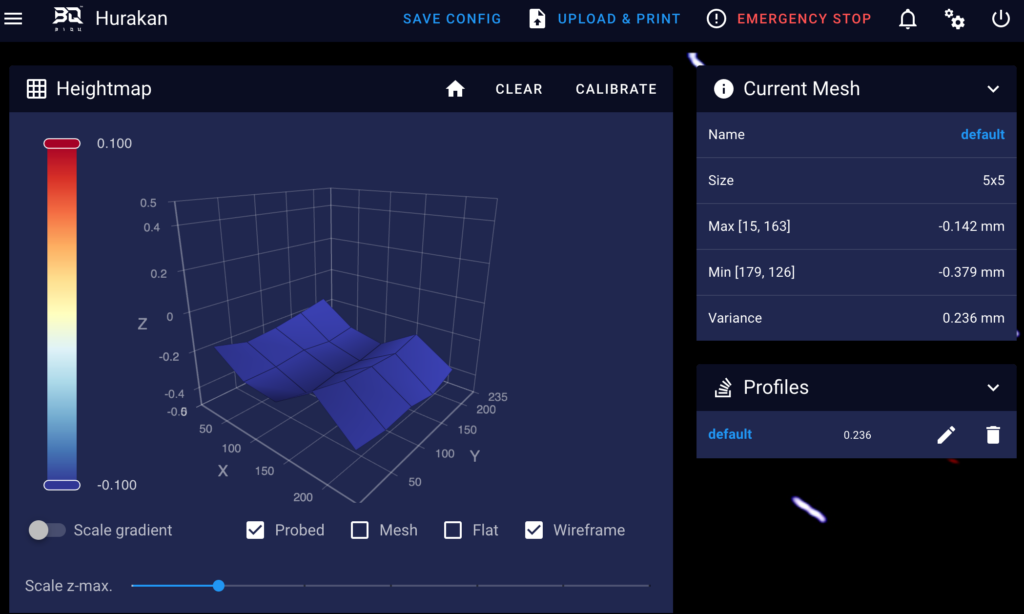
In the upper captures you can see the difference between making a mesh with the bed level as we referred to before to not having it.
The machine will have to compensate for fewer deviations, which will ensure better quality in our prints.
Although the most advisable thing is to launch the process from the UI we can also do it from our screen from Control / Bed Mesh & Save

Input Shaper
One of the great features of Klipper is the support for Input Shaping which is a technique that reduces vibrations / waves (ringing, echoing, ghosting, rippling are other names of this type of artefacts) normally produced by mechanical vibrations.

BIQU has once again done an excellent job by including everything you need to be able to use this functionality with an accelerometer, which greatly simplifies the process.
To perform the Input Shaper tests, the first thing will be to connect the sensor to our printer, for this we will use the SPI port on the back of the printer.

Accelerometer activation
It is important to make sure that we have activated the accelerometer in our printer.cfg, we remind you as we suggested in the start-up that in our case we use the new modular configuration:
#############################################################################################################
### INPUT SHAPER CONFIG
### Uncoment this line if you want to test resonances.
#############################################################################################################
[include Hurakan/Adxl.cfg]
Checks
- With everything connected, we will go to the console/terminal of our Klipper UI and run:
ACCELEROMETER_QUERY
- If we get an answer like the following, our accelerometer works correctly!!!
adxl345 values (x, y, z): 6042.857730, 5507.414640, -5889.873990
Resonance measurement
Now that we have everything configured, we will proceed to perform our resonance test following these steps:
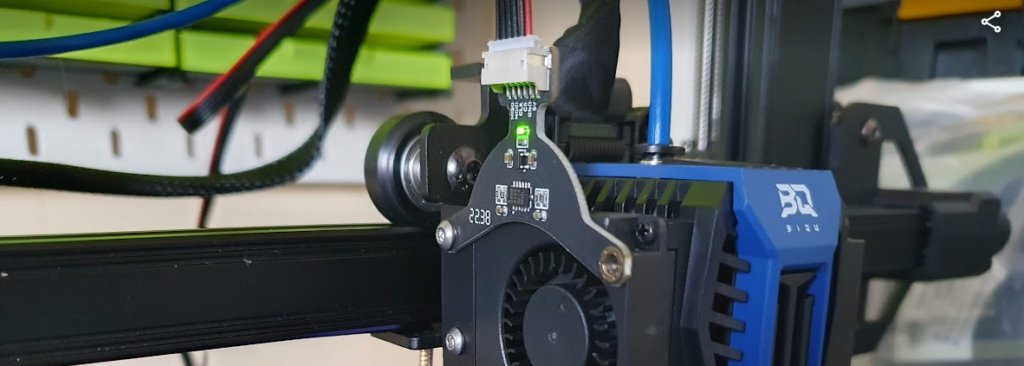
- X-resonance test, we will launch by console/terminal from our UI the following command:
TEST_RESONANCES AXIS=X
- Y-resonance test, we will place the sensor in this case in the anchors at the back of the bed where the cables arrive, and we will launch by console / terminal from our UI the following command:
TEST_RESONANCES AXIS=Y
It is very advisable, at least during the first time we launch the process, to be very attentive that the vibrations caused by the test are not very violent and can damage our printer.
You can use the M112 command or the EMERGENCY STOP button in your UI to stop the process.
Review the results
The above process will generate two CSV files with the results of the test.
These CSVs will be processed by running (there are some scripts/macros that can simplify life) the following commands from the SSH terminal:
~/klipper/scripts/calibrate_shaper.py /tmp/resonances_x_*.csv -o /tmp/shaper_calibrate_x.png
~/klipper/scripts/calibrate_shaper.py /tmp/resonances_y_*.csv -o /tmp/shaper_calibrate_y.png
To facilitate access to the generated images we advise you to save these in a path / directory that is accessible from your UI, for example we can create an input-shaper folder from the UI:
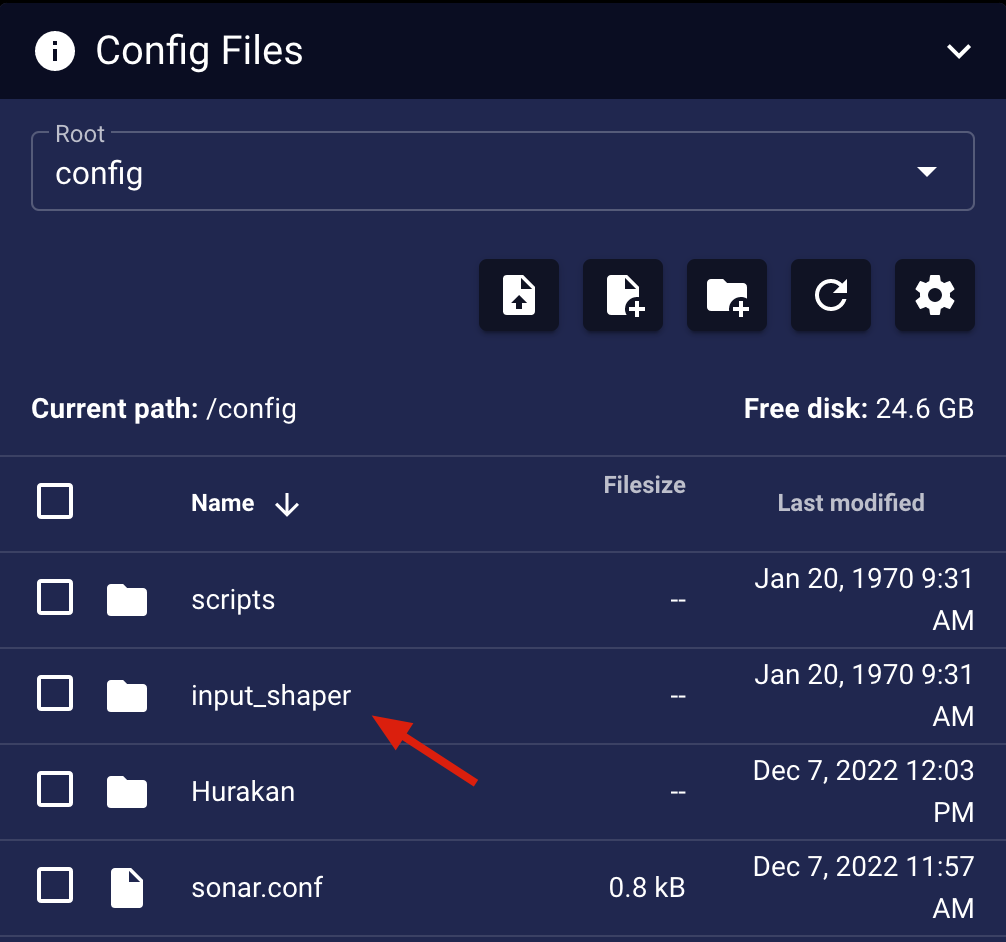
And execute the above commands as follows:
~/klipper/scripts/calibrate_shaper.py /tmp/resonances_x_.csv -o /home/biqu/printer_data/config/input_shaper/shaper_calibrate_x.png
~/klipper/scripts/calibrate_shaper.py /tmp/resonances_y_.csv -o /home/biqu/printer_data/config/input_shaper/shaper_calibrate_y.png
In this way, we can download the images in a very simple way without having to use WinSCP or another similar tool: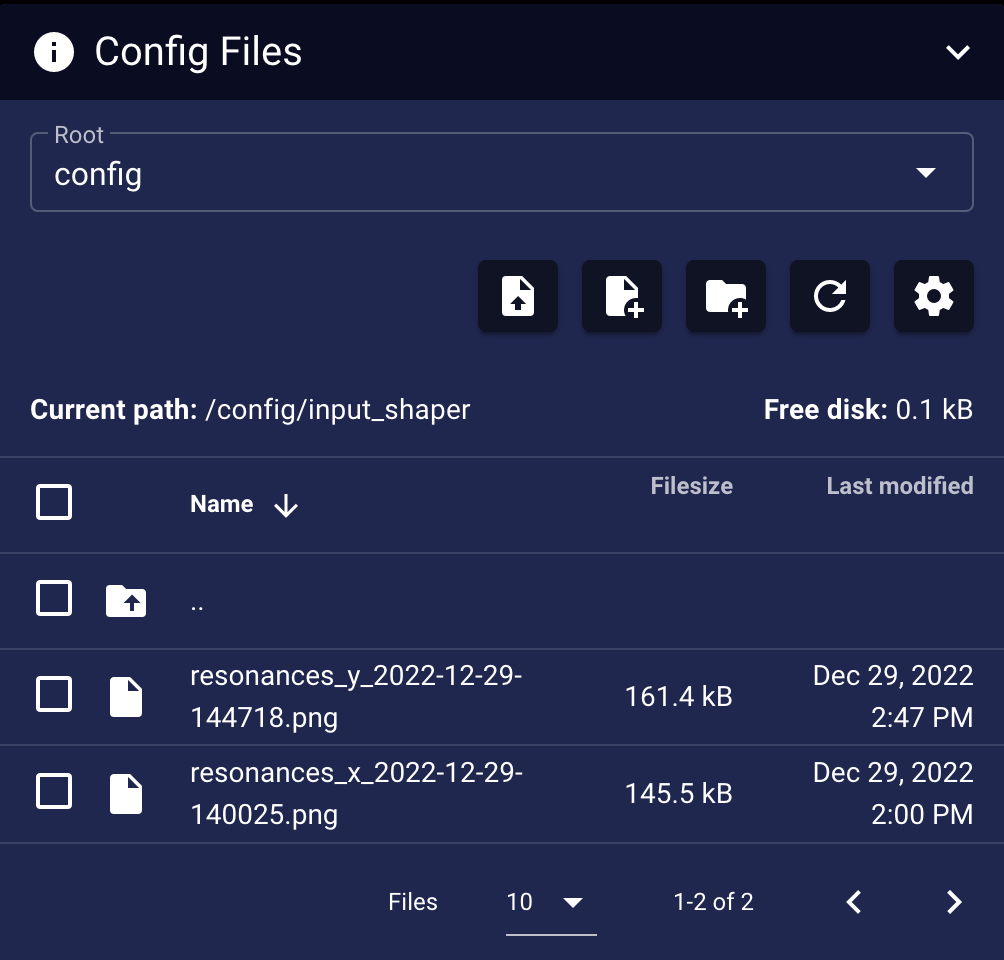
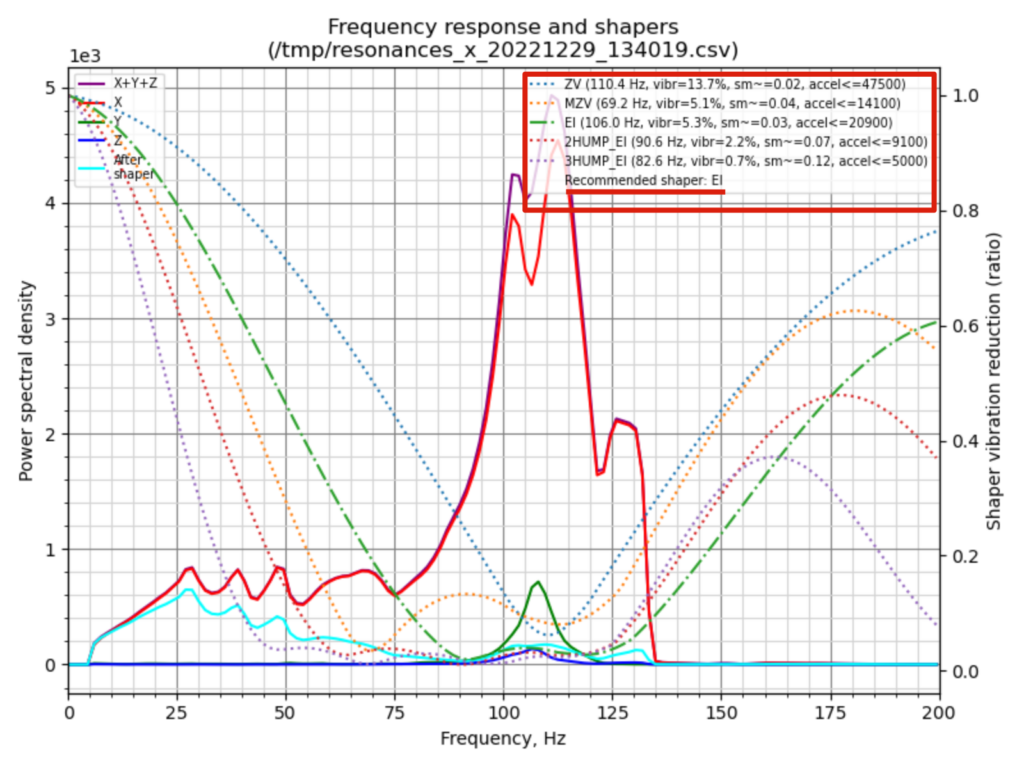
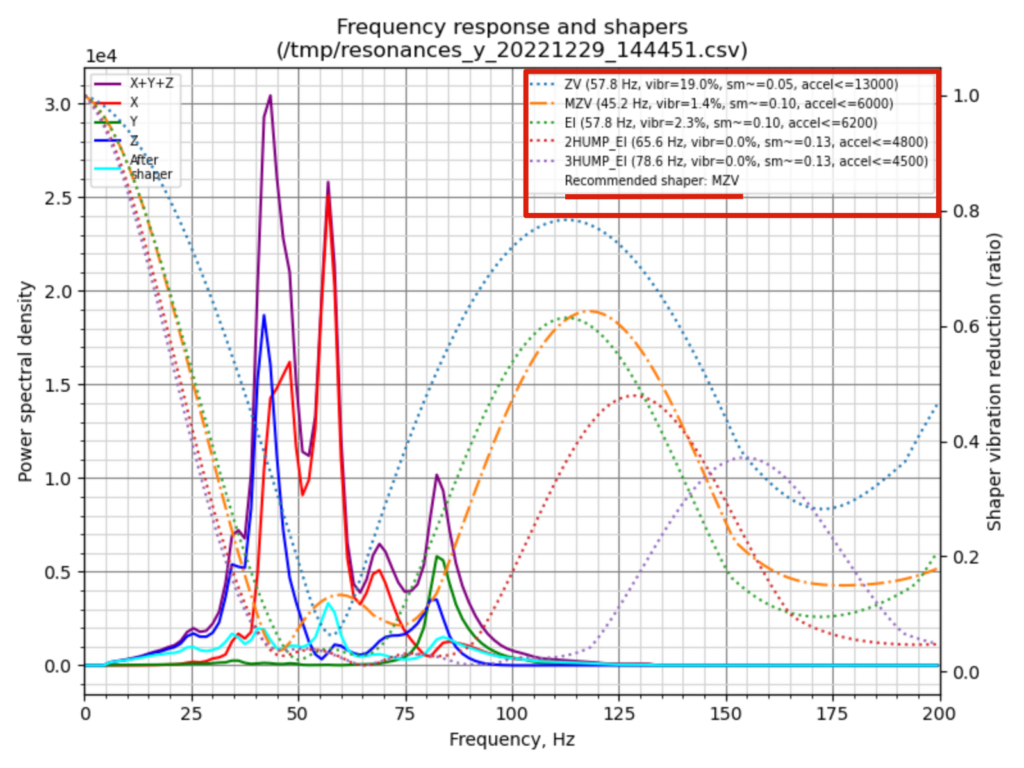
These scripts will generate images with graphs with information on the frequency responses of our machine, as well as suggesting the most appropriate:
Add Input Shaper information in our configuration
Once we have the suggested configuration for our machine, we will add this to our printer.cfg in the [input_shaper] section and update the maximum accelerations of our [printer]
- From the graphs obtained previously, we will adjust the parameters of the section [input_shaper]
#############################################################################################################
### INPUT SHAPER CONFIG
### Uncoment this line if you want to test resonances.
#############################################################################################################
[include Hurakan/Adxl.cfg]

[input_shaper]
shaper_freq_x: 106
shaper_type_x: ei
shaper_freq_y: 45.2
shaper_type_y: mzv
- For accelerations we will take the lowest value obtained from our the tests:
[printer]
kinematics: cartesian
max_velocity: 180
max_accel: 6000
max_z_velocity: 15
max_z_accel: 100
max_accel_to_decel: 6000
square_corner_velocity: 5.0
Slicer
An important aspect, especially for those who do not have much experience in 3D printing, is to have a profile in our laminator with a normally conservative configuration that gives decent results from our first piece.
In any case, whether starting from a profile already created or one that we create ourselves, it is crucial to perform calibration tests to adjust our printing profile to our machine, filaments, and printing conditions.
For this we advise you to follow the tests of our calibration guide where we should at least:
- Perform step adjustment tests of our motors / axles with a calibration hub where we will adjust the rotation distance of our printer.cfg to adjust it correctly
- Temperature tower to find out the optimal temperature of our filament for our printer
- Retraction test to reduce those annoying threads and artefacts
Profile
Currently, we do not have an official profile by BIQU, where if we find one included is in Lychee Slicer, in any case we indicate how to create it from different laminators:
To create our profile on Cura:
- We will add printer:

- From the list of printers we will select the Biqu B1 that we will rename as BQ-Hurakan:
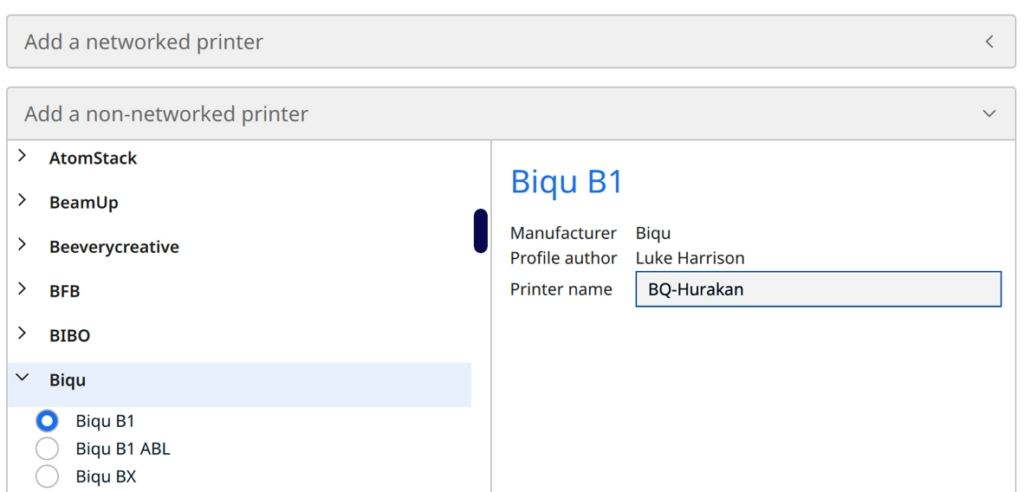
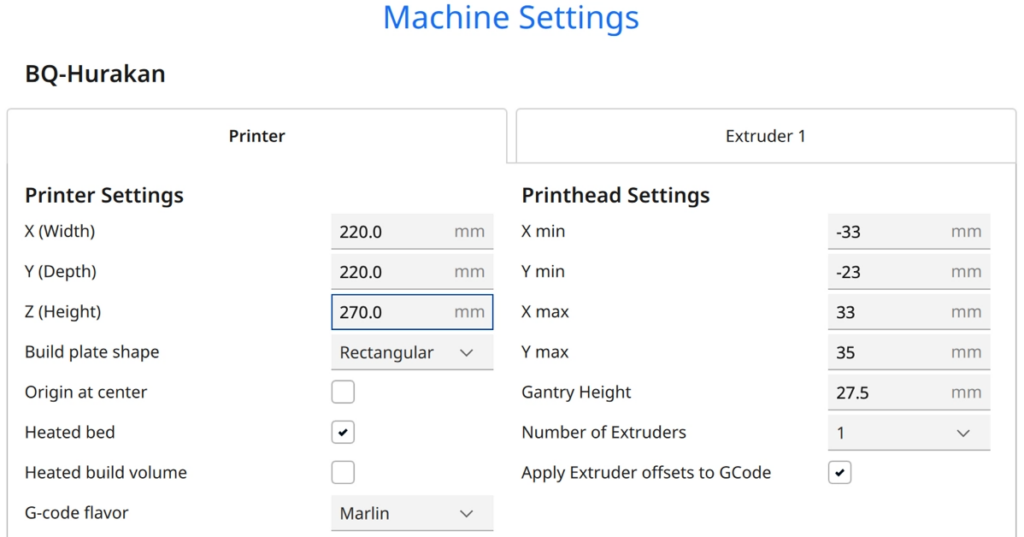
- We will adjust the properties of the printer as we see in the following screenshot:
- Start G-code/End G-code
M117 Getting the bed up to temp!
M140 S{material_bed_temperature_layer_0} ; Set Heat Bed temperature
M190 S{material_bed_temperature_layer_0} ; Wait for Heat Bed temperature
M117 Getting the extruder up to temp!
M104 S{material_print_temperature_layer_0} ; Set Extruder temperature
G92 E0 ; Reset extruder
M117 Homing axes
G28 ; Home all axes
M109 S{material_print_temperature_layer_0} ; Wait for Extruder temperature
G1 Z2.0 F3000 ; Move Z Axis up little to prevent scratching of Heat Bed
G1 X4.1 Y20 Z0.3 F5000.0 ; Move to start position
M117; Purging
G1 X4.1 Y200.0 Z0.3 F1500.0 E15 ; Draw the first line
G1 X4.4 Y200.0 Z0.3 F5000.0 ; Move to side a little
G1 X4.4 Y20 Z0.3 F1500.0 E30 ; Draw the second line
G92 E0 ; Reset extruder
M117 Ready!!!
G1 Z2.0 F3000 ; Move Z Axis up little to prevent scratching of Heat Bed
G1 X5 Y20 Z0.3 F5000.0 ; Move over to prevent blob squish
G91; Relative positioning
G1 E-2 F2700; Retract a bit
G1 E-2 Z0.2 F2400 ;Retract a bit more and raise Z
G1 X5 Y5 F3000 ;Wipe out
G1 Z10 ;Raise Z by 10mm
G90 ;Return to absolute positioning
G1 X0 Y{machine_depth} ;TaDaaaa
M106 S0 ;Turn-off fan
M104 S0 ;Turn-off hotend
M140 S0 ;Turn-off bed
M84 X Y E ;Disable all steppers but Z
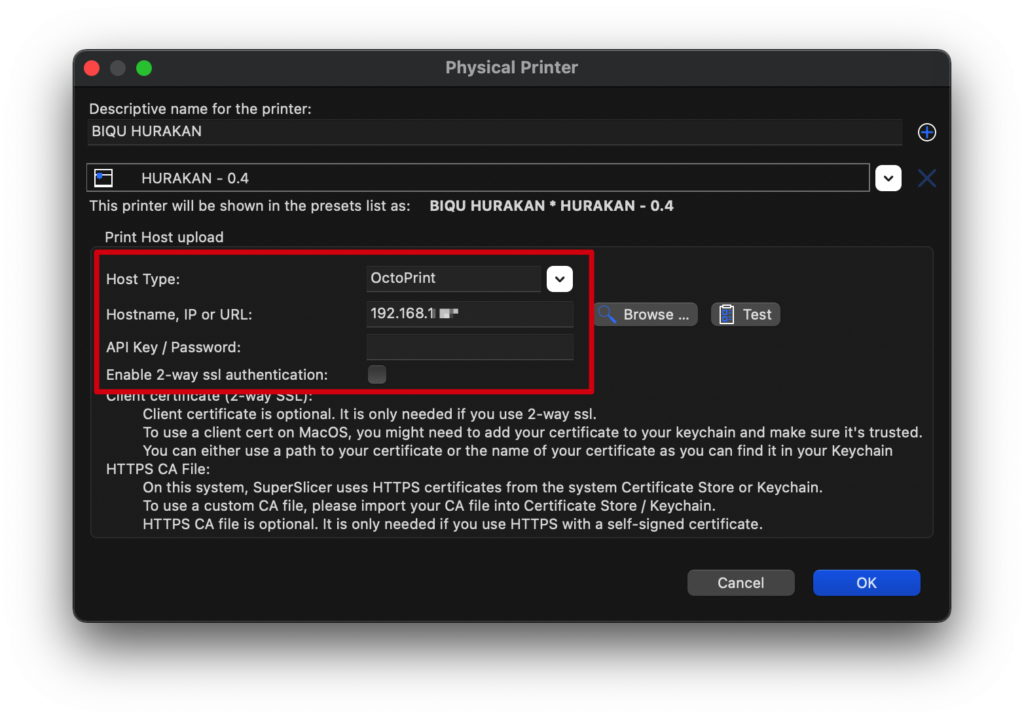
- We will install the OctoPrint-Connection extension from the Marketplace. We will go to Settings > Printer > Manage Printers and look for the Connect OctoPrint button and add our printer as we see in the following screenshot, we can put anything in API Key.

In this case we do not have official BIQU profiles but we use as a basis that of an Ender 3
- We adjust a copy of Ender 3’s profile as BIQU Hurakan and within his profile we adjust the measurements of our printing area:
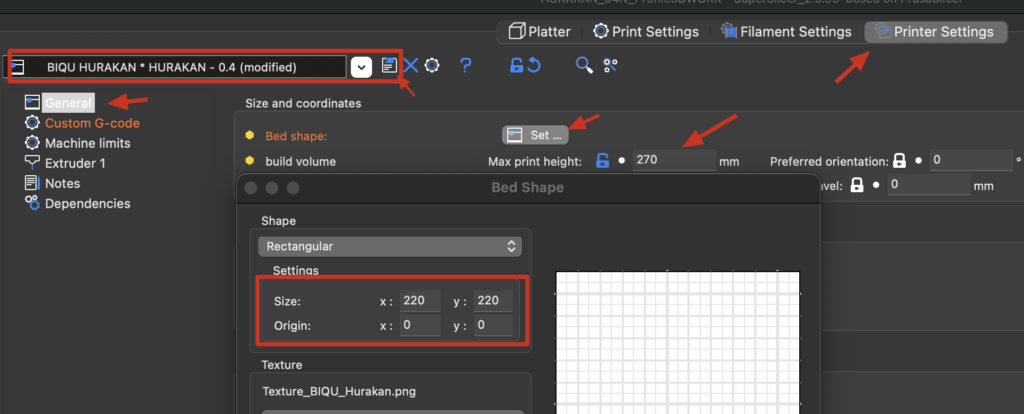
- We also add our physical printer associated with the profile of the BIQU Hurakan that we have just created to be able to send our prints directly to our printer by adding the IP of the same

You already have a profile for our BIQU Hurakan!!!
We also recommend, as a guide, the values that in our case have worked well with our filaments:
| PLA HD (Winkle) | PETG E (Fiberlogy) | ABS (Smartfil) | |
|---|---|---|---|
| Temperature | 205-210º | 245-250º | 240-245º |
| Bed temperature | 60º | 65º | 90º |
| Print speed | 70mm/s | 60mm/s | 65mm/s |
| Retracts | 4mm a 45 mm/s | 3.5mm a 40mm/s | 4mm a 35mm/s |
| Fan | 100% | 50% | 0% |
| First layer | 10mm/s, 0% fan, 115% line width | 10mm/s, 0% fan, 115% line width | 10mm/s, 0% fan, 115% line width |
Gcode Preview
Something very interesting is to be able to preview our piece from the Klipper UI, since it can be very useful to visually identify that the gcode we want to print is correct.
We will make sure to have the Create Thumbnail active as a post process:

And we’ll adjust your options as follows:

With this we can already see our previews from the UI!!!

To activate previews from our Printer Settings -> General -> Thumbnails

Print our gcodes
Apart from being able to send our gcodes directly from the laminator, as we explained in the previous point, it is simply dragging the gcode to our UI from the browser:

Once uploaded, we can launch the printing from the UI itself:

Filament sensor
Since we have a filament sensor, sometimes we may need to have it deactivated or manage its status. We can enable or disable it from our UI in the Miscellaneus -> Extruder Filament Sensor section in our Dashboard.

From this Miscellaneous section we can also manage:
— the speed of the layer fan (Fan)
— the beeper/buzzer of notifications with sound (Beeper)
— display the % speed of the hotend electronics and cooling fans (Case Fan and Nozzle Cooling Fan)
— manage the LEDs of the hotend and the screen (Hotend Rgb and Mini12864)
User experience
The BIQU Hurakan has seemed to us a sensational machine that marks a change of post-Marlin era. The support by important brands such as BigtreeTech/BIQU to Klipper will greatly benefit Klipper from extending and allowing to improve those areas in which it still has room for improvement, such as the availability of information and simplicity of use / management.
Klipper brings us great improvements in terms of performance, let’s not forget that now it is an external host to the electronics commanded by Klipper that is responsible for basically everything, relegating electronics to a mere controller of motors and sensors.
On the other hand, the Klipper web interface or through a screen using KlipperScreen, drastically breaks with the usual interfaces of 3D printers… even with those that have graphic TFT touch screens. Although here BIQU has been cured in health by adding a small screen that is of great help to perform certain actions locally.

One aspect that we loved has been to find a first level electronics with the inclusion of the SKR Manta M4P perfect for this machine in conjunction with the CB1 module and excellent for use with Klipper.
We also have the excellent TMC2209 drivers of the brand itself, which ensures a powerful response and silent operation that is always appreciated.

We have a wide variety of expansion options and connectors such as various USB 2.0, MicroSD and SD, wired network, an HDMI interface and SPI.
The inclusion of the accelerometer together with Klipper help us in a simpler way to adjust one of the most interesting functions of Klipper such as Input Shaper. With the accelerometer we can find how our machine behaves in different situations to find mechanical vibrations and thus be able to compensate for them to obtain a significantly better print quality.
In the BIQU Hurakan they have not spared in functions and the inclusion of their MicroProbe leveling sensor is a great extra to ensure that our machine is perfectly leveled in a precise and simple way. We were pleasantly surprised by its size, weight and precision.

On the other hand, and although the BIQU Hurakan has a standard size bed of 220x220mm (235x235mm physically), it has a factory PEI sheet that although in our first tests we had some problem has behaved excellently as we have been using it.

Another remarkable aspect is that it has two areas of calor, being able with a simple switch to turn on only the central part or the total size of the bed … Something that is undoubtedly fantastic to control the consumption and efficiency of our machine.
And as not Bigtreetech / BIQU always attentive to the needs of users, the inclusion of a led in the hotend gives an excellent design touch to the machine … In addition to being very functional to check the status of our printing or notification of events. Also comment that the LCD also has controllable led lighting that we can also adjust to our liking.

The inclusion of a filament sensor that is always excellent to avoid the loss of our impressions due to lack of material. An aspect that has generated some problems due to its location, which despite being the standard in this format of machines, usually makes the filament does not enter naturally into the extrusion system.

We also have belt tensioners for both axes that although they are made of plastic do their function perfectly.

Upgrades
Although our BIQU Hurakan comes loaded with options and functions… It’s not perfect. Here are some improvements that can further improve this excellent machine.

Double Z
One of the improvements that we like the most for our printers is to have double motor in Z especially if our machine has certain dimensions and / or we have a direct extrusion system since we usually increase the weight on the X axis.
Although our BIQU Hurakan has bowden extrusion and the head is quite light, having double Z will allow us to:
- Improve overall machine stability
- Make sure our leveling is more reliable
- improve the quality of our prints
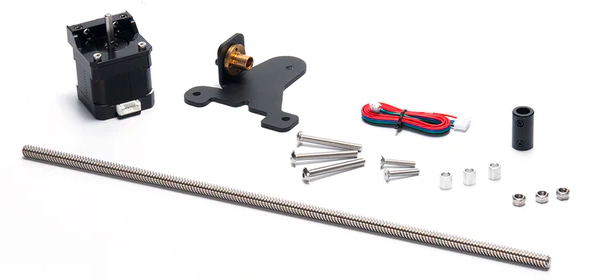
You can find the Dual Z Kit for the BIQU Hurakan here, it contains everything you need to be able to make the improvement in a simple way.
We would have loved to have an extra driver to be able to separate the motors and level each axle individually… But that will already be a mod in the future.
Direct extrusion
BIQU H2 printhead is one of our favorite extruders for its great performance being very compact and lightweight which makes it perfect for machines like the BIQU Hurakan.

In our case we have opted for the BIQU H2 V2S Revo version. Other improvements over other versions of the H2 include compatibility with E3D Revo barrel/nozzles and a new filament tensioner system that improves when working with flexible materials, something that limps a bit in the BIQU Hurakan.

We provide you with a list of things to keep in mind:
- adapter for the H2 V2S Revo to our BIQU Hurakan, you can get it here
- adapter for the H2 V2S Revo and our BIQU MicroProbe, you can also download it from here
- the excellent modular fan system for the BIQU H2 of the Predy colleague in Printables. Apart from being compatible with all BIQU H2 it has an excellent, robust design and the ventilation nozzle is excellent. In our case we have opted for a Sunon Maglev 24v as a layer fan with a triple outlet nozzle.
Since these parts are going to be at relatively high temperatures, we advise you to print them in ASA / ABS or another material that withstands temperatures well without deformation.
In the BIQU Hurakan you can print ASA without problem just paying attention to improve adhesion with skirt or through additives in your bed such as Dimafix. - Cable adapters for hotend layer/hotend fans, thermistor, and heater

- Extrusion motor extender cable

Adjustments to your Klipper to adapt your BIQU Hurakan:
Some of these values may require adjustment for your machine, especially if you have not used the same type of mod as ours to adapt your BIQU H2 V2S Revo.
printer.cfg
[extruder]
rotation_distance: 24.15 # Original 22.9
gear_ratio: 7:1
...
[extruder]
max_extrude_only_accel: 1000 # Original 10000
Hurakan/Probe.cfg
[probe]
...
x_offset: 2 # Original 0.0
...
[safe_z_home]
home_xy_position: 120, 160
Once the configuration is installed and adjusted, it is advisable to follow these steps:
- Check hotend temperature probe
- Check layer fan operation
- verify deployment of the BIQU MicroProbe probe pin
- Perform a homing of all axes, pay attention to turn off the machine in case something goes wrong
- perform a PID as recommended in the initial settings section of this guide
- Manual sensor-assisted bed leveling as recommended in the Initial Settings section of this guide
- adjusting the Z-Offset as recommended in the initial settings section of this guide
- Mesh our bed as recommended in the initial settings section of this guide
- perform the Pressure Advance test as recommended in the calibration guide in this guide
- perform the Input Shaper test as recommended in the initial settings section of this guide
- Review our calibration guide to adjust those tests that affect the extrusion system
KlipperScreen
Klipper’s web interface is comfortable, versatile and powerful, but sometimes having a screen on the same printer can make some tasks easier. Although our BIQU Hurakan already includes a very comfortable LCD screen sometimes it can fall short in options.
The BIQU Hurakan is mounted KlipperScreen that allows you to have an interface to control Klipper on a screen including many options that unfortunately from the screen of our BIQU Hurakan is not possible to do. We will only have to connect the HDMI cable and a USB of the electronics to our screen, there are other ways but they are usually more laborious to implement.

Bigtreetech has its HDMI5/7 which we normally use and work excellently with 5 touch points, plug & play, brightness adjustment and image rotation.
Camera
Another interesting improvement taking advantage of the full potential of Klipper is to add a camera to monitor our impressions or make sensational timelapses of our works of art.
The great versatility of Klipper allows us to use different types of cameras, although the easiest to use because it is practically plug & play are USB.








Déjanos un comentario