Today in 3DWork I have set myself the challenge of analyzing a new extruder that I was completely unaware of, but that aroused my curiosity both for its extreme simplicity and for its impeccable visual appearance (design).
The name of this extruder is DyzeXtruder Pro, and it is available for practically any type of 3D printer on the market, being able to be used as Bowden or via direct extrusion – I will use this last option in today’s article.
Before starting I want to remind you as always that you can join the 3DWork community on our Telegram channel or on our social networks (Facebook, Twitter, Instagram).
A little history
The company that develops these high performance extruders and hotends is called Dyze Design. This Startup, founded by Philippe in 2015, is located in nothing more and nothing less than in the beautiful city of Montreal (Canada).
The anecdote behind the company is that Philippe was looking to be able to print drums to generate new and different sounds, but many times his impressions ended with disastrous results.
After taking apart their 3D printer several times and locating the problem in the extrusion, the idea arose to create a startup to try to improve the extruders that were currently distributed in the market and develop more reliable alternatives, for higher temperatures and aimed at the most demanding sector 3D printing by filament.
And in this curious way Dyze Design was born.
Brief introduction
The extruder is one of the fundamental components in 3D printing technologies. It is in charge of “pushing” our filaments towards the nozzle in a constant way to melt them correctly and with the right amount of material.
There are dozens of them available in the market, with different characteristics and ways of operating. These can be direct extrusion – the motor is in the same head and with hardly any distance from the nozzle – or bowden – extruder and motor outside the head – which we have talked about in previous articles on our website.
As an anecdote, there are also some “hybrid” systems with traction gears in the head, but with the motor outside it (Remote direct extruder). They are so exotic and questionable that they have barely gotten visibility or marketing.
Going back to the most commonly used systems, I always like to emphasize the importance of an extruder within our 3D printer. Being able to have a continuous extrusion and with an oversized traction is essential to obtain optimal results in our 3D prints.
Sometimes users of our Telegram channel ask about what possible updates to make on your machines for best results. If I am online I always comment that a very good update is to improve the extrusion system, as long as the current one is of a very low quality.
This not only offers a qualitative leap in terms of quality, but it will also allow us to deal less with possible jams, facilitate maintenance and even work with a greater range of filaments (such as the TPU).
In today’s article we will talk about the innovative DyzeXtruder extruder and its companion the DyzEnd hotend. Both components belong to the “Pro” series that the Canadian manufacturer Dyze Design introduced at the end of the year 2018, and they combine perfectly to offer superior extrusion performance in all kinds of possible scenarios.
In fact, many manufacturers and offer series parts (OEM) this extruder in some of their printers. Companies like Blackbelt, Kumovis, Markforged, Sharebot, Dynamical 3D or Roboze are just some of a long list in the sector that already assemble Dyze extruders.
Opening the package (Unboxing)
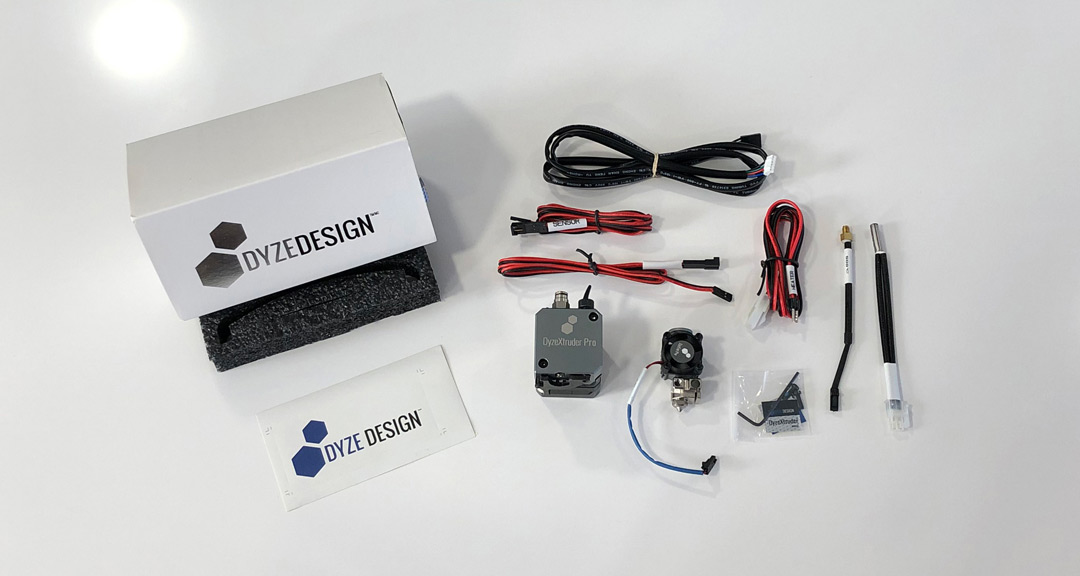
At this point in the article I wanted to make a brief clarification. Although the title of the same mentions only the DyzeXtruder Pro extruder, we will not stop to analyze only this product, but I will also talk a little about its perfect complement, the DyzEnd Pro hotend.
On the manufacturer’s website you can obviously buy both components separately, but they also offer you the possibility of purchasing the complete kit (extruder + hotend), which is appreciated. So in the video below you can see how it is carefully packaged with a perfect “Packaging”.
The truth is that I am not very fond of preparing videos (as those of you who know me from the channel know), and nothing is further from reality than trying to compete with the numerous “Youtubers” that currently exist in 3D printing. However I came up and prepared a short video of Unboxing, here below I leave you:
The DyzeXtruder Pro extruder
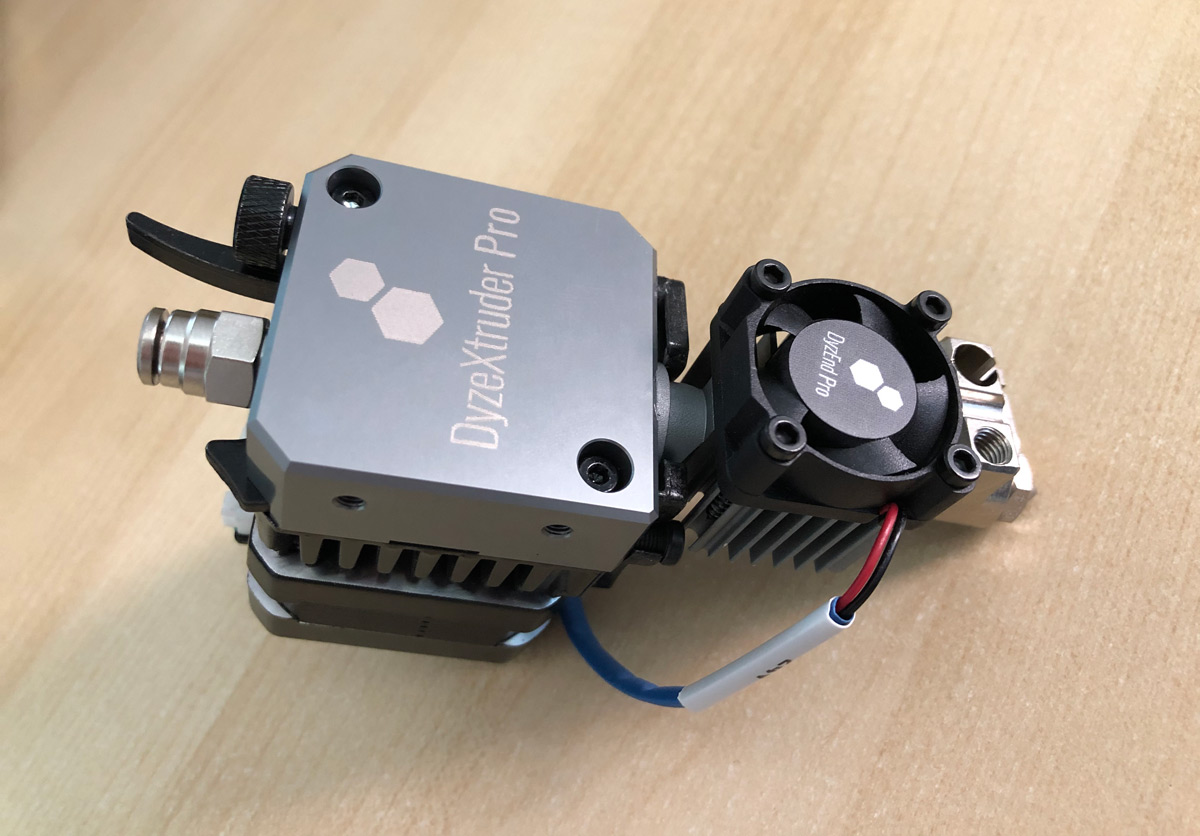
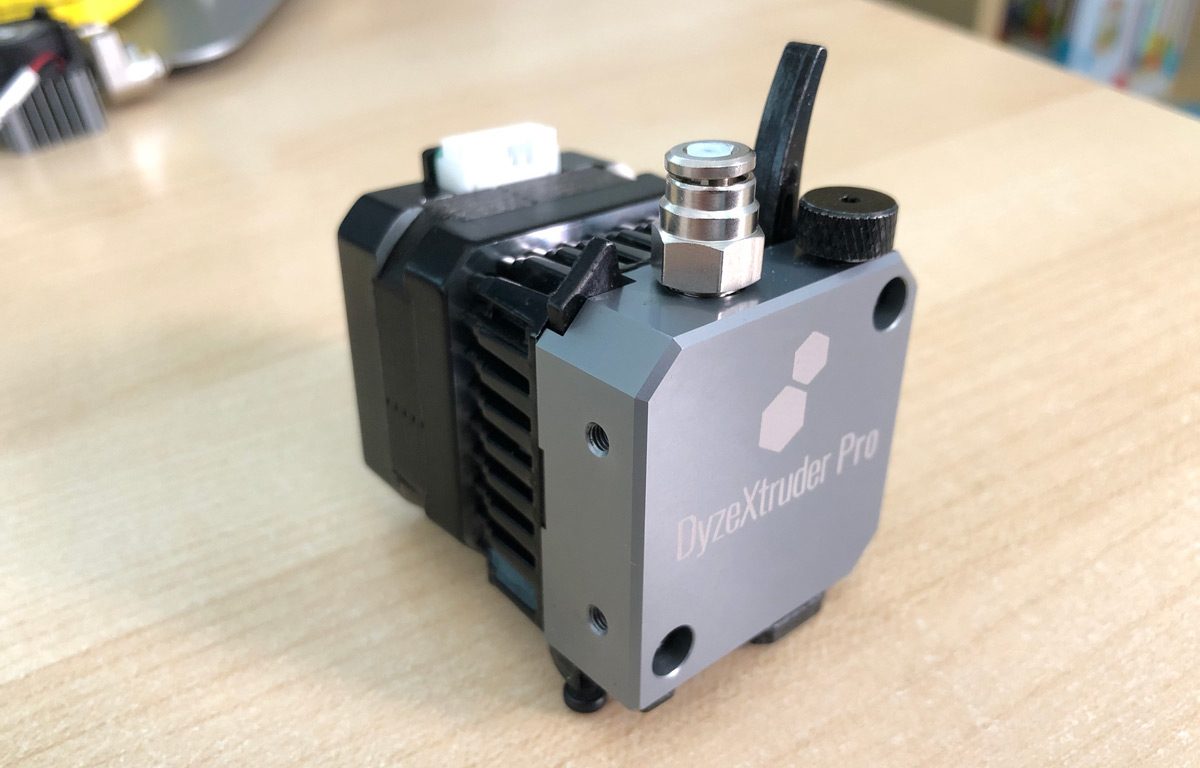
Dyze Design presents a visually spectacular extruder composed of 3 clearly distinguishable parts (click on the image to enlarge).
On the one hand we have an extremely compact NEMA17 (0.9A) motor of just 25mm. of height. This motor perfectly fulfills the function of moving the gears, thanks to the reduction (5.65: 1) offered by the extruder’s own mechanics.
In the central part we can see a kind of chassis, made of cast iron, which acts as a heat sink or radiator. In turn, it houses most of the gears inside, apart from connecting the main aluminum block with our beloved motor.
And the third and last part would be the main block of anodized aluminum, with the name of the extruder, which is going to be in charge of guiding our filament towards the nozzle. In this same block we can see the different essential elements to carry out this task successfully.
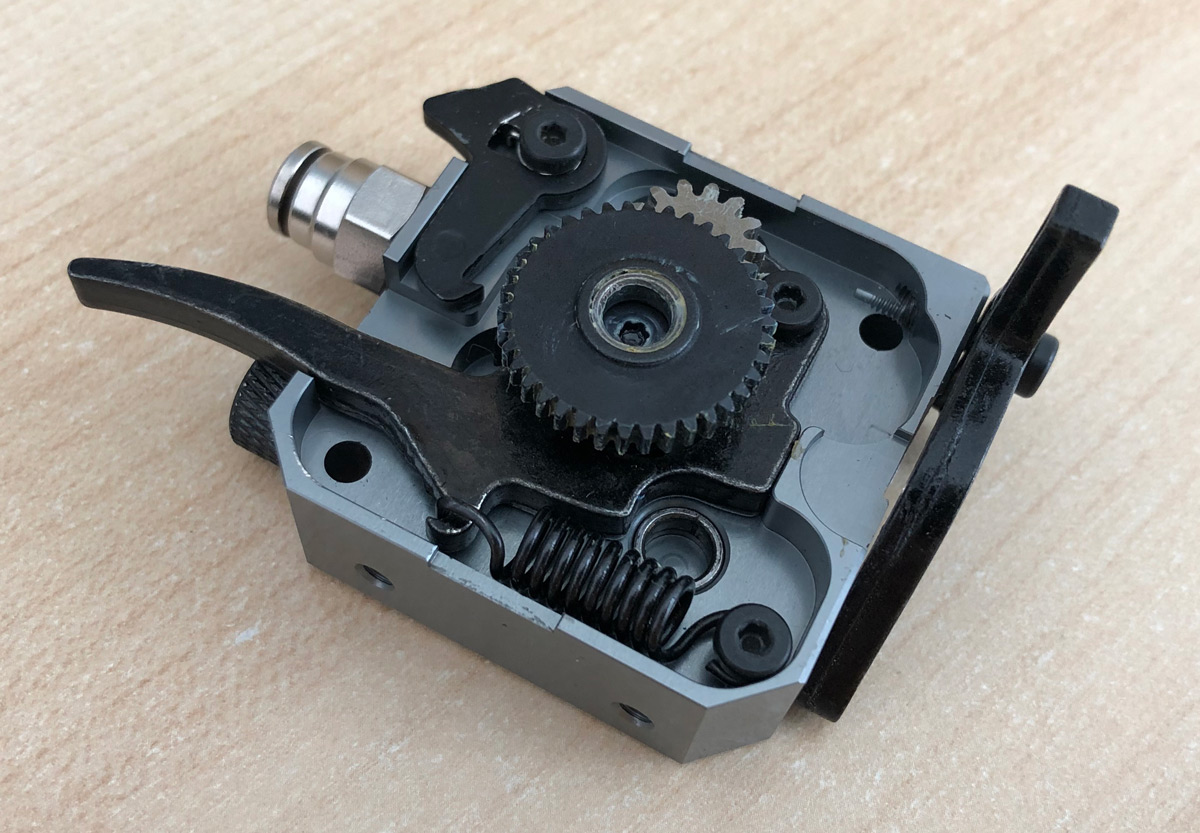 At the top we see a lever whose function will be to press the filament for proper traction.
Dyze Design has chosen to offer us a lever without any regulation, which at first glance might seem like a lack, but nothing is further from reality.
With this system Dyze Design ensures the optimal pressure that we must exert on our filaments and frees us from the task of regulating the pressure on our own, eliminating the human factor from the equation.
If we make excessive tension we could damage the filament before entering the hotend, and with little tension our filaments could slip or bite. In this way, we will always have the appropriate configuration to work with our motor and obtain the best possible performance, delegating this work to Dyze Design.
Another detail that has pleasantly surprised me is that by tightening the tensioner when introducing the filament, you can lock the lever to introduce it without the need to continue holding it. It would be something similar to when you fill gasoline in your vehicle, some jets allow you to “activate” a small lock, without having to keep the pressure on the trigger constantly.
This is something that can make your life easier in the event of possible jams, and it is done with a small piece on one side of the block, which you have to move with your finger and hold the lever until you move it again (click image to visualize the system).
To assemble the Hotend with our extruder, Dyzen offers us a new anchoring system for the DyzEnd Pro, which can be removed simply by loosening two Allen screws and removing it completely.
Probably I don’t have to explain what maintenance can facilitate in case of possible jams, since we all suffer constantly. The way in which the extruder and the hotend are coupled, without any type of thread and with such a fast and original assembly, seems to me like a little cool.
Technical specifications
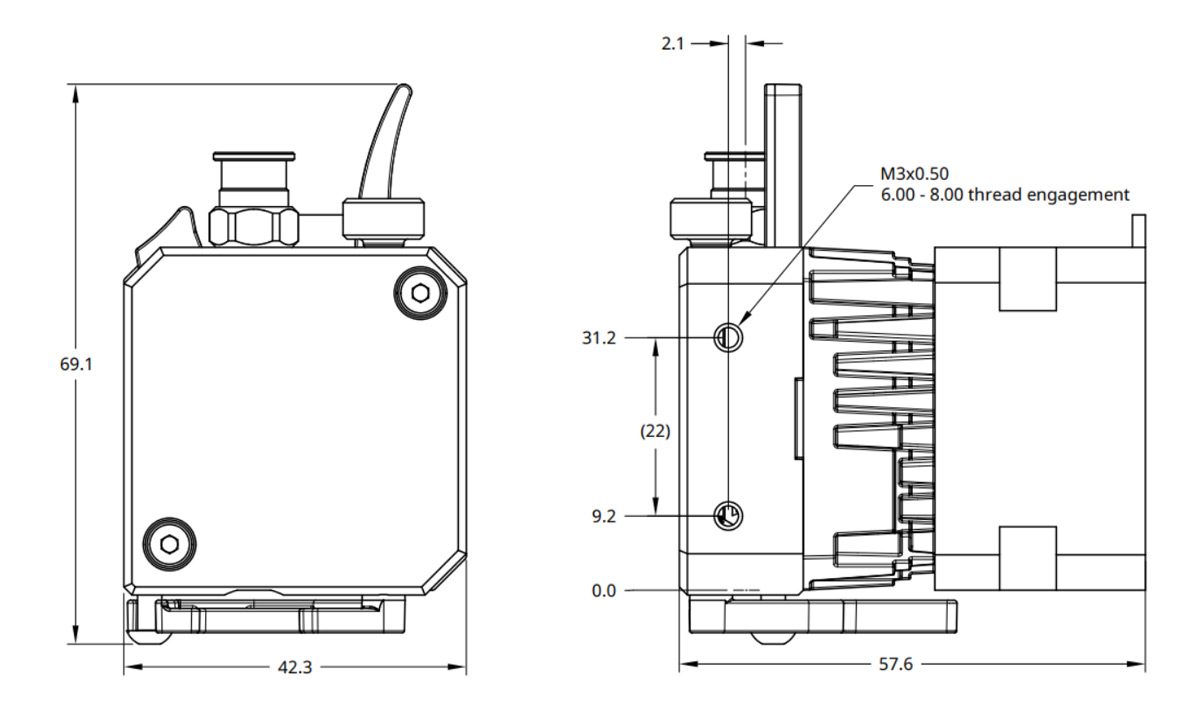
| Parameters | Values |
| Weight | 300gr |
| Filament diameter | 1.75mm |
| Operating current | 0.9A |
| Operating temperature (air cooled) | 0°C hasta +60°C |
| Operating temperature (liquid cooled) | 0°C hasta +120°C |
| Top fitting tube OD | 4.00mm |
| Gear ratio | 5.65 : 1 |
| Mounting screw thread | M3 |
| Mounting screw min thread depth | 5mm |
| Supported filaments | All available PLA, ABS, TPE, TPU, PVA, HIPS, PC, PET PETG, Nylon, PEEK, PEI, Metal/Wood/Carbon, etc. |
The DyzEnd Pro hotend
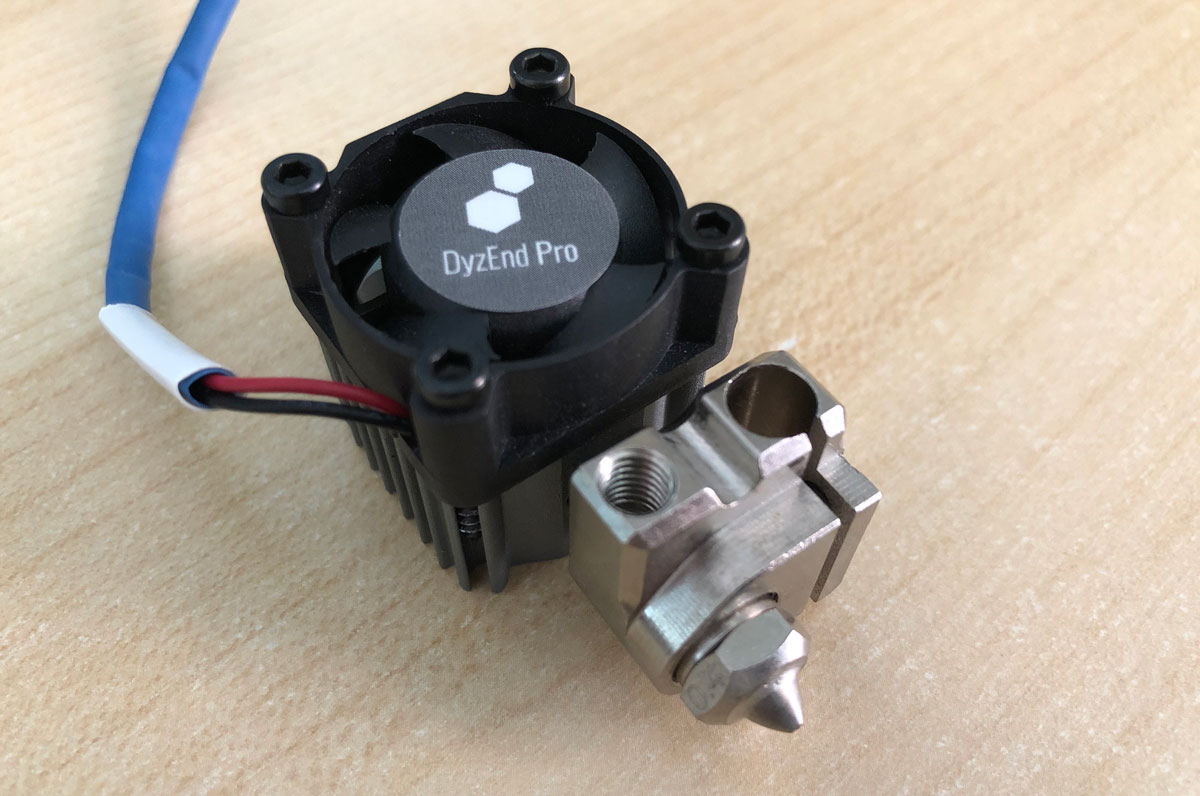
The DyzEnd Pro hotend has been designed for high performance environments, as you can imagine looking at the materials used in its manufacture. If we look at the assembly from bottom to top, the first thing that strikes us is a tungsten carbide nozzle of metric M10.
This “exotic” material assures us a maximum durability, due to its high resistance to wear and tear, and a high thermal performance that will allow us higher printing speeds without sacrificing quality during the process.
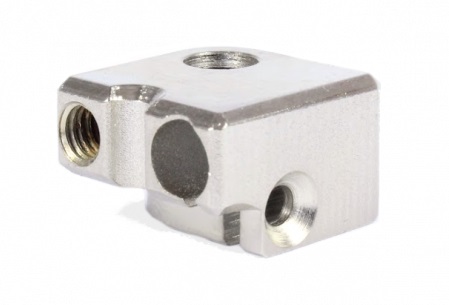 This nozzle will be threaded into a compact block of steel, much stronger than aluminum for high temperatures.
We must not forget at any time that the operating temperature of the set can reach up to 500ºC, if we use filaments such as PEI or PEEK.
Normally the heat blocks are usually completely square, with chamfered edges and with 2 small holes to arrange the thermistor and the corresponding resistance. However, this is reduced to the minimum expression by numerous machining operations that give it a quite impressive visual appearance.
Reducing the size of the block can positively influence its heating, reducing waiting times, as well as lightening the weight (somewhat higher being the steel block instead of aluminum).
The thermistor is placed by threading it inside the block, and not pressing with an Allen screw as usual. I have never been convinced by that system with the resistance inside and without uniform contact, so the way in which Dyze Design places the thermistor pleases me a lot, it must be said.
On the official website you have 3 types of thermistor available: One 300ºC thermistor and two variants for 500ºC measurement (PT100 and Type K Thermocouple Sensor), so you can choose the one that best suits your needs.
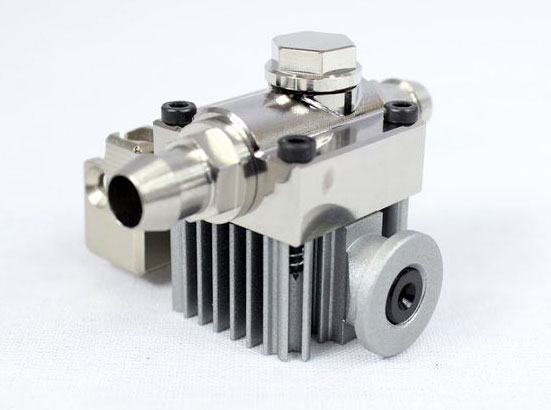 If you wish, and you are one of those who require extreme temperatures, you can add an accessory for liquid cooling very easily, since it comes perfectly prepared for such an effect as you can see in the following image.
If we continue climbing in our set, we will be able to observe the transition tube that directly guides our filament. The tube is made of titanium and ceramic coated. This offers us great resistance to wear and reduces friction, allowing easier retraction and optimal flow.
And finally we come to the radiator or heatsink, which mounts a tiny quality fan, with a rubber separator, whose function is to absorb the vibrations generated by it.
Technical specifications
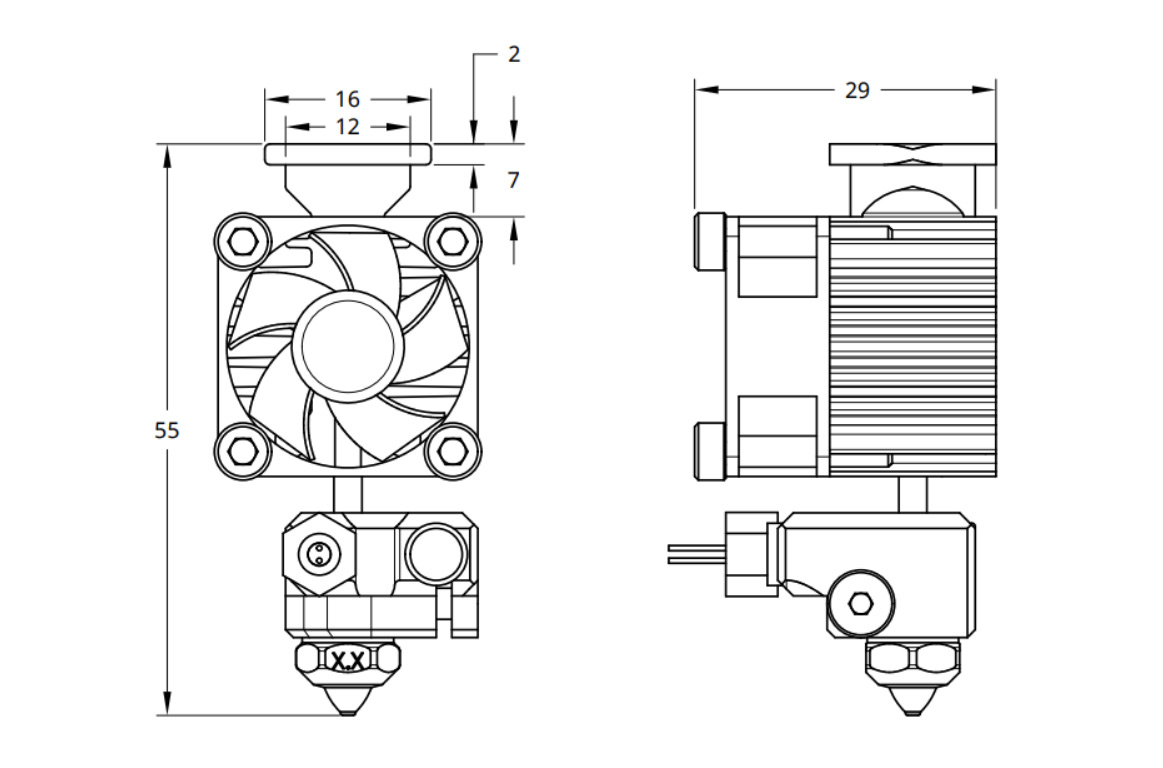
| Parameters | Values |
| Weight | 52gr |
| Operating voltage | 12V y 24V |
| Operating temperature (air cooled) | 0 hasta +60ºC |
| Operating temperature (liquid cooled) | 0 hasta +120ºC |
| Union thread | M8x1.25mm |
| Thermistor resistance at 25°C (500°C) | 4700kΩ |
| Thermistor resistance at 200°C (500°C) | 8kΩ |
| Maximum temperature – 40W | 420°C |
| Maximum temperature – 60W | 500°C |
| Supported filaments | All available PLA, ABS, TPE, TPU, PVA, HIPS, PC, PET PETG, Nylon, PEEK, PEI, Metal/Wood/Carbon, etc. |
Extruder mounting
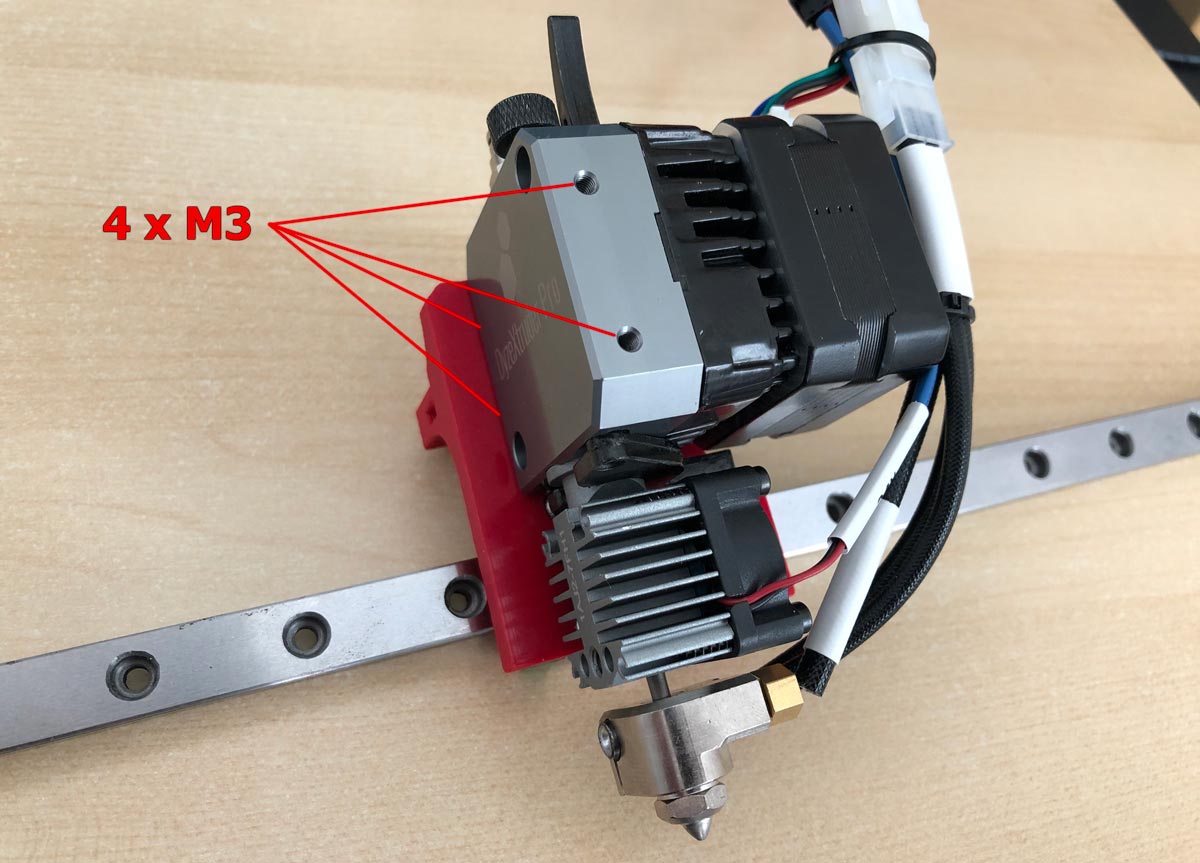
The anchor or mounting of the extruder in our printer is quite simple, since Dyze Design offers us 4 M3 holes machined in the anodized aluminum block at our complete disposal.
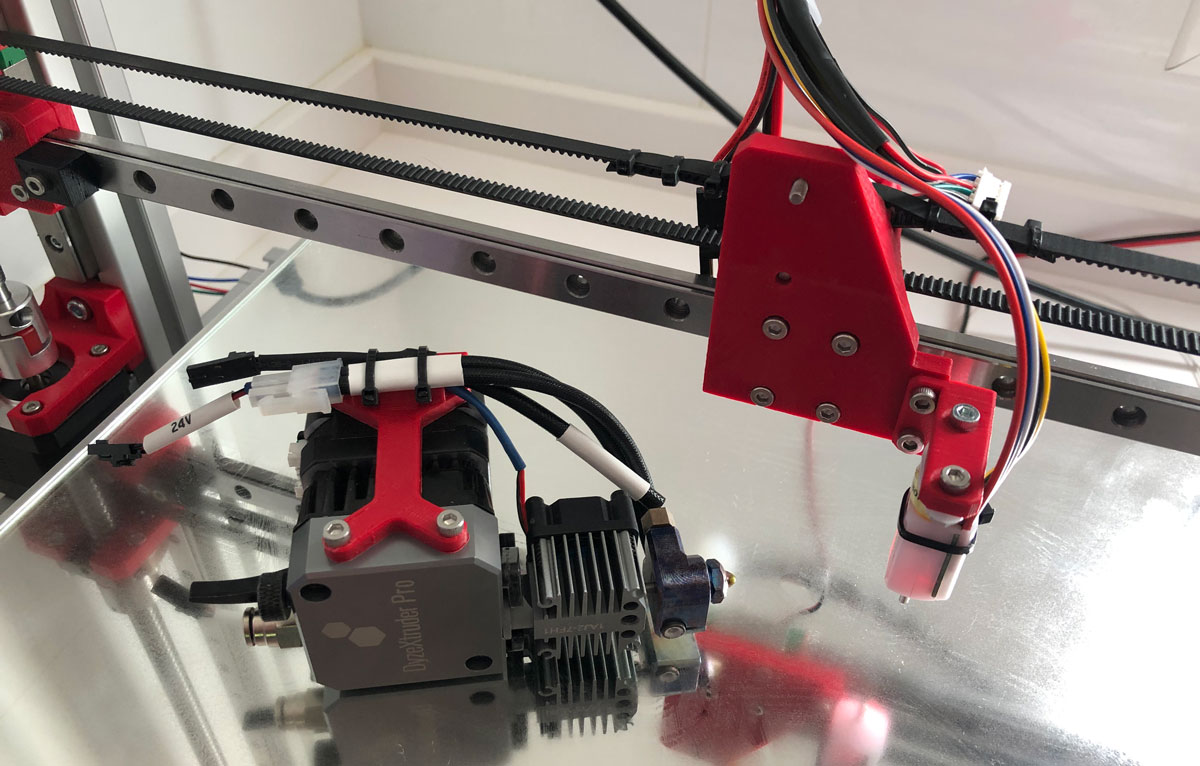
In my “custom” printer I have used two of those holes to screw the extruder to the support of my linear guide, as you can see in the image above.
In this way, I have another 2 fronts free for other possible functionalities, such as installing a layer fan, a self-leveling sensor or both, which would be recommended.
Then I screw the layer fan and my 3DTouch directly onto my bracket, leaving the 2 front holes free. I have always liked to leave the front of the heads as visually clean as possible, hobbies that one has 🙂
Setting up DyzeXtruder and DyzEnd
Now it is time to configure DyzeXtruder and DyzEnd in Marlin. Simply modifying a few parameters you will have the set fully operational.
For those who have no previous experience in compiling firmwares I always remember that I have a very complete article on Marlin in 3DWork.
I advise you to read it from top to bottom if that is your case and I leave the link here: Complete guide: Set up Marlin 2.0.x from scratch and not die trying.
Returning to the configuration, for our DyzeXtruder you must configure the appropriate steps for a correct extrusion. These steps are offered directly by the manufacturer on its website, which you can consult at next link.
Once we know what steps to indicate to Marlin, edit the following lines:
/**
 * Default Axis Steps Per Unit (steps/mm)
 * Override with M92
 *                                      X, Y, Z, E0 [, E1[, E2...]]
 */
#define DEFAULT_AXIS_STEPS_PER_UNIT   { 80, 80, 802, 582 }
In addition, you must modify the parameter “Retraction Speed” in your favorite Slicer. The recommended retraction speed is 25mm/s and the maximum is 35mm/s, as recommended by the manufacturer.
About the retraction length I am not putting more than 1mm, since being direct extrusion as I have installed it in principle does not require a greater distance.
And to finish the extruder configuration you will have to invert the logic of the motor itself. That is very simple, as I show you in this line:
#define INVERT_E0_DIR true
Once our extruder is configured, you must modify some more parameters for the hotend. As I previously mentioned in the article, the melter can come with either a 300ºC Thermistor or a 500ºC Thermistor. In my case I have the higher version, so this is the configuration for 500ºC:
#define TEMP_SENSOR_0 66
#define HEATER_0_MINTEMP 21
#define HEATER_0_MAXTEMP 500
//===========================================================================
//============================= PID Settings ================================
//===========================================================================
// PID Tuning Guide here: http://reprap.org/wiki/PID_Tuning

  // If you are using a pre-configured hotend then you can use one of the value sets by uncommenting it

  // Ultimaker
  //#define DEFAULT_Kp 22.2
  //#define DEFAULT_Ki 1.08
  //#define DEFAULT_Kd 114

  // DyzEnd
  #define DEFAULT_Kp 14.0
  #define DEFAULT_Ki 0.5
  #define DEFAULT_Kd 125.0

  // MakerGear
  //#define DEFAULT_Kp 7.0
  //#define DEFAULT_Ki 0.1
  //#define DEFAULT_Kd 12

  // Mendel Parts V9 on 12V
  //#define DEFAULT_Kp 63.0
  //#define DEFAULT_Ki 2.25
  //#define DEFAULT_Kd 440
And finally, we will finish the configuration of our Marlin firmware by modifying the file “Configuration_adv.h” with the following parameters:
#define MAX_CONSECUTIVE_LOW_TEMPERATURE_ERROR_ALLOWED 5
#define MILLISECONDS_PREHEAT_TIME 30000
If you have modified all the parameters correctly you can now proceed to compile the firmware, simple right?
Real tests with various filaments
Really printing with such an extruder is quite a rewarding experience. Its filament thrust power, up to approximately 10 Kgs, offers us a constant extrusion, regardless of the conditions or the material used.
According to the manufacturer, practically any type of material can be used, from the most basic and well-known (PLA/ABS) to extremely technical materials (PEEK/PEI), as long as your printer is prepared for this type of work.
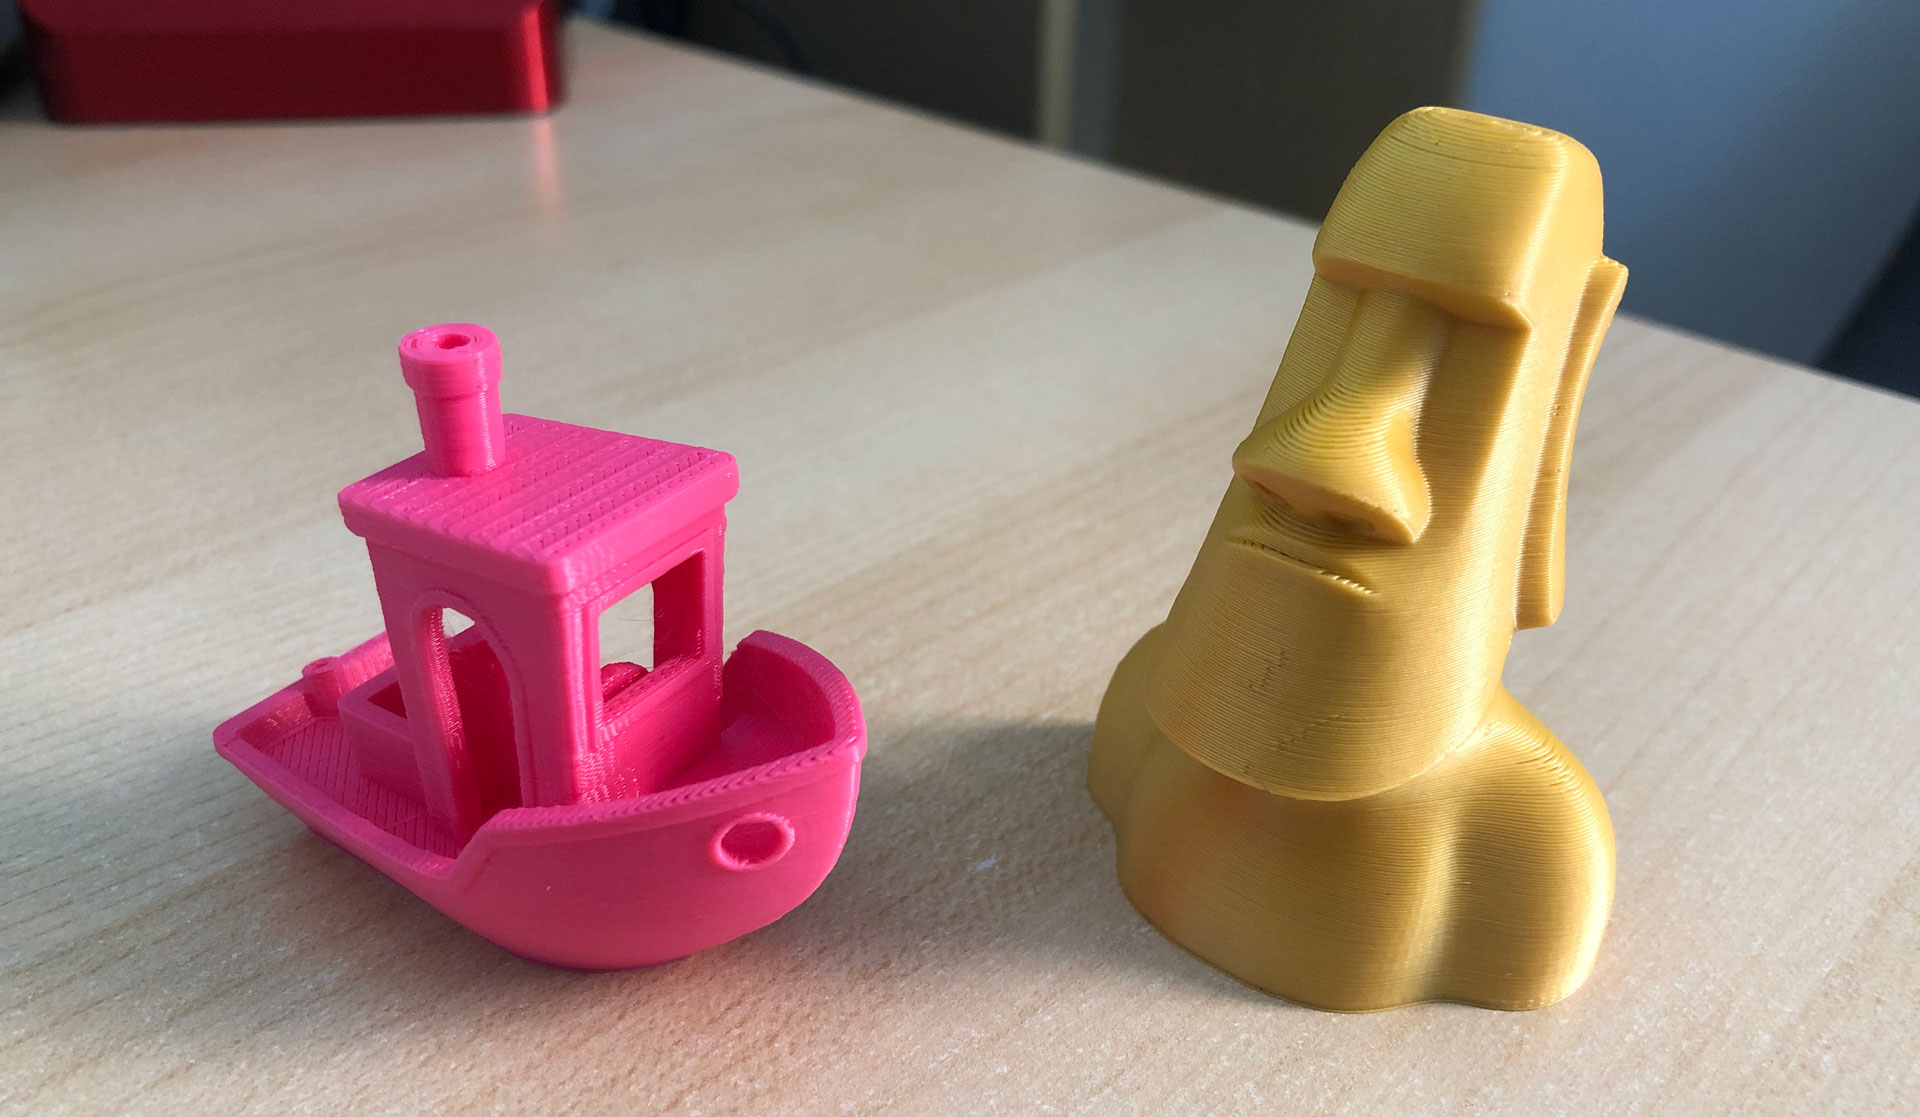
If we click on the image above you will see a couple of pieces in more detail (resolution 1920×1117 pixels). I have to confess that I have hardly done any calibration since I assembled the extruder, just set up Marlin and leave the extrusion multiplier at 0.95.
And I certainly think I fell a little short on flow if you look at the pieces closely. However, the results obtained without just doing exhaustive calibration tests are quite good as you can see, and I have no doubt that there is a lot of room for improvement.
For the testing of the DyzExtruder + DyzEnd I used a “custom” printer that I made these days ago and from which I would like to make an article as time permits.
This comes equipped with linear guides on all axes (X, Y and Z), 12 mm spindles. ball (1204), SKR v1.4 Turbo electronics, TMC2209 sensorless drivers and 3DTouch leveling, as you can see in the video above.
Finally note that Dyze has taken into account throughout the design process the use of its extruder with elastic materials (TPU / TPE), making a complete guide (or encapsulation) of the entire filament through it. This will avoid many headaches when printing these materials that are so cumbersome.
DyzeXtruder’s strengths (and weaknesses)
The first strong point that I want to emphasize and that has caught my attention the most is the nozzle mounting/dismounting system compared to the extruder.
Two Allen screws that you can loosen in 20 seconds (one of them by hand simply) and you already have it out, easier than ever for later maintenance tasks. This is something to be thankful for, since as you well know jams are the order of the day.
On its operation with the different types of filaments on the market there is certainly not much to talk about. DyzExtruder has no problem with any of them, even when we talk about extremely technical filaments like PEEK or ULTEM (also known as PEI) or flexible materials. The latter are fully guided throughout its journey, for optimal extrusion free of possible jams.
As a last strong point highlight its tungsten carbide nozzle and the enormous power of its extruder (up to 10 kilos of drag). This provides us with a completely uniform output of the plastic, with minimal wear and without any failure, extremely important characteristics and sometimes relegated to oblivion.
Regarding possible improvements of this product, I must confess that it is the best extruder that I have had in my hands to date, and I have not had few. However I leave a couple of points or ideas to improve even more if it fits the DyzExtruder.
Two M3 metric screws are more than enough to anchor the extruder, but someone may not give you too much confidence or need some more. It is not my case in particular, since in my printer it is perfectly attached to the part that I designed for the head and I have solved the issue of layer ventilation and self-leveling with my own support.
Maybe Dyze Design could add another hole in future revisions of it, which would be appreciated. However, I still think that 2 holes are necessary, and if you want you can always add some lock washers (also called Grower) to rest easy.
Finally, although it is not a possible improvement but rather a thought out loud, I think it would be a good idea to develop a “lite” version with identical mechanics but with cheaper components.
The extreme quality of the nozzle and the heating block greatly influence its price, and give another profile of less professional consumers the possibility of acquiring a similar extruder at a lower price, bringing more options to the market.
The market is flooded with extruders and hotends of dubious quality (and in most cases made in China), but when we try to move in the mid-range or professional range, the options are more limited. Being able to expand this range would be great for advanced Creators who might appreciate it.
STRENGTHS |
POSSIBLE IMPROVEMENTS |
||
|
|
Last conclusions
DyzExtruder is an extruder of extreme quality more oriented to professional printers than desktop printers to get started in the world of 3D printing.
The price of the set is around $315 (about 279 euros in exchange), something that is certainly not suitable for all budgets today. However, we will make a serious mistake when evaluating only the price, since we are dealing with a high-end product, aimed at additive manufacturing of a professional nature and whose function is to offer the highest possible performance.
Also, keep in mind that a quality extruder will avoid many problems that directly translate into extra costs. And if you work with filaments of 400 euros per coil, you should minimize the possibility of any unforeseen during the printing process.
This in no way means that you cannot install it on any 3D printer like I have done myself. But I would recommend a minimum of mechanics and quality components in it so as not to detract from its performance. For example linear guides, a 32-bit electronics with TMC drivers and a good enclosure would be somewhat recommended since in 3D printing the sum of all our components reflects the final result.
In my opinion DyzExtruder is a product designed specifically for professionals in the sector and advanced companies or makers who must “deal” with all kinds of technical materials in their day-to-day life, and need a robust solution to the time to focus your different projects.
If your environment demands high productivity, what you least need is to have problems in your head, or if necessary, solve them quickly to continue your production. And in this regard, DyzExtruder surprises us with a more than spectacular ease of disassembly .
In short, if money is not a big problem for you, and you have a high workflow, I have no doubt that DyzExtruder is a highly recommended option to consider, without a doubt.
I hope and wish that this analysis has been of interest to you. If you wish, you can find other interesting articles at the following links:
- MKS TFT35 Display: Latest updates v106 and v107 available
- The Spaghetti Detective: Monitoring Octoprint from the Internet safely
- Powering the Raspberry Pi from the power supply of your 3D printer
- Booting our Raspberry Pi from USB with an SSD hard drive (or pendrive)
- Maker Ultimate 2: Review of the latest Monoprice printer
- Analyzing the new resin printer Phrozen Sonic Mini (Review)
- MKS Robin Nano v1.2: Analyzing the new MakerBase 32bit boards
- Hollow 3D objects with ChiTuBox to save resin
- 10 reasons to use ChiTuBox with your resin printer (SLA / DLP)







Outstanding article! Very well done and I own the Dyze Design Pro hotend and extruder. Do you have a file for the wire management shown in the photo or a link to purchase it? I am interested in adding this to my setup.
Thanks for your words.
Please, send me here your email and will send STL, and of course for free 🙂
Best regards!
Good work …. Could you please also provide me with the STL data. Thank You and best regards!
Robert
r082rt@gmail.com
I also own the Dyze Design Pro hotend and extruder. Do you have a file for the wire management shown in the photo or a link to purchase it? I am interested in adding this to my setup. If available my email is geeksquad@cox.net.
Thank you for the great article.
Brian
Good work …. Could you please also provide me with the STL data. Thank You and best regards!
Robert
r082rt@gmail.com