I recently had to upgrade a 32bit board (MKS Robin Nano de MakerBase) to install a Marlin firmware, specifically version 2.0.1. I usually use sublime and the arduino IDE, but this time I set about doing it with Visual Studio Code and its great extension Platform.io IDE.
I had previously heard of it on our Telegram channel, but had never had the chance to use it. And it certainly seemed like a great way to edit and compile Marlin files.
So I leave you here a short and quick guide on how to start using it. I hope as always that it can be of use to you.
Visual Studio Code
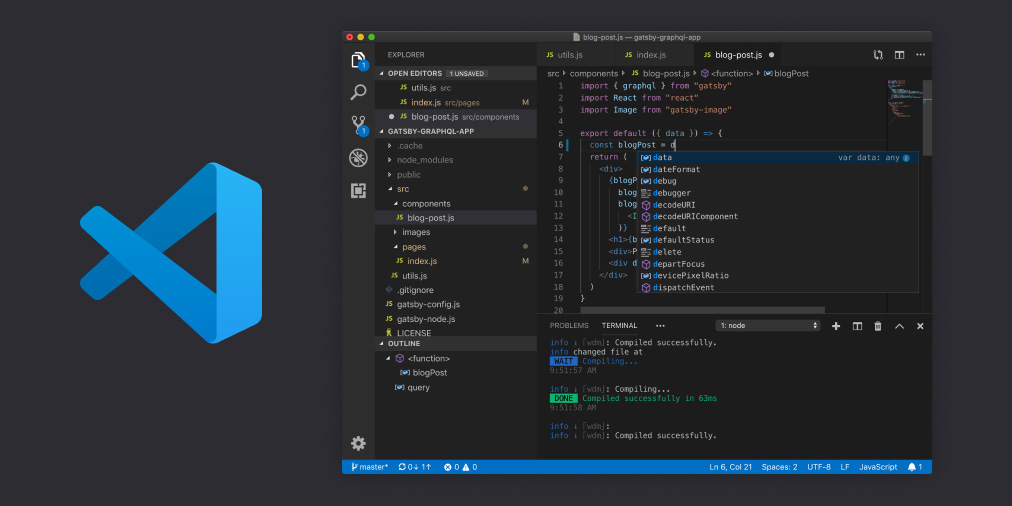
Visual Studio Code is a fabulous freeware editor of very light and powerful code. It is oriented to programming languages of all kinds (JS, TypeScript, C ++, C #, Python, PHP, etc.). In addition, it includes numerous functions such as code debugging, syntax highlighting, intelligent code completion, refactoring, and much more.
It is available on the 3 most important platforms that currently exist: Windows (7, 8 and 10), Linux (.deb .rpm and .tar.gz formats), and of course Mac (macOS 10.10+).
It is not my role, nor that of this mini-guide, to explain all the bonanzas of this great code editor in depth. However, if you want to know more about it and obtain all the information about it, do not hesitate to visit the page official website of the project at this link.
Well, the first thing you should do is install this software. Here is the download link for each and every available platform: Download Visual Studio Code
Installing the PlatformIO IDE extension
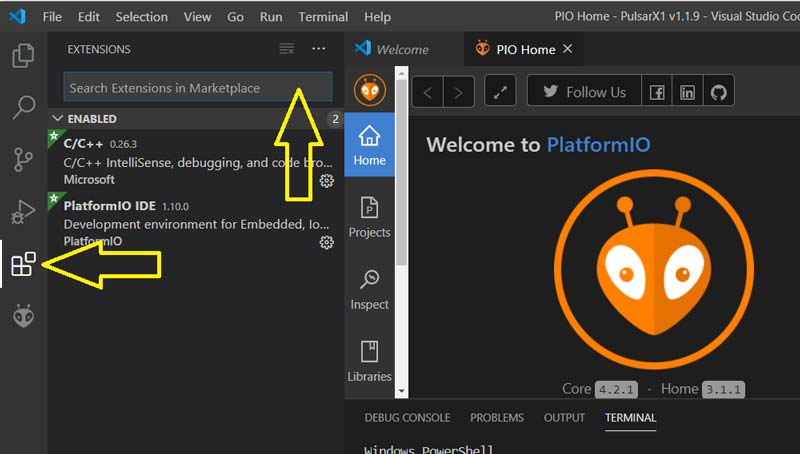
Once we have correctly installed Visual Studio Code, we will run the program and look in the left sidebar for an icon with a kind of Puzzle (as you can see in the image above)
With this we will access the section where Extensions are administered. There we will go to the search box, enter the name “PlatformIO IDE” and wait for it to appear in the list. Then we will select it and press the “Install” button to begin the installation process.
The installation time will depend on your computer and the operating system you have. It will take a little while, so be patient and wait for it to finish completely. Once finished, the software itself will notify you with a message in the lower right part “PlatformIO IDE has been successfully installed! Please reload window“.
In case you don’t have Python installed, Visual Studio Code will ask you to install it, as it is completely necessary for this extension. You should see a message like this “PlatformIO: Can not find working Python 2.7 or 3.5+ Interpreter. Please install the latest Python 3 and restart VSCode“. And it will offer you the possibility of downloading it by pressing a button, click on it, download the software and install it.
Uploading our Marlin Firmware
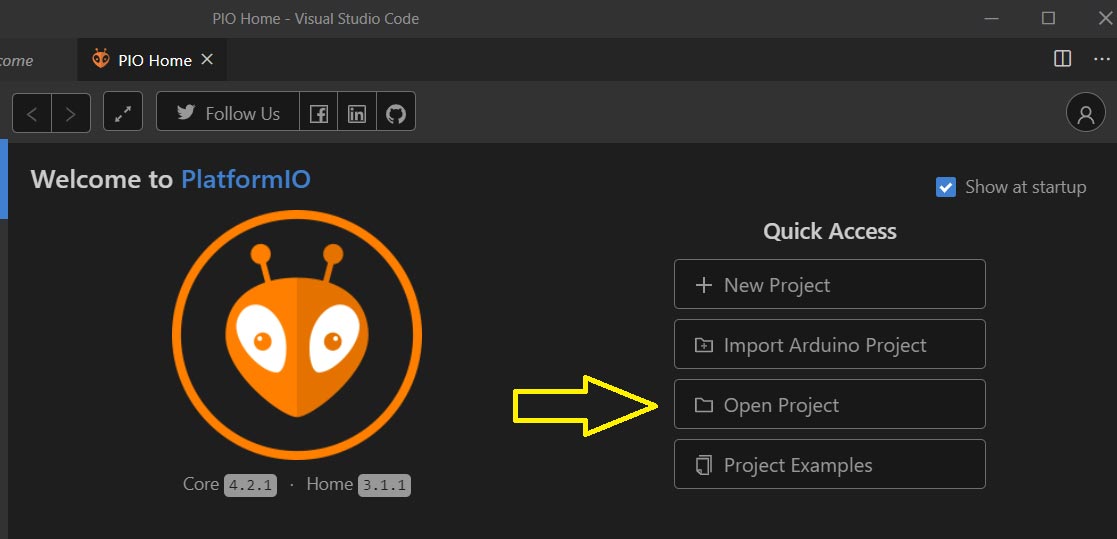
With Visual Studio Code and the Platform.io IDE extension fully installed and functional, we can start messing with our Marlin firmware. To do this we will start the application, and in the upper part we will look for a tab called PIO Home (just to the right of the Welcome).
If we click on this tab, PlatformIO will welcome us and show us several quick access buttons (Quick Access). Among them we will find one that says “Open Project” and we will click on it to search for our project, which in this case will be a Marlin firmware to edit and / or compile.
Remember to have unzipped the Marlin firmware, in case it was just downloaded, since what we are going to select here is the containing folder, and not the project file as we did with the official Arduino compiler (Arduino IDE).
Setting up our project

Now comes the time to configure our Marlin firmware for the mechanics of our printer, and with the options that we obviously want.
To do this, we encourage you to read our article Complete guide: Configure Marlin 2.0.x from scratch and not die trying, which I wrote a few weeks ago and which will be of great help if you have no previous experience compiling Marlin.
If you already have the firmware configured to your liking (and that of the demanding printer), it only remains to select the microprocessor on which we are going to work, which can be 8-bit or 32-bit. To do this, inside the Marlin project folder, we will find and edit a file called “platformio.ini“.
In this file we will indicate what type of microprocessor our electronics has, so the compiler can prepare the firmware to work on it without any problem. For this we will look for the following lines:
[platformio]
src_dir      = Marlin
boards_dir   = buildroot/share/PlatformIO/boards
default_envs = megaatmega2560
include_dir  = Marlin
Where default_envs appears, you must indicate the microcontroller of your electronics. In this particular case, I have an MKS Gen v1.4 from Makerbase, and that is why the value “megaatmega2560” is configured.
You should discover what microcontroller use your electronic board for fill it in default_envs. Otherwise it will show you an error during the compilation process.
I leave here a list with some of the most common microprocessors and the value to indicate in that variable. There are more, so check the “platformio.ini” file if yours doesn’t appear here.
| MICROCONTROLLER | ENV_DEFAULT |
| Arduino Mega 2560 (8-bit) | megaatmega2560 |
| Arduino Mega 1280 (32-bit) | megaatmega1280 |
| Arduino Due | DUE |
| SKR v1.4 Re-ARM Board MKS SBASE 1.3 |
LPC1768 |
| SKR v1.4 Turbo Panucatt Azteeg X5 Smoothieboard 4x |
LPC1769 |
| MKS Robin | mks_robin |
| MKS Robin Nano | mks_robin_nano |
| RAMBO (8-bit) | rambo |
| Melzi y clones | melzi |
| Sanguinololu (ATmega644p) | sanguino_atmega644p |
| Sanguinololu (ATmega1284p) | sanguino_atmega1284p |
| FYSETC S6 (STM32F446) | FYSETC_S6 |
Compiling and uploading the firmware to our printer
And finally, we come to the simplest part of the article, compiling and uploading our custom firmware to the 3D printer. So let’s get to it!
8-bit electronics
In 8-bit plates we must click on the icon of the “martian” or “dragonfly” (I have no idea what the hell it is). This is in an icon bar on our left, and is positioned below the icon that we used previously to install the “PlatformIO IDE” extension.
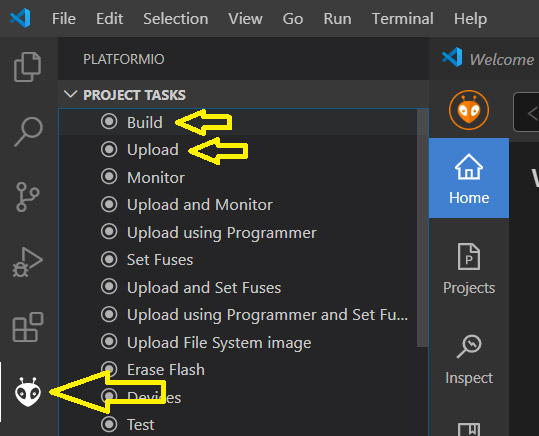 Once we have clicked, another bar (somewhat wider) will appear on its right with the different compiler options. In the PROJECT TASKS section, we will press the “Build” option to compile the firmware.
The compiler will start working, and we will only have to wait for it to finish. On my Windows 10 computer with an i7 (1st generation) microprocessor it usually takes just over a minute. Needless to say, if we have something wrongly configured, the compiler and Marlin’s “SanityCheck.h” will give us a compilation error and exhaustive information about the problem.
Finally, if we want to upload the compiled firmware to our printer, we will press the “Upload” option. Remember to have plugged your board into the computer via USB, otherwise you will not be able to connect and finish the process.
32-bit electronics
For 32-bit boards, we will follow the same process to compile. Click on the “martian”, and then on the option “Build” in the same way that we did in the 8 bits.
But in this case we will not use the “Upload” option to upload the file to the board, since normally in 32-bit electronics the generated file (Firmware) is usually copied to an SD Card. Then you insert the SD Card in its corresponding slot and after feeding the board, it will detect a new firmware and update itself automatically during the power-on process.
For this to happen, we will copy our generated firmware to the card, and we will find it in the following path of our Marlin project: \.pio\build\mks_robin_nano\firmware.bin
And well, this is it for now. I don’t want to get too long since I promised you that it was only a mini-guide on how to use Visual Studio Code and Platform.io. As always, if you have any questions, do not hesitate to join our Telegram channel.
If you wish, you can find other interesting articles in 3DWork at the following links:
- Complete guide SKR v1.4 / v1.4 Turbo with TMC2209 Sensorless drivers and Display TFT35 V3.0
- DyzeXtruder Pro: Analysis of a high-performance extruder for professional environments
- MKS TFT35 Display: Latest updates v106 and v107 available
- The Spaghetti Detective: Monitoring Octoprint from the Internet safely
- Powering the Raspberry Pi from the power supply of your 3D printer
- Booting our Raspberry Pi from USB with an SSD hard drive (or pendrive)
- Maker Ultimate 2: Review of the latest Monoprice printer
- Analyzing the new resin printer Phrozen Sonic Mini (Review)
- MKS Robin Nano v1.2: Analyzing the new MakerBase 32bit boards
- Hollow 3D objects with ChiTuBox to save resin
- 10 reasons to use ChiTuBox with your resin printer (SLA / DLP)









Slight error 🙂
“Arduino Mega 1280 (32-bit)” —> Both ATMega-1280 and ATMega-2560 are 8-bit chips from AVR family. They do not embed the AVR32 architecture.