Checking the status of your 3D printer is something more than recommended if you usually spend a lot of time printing parts. So in 3DWork today we want to show you a curious way of Monitor your 3D printer with an OLED display, Wemos D1 and Octoprint.
If you are a regular on our blog and took a look at our recent article How to install Octoprint on your 3D printer you will know that it is possible to control your 3D printer remotely, simply by accessing from an IP address or the default URL (http://octopi.local)
Okay, you will tell me that with Octoprint you can control it via the web, but … How would you like to be able to monitor the current printing time, the time that remains for completion and the bed and Nozzle temperatures with an OLED display that you can take anywhere place of your house?
And as a bonus, when your printer is not fully operational, the OLED display will show the current time and temperature in your city, what more could you ask for?
Introduction to OLED Monitor
This app was developed and published by David Payne (also know as Qrome) in his GitHub repository for all Makers who want to use it. In addition, he not only published the code, but added the printing files in Thingiverse where you can easily download them.
If you’re a 3D printing freak like us and you love messing around with electronics, you’re in luck. Keep reading this article to the end and you will find out how to do it very easily. And of course, do not forget to leave us your comments at the end of it. Go for it!
Required components
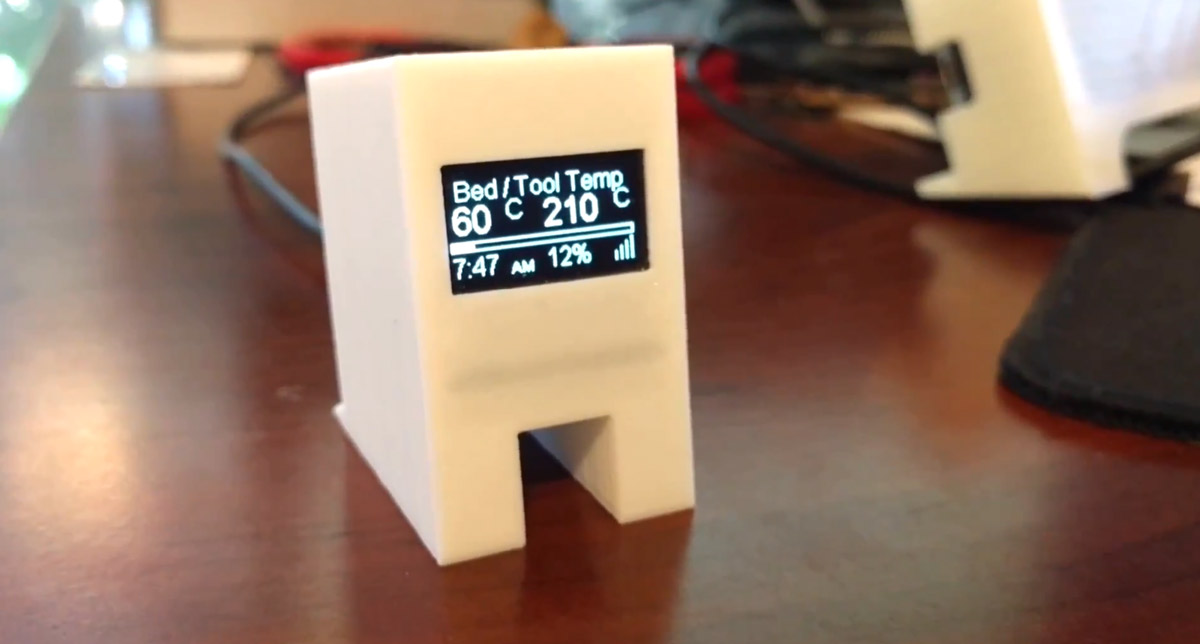
Before starting this project I must inform you that you need to have an Octoprint server already installed in your printer . In this way, our OLED display (with its Wemos D1 Mini board) will connect to the Octoprint server, extract the data in real time and show it to us on the screen.
If you don’t know what an Octoprint server is for a 3D printer, I highly recommend that you take a look at the article How to install Octoprint on your 3D printer. There you will find very detailed instructions for the entire installation and configuration process.
We need the following components to develop our OLED monitor:
| Raspberry Pi 3 | ||
| Raspberry Pi 4 | ||
| Wemos D1 Mini ESP8266 | ||
| Display Oled LCD 0,96 I2C 128×64 | ||
| Tarjeta MicroSD + Lector |
OLED Display connection to the Wemos D1
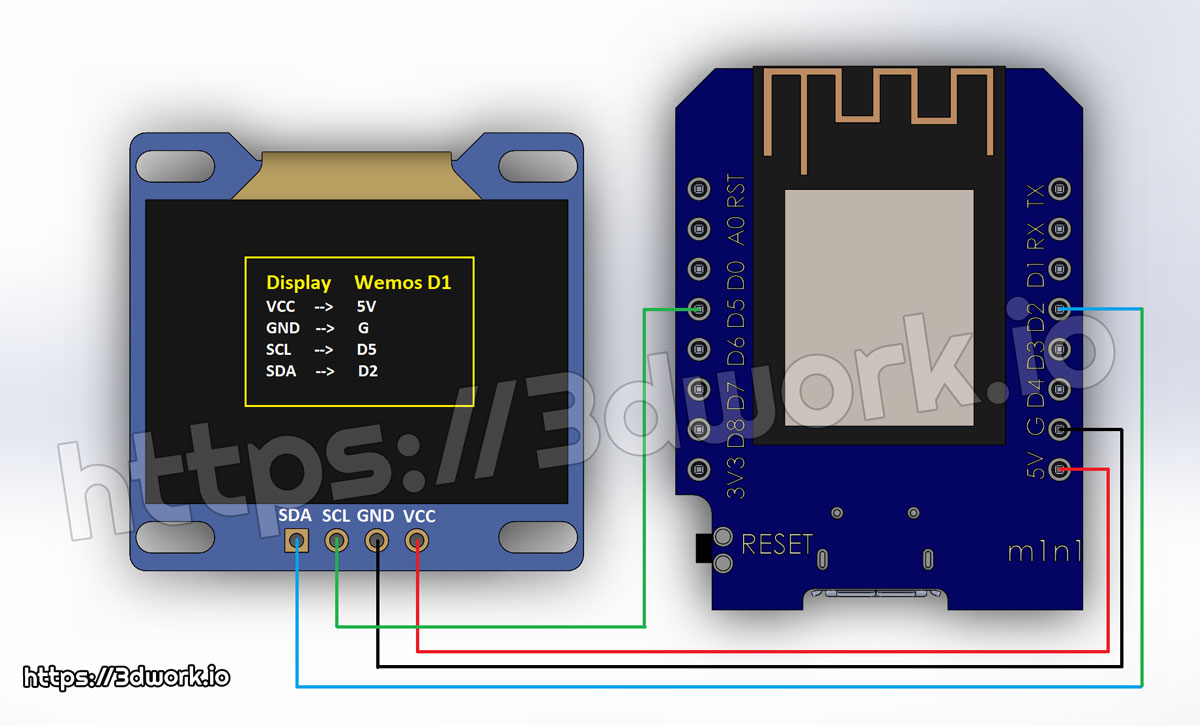
The Wemos D1 Mini board do not have any type of integrated display as standard, so we must connect (or rather solder) one of our own for our purpose. Wemos D1 Mini supports two types of I2C display (SSD1306 and SSH1106).
The way to connect them is very easy, so don’t worry. You only have to solder the cables as you can see in the image above.
In our example we have used an SSD1306 display, which comes by default in the already configured software. If you want to use a SH1106 display, you just have to uncomment the following line in the firmware code:
//#define DISPLAY_SH1106 // Uncomment this line to use the SH1106 display -- SSD1306 is used by default and is most common
IMPORTANT!! According to the manufacturer, you may find OLED screens where the position of SDA, SCL, GND and VCC is different. Always check how they are arranged on your LCD and be guided by the names. Then check it completely to avoid unpleasant unforeseen events.
3D printing parts (Thingiverse)

The links of the parts in STL format for printing are available as always on the platform Thingiverse.
- 0,96″ SSD1306 Display OLED (Thingiverse)
- 0,96″ SSD1306 Display OLED (Thingiverse)
- 1,3″ SSD1306 Display OLED (Thingiverse)
Required software (Arduino IDE + drivers)
To install the OLED Monitor firmware on the Wemos D1 Mini board, we naturally need a compiler. We will use the Arduino IDE that is already known to many of us if you have previously compiled Marlin. It is completely free.
It can be downloaded from official website of arduino. Access the Software -> Downloads, select Windows Installer and press Just Download to get hold of it.
Finally, we will need to install some necessary USB drivers to connect with our computer. Download it from the following link: http://sparks.gogo.co.nz/ch340.html
Setting up our compiler
By default our compiler does not support Wemos D1 Mini boards, so we must configure the Arduino IDE so that it can recognize this type of electronics. It’s as simple as going to the main menu File -> Preferences and look for the option Manager of additional card URLs.
There we will look for Aditional Boards Managers URLs and we will include the following URL:
https://arduino.esp8266.com/stable/package_esp8266com_index.json
In this way we will add support for the Wemos D1 Mini boards and many other ESP82xx existing on the market. Then we have to go to the Tools menu and in the Board option we will select “LOLIN(WEMOS) D1 R2 & Mini“.
Having already selected the board, we will configure the size of the flash. Using other options I got a black screen on the display, so I recommend using the 1MB size by selecting this option -> 4MB (FS: 1MB OTA: ~1019KB)
With this our compiler is ready. Now it is time for the libraries that we must install to enable the firmware compilation without errors.
Necessary libraries
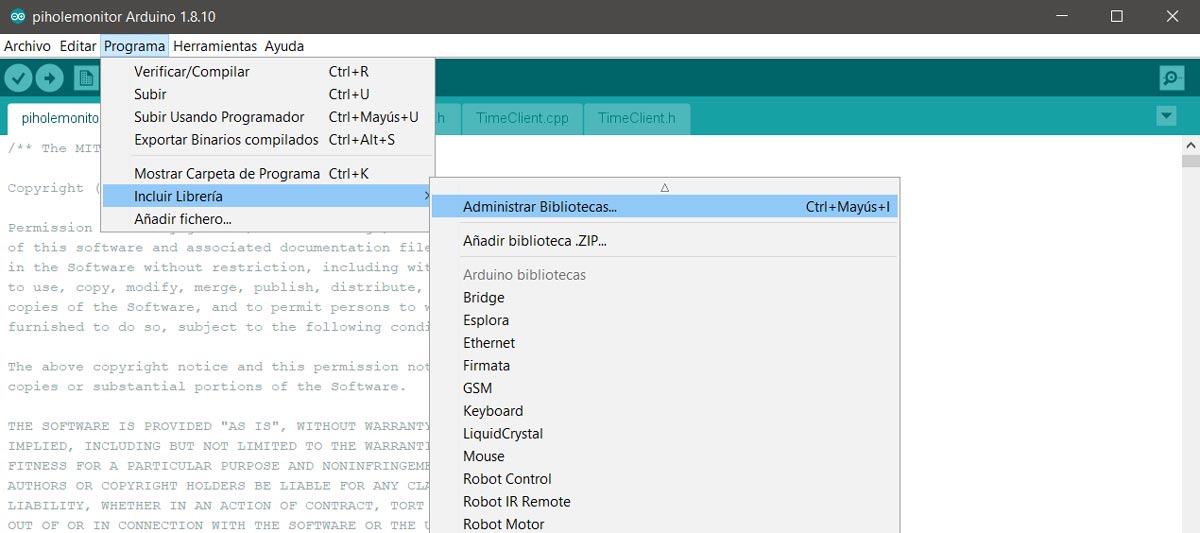
David’s source code requires 3 libraries to be compiled correctly, so we will proceed to install them first. We can get them online from the same compiler easily. Find the Tools section, and then click Manage Libraries .
Now enter the name of each and every one of them (there are 3 in total) and press the ENTER button on your keyboard. Now the online libraries available with this search parameter should appear.
Make sure that the libraries you are going to install are correct. Sometimes several with similar names appear for the same search parameter. Compare the name and the author before installing them, here are the libraries in question:
- WiFiManager (by Tzapu)
- Arduino OTA Library
- ESP8266 and ESP32 OLED driver for SSD1306 displays (by ThingPulse)
Downloading Firmware (OLED Monitor)
The firmware for the OLED Monitor can be downloaded directly from its repository on GitHub. We simply have to click on the following link.
Now look for a button called Clone or download (located at the top left), click on it, and select the Download ZIP option. Once downloaded, unzip it on your desktop.
A folder called /printer-monitor-master will be created, where all the available files of the project will be found, and within it another called /printermonitor.
Access this last folder and click twice on the project name, called printermonitor.ino.
Compiling and Uploading the Firmware

Once our project is open, having double-clicked on the printermonitor.ino file, we will have to select the correct port. We will go to Tools -> Port and we will select the one that was created automatically when connecting our Wemos D1 Mini.
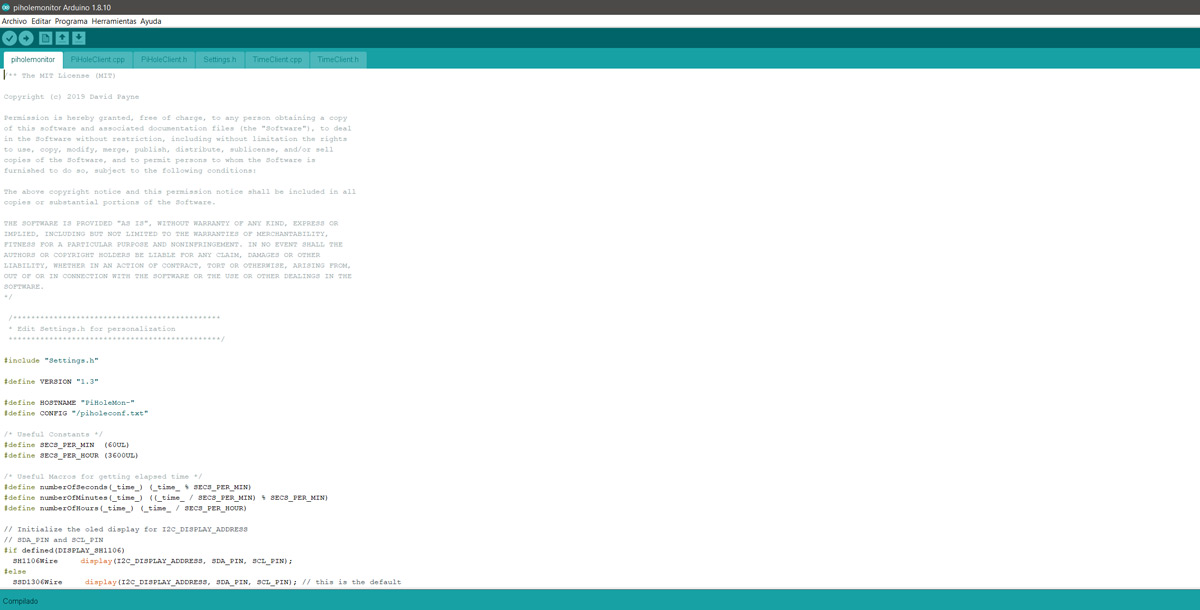
Before compiling, there is a file called Settings.h where we will configure all the firmware parameters. I leave here the lines that I modified to configure it correctly.
// OctoPrint Monitoring -- Monitor your 3D printer OctoPrint Server
String OctoPrintApiKey = "5C0A62FE1A7122469530A15E7C555172";   // ApiKey from your User Account on OctoPrint
String OctoPrintHostName = "octopi";// Default 'octopi' -- or hostname if different (optional if your IP changes)
String OctoPrintServer = "octopi.local";   // IP or Address of your OctoPrint Server (DO NOT include http://)
int OctoPrintPort = 80;        // the port you are running your OctoPrint server on (usually 80);
String OctoAuthUser = "3dwork";      // only used if you have haproxy or basic athentintication turned on (not default)
String OctoAuthPass = "12345678";      // only used with haproxy or basic auth (only needed if you must authenticate)

// Weather Configuration
boolean DISPLAYWEATHER = true; // true = show weather when not printing / false = no weather
String WeatherApiKey = "323d748925849b0895f6ac3df946686d"; // Your API Key from http://openweathermap.org/
// Default City Location (use http://openweathermap.org/find to find city ID)
int CityIDs[] = { 3117735 }; //Only USE ONE for weather marquee
boolean IS_METRIC = true; // false = Imperial and true = Metric
// Languages: ar, bg, ca, cz, de, el, en, fa, fi, fr, gl, hr, hu, it, ja, kr, la, lt, mk, nl, pl, pt, ro, ru, se, sk, sl, es, tr, ua, vi, zh_cn, zh_tw
String WeatherLanguage = "es";  //Default (en) English
In the first section “OctoPrint Monitoring” we have filled the OctoPrintApiKey parameter with the key that we have extracted from our server. With this Key and with the username and password (OctoAuthUser and OctoAuthPass) we will give the OLED Monitor access to consult the parameters of our printer from OctoPrint. Don’t forget to also configure the IP or the address of your OctoPrint server, in this case it would be “octopi.local”.
In the second section “Weather Configuration” we will configure the WeatherApiKey parameter with a Key that we must obtain from the web page https://openweathermap.org. To do this, you will have to access its website and make the corresponding registration. Then in the user control panel the Key will appear available.
Furthermore, you will also need to indicate your city ID in the CityIDs[] parameter. Open the following URL https://openweathermap.org/find, enter the name of your city and click on it. When the data of it appears, in the URL of your browser you will see the ID (it will be a 7-digit number). Finally, we will configure the language in WeatherLanguage, in our case we will simply enter “es“.
Well, everything should be ready, so let’s proceed to compilation. If all goes well, the build process will finish quickly and you will upload it to the Wemos D1 Mini.
To do this, we will go to the Sketch menu and then press the Verify/Compile option (Control + R). This will compile the firmware and verify if it is correct. If the process ends without any problem, we will press Upload (control + U) and that’s it. When the compiler finishes uploading the firmware to our board, it will automatically restart it.
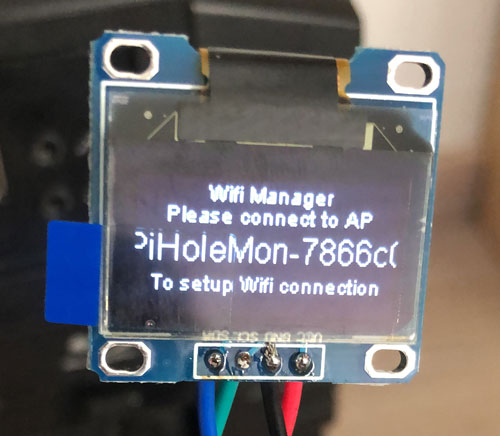 After this reboot, the Wemos D1 Mini module will have created an Access Point (AP). You must access it via WiFi with your mobile and proceed to its configuration so that it connects to your local WiFi network.
Once accessed through your Access Point (AP), look for the option to configure the WiFi, select the name of your network (SSID) and enter the correct password so that you can connect to the router without any problem.
Now, it will detect the available statistics (as long as our OctoPrint server is correctly installed and running). And in the event that our server is not (printer stopped), it will show us data about the time and local temperature.
Final remarks
In principle all this would be more than necessary to configure your OLED Monitor. I think I have not left anything in the pipeline but if so, do not hesitate to indicate it in the comments at the end of the article.
I hope that the article has been to your liking and that it awakens your interest in this type of development boards that are so fashionable lately that are the Wemos D1 Mini.
Finally, we remind you that you can find us on our Telegram channel. Do not hesitate to join us in the next link, you will be welcome to our community 🙂
Other articles that may interest you in 3DWork.io :
- Post-processing of 3D parts: Much more resistant and airtight with heat and salt
- Marlin Builder: Update with support for version v2.0.6.1 and factory preconfigured firmwares
- Monoprice Cadet: Safe 3D printing for kids and beginners
- New review of electronic BTT SKR MINI E3 V2.0 for your Ender 3 printer
- Closed-Loop Motors: Makerbase MKS Servo42b (Brief analysis)
- Complete guide SKR v1.4 / v1.4 Turbo with TMC2209 Sensorless drivers and Display TFT35 V3.0
- DyzeXtruder Pro: Analysis of a high-performance extruder for professional environments
- MKS TFT35 Display: Latest updates v106 and v107 available
- The Spaghetti Detective: Monitoring Octoprint from the Internet safely












This works perfectly for me with one exception. When it automatically reboots after installing the code, I log onto the web page and set up my wifi. It finds the network, connects, displays weather and printer information as long as it stays powered. When I disconnect the power for any reason, when it boots back up, it never connects to the network. Basically, after the initial boot, it never connects to the network again. I’ve reloaded the code multiple times and it is very repeatable.